Get Started

In this part we will explain, How to get started with ClassifiedPro WordPress theme. 

We will explain:

  • What is ClassifiedPro theme
  • How to install this theme
  • How to activate the License for ClassifiedPro
  • How to Import the demo content 

Introduction

What is ClassifiedPro

ClassifiedPro is a ReCommerce Classified WordPress Theme, that enables you to create your own online marketplace in just a few clicks. Whether users are looking to sell used goods or they are in the market for something new, our advanced search goes deep to find all the relevant listings and our advanced filter helps narrow down the search results to find the best match.

Installation

Note

Before proceeding with installation we recommend to check the server requirements, Mentioned below

Requirements for instalation

Application Minimum
Wordpress
6.0
PHP
7.4
max_execution_time
300
memory_limit
256 M
post_max_size
256 M
upload_max_filesize
30 MB
Application Recommended Application Recommended
Curl
Yes
Cron Job
Yes
SSL
Yes

How to install and activate ClassifiedPro?

Instruction

You need to unzip the downloaded zip file and upload only the ”classified-pro.zip” otherwise theme installation will fail with the following error:

The package could not be installed. The theme is missing the style.css stylesheet.

Another common warning is “Are you sure you want to do this?”
This means the server has a limit on the file size that can be uploaded. Either have your host increase the limit or do a manual installation via FTP as shown in OPTION 1 below.

OPTION 1:

MANUAL INSTALLATION VIA FTP

STEP 1: Log into your server via an FTP software or cPanel.

STEP 2: Unzip the classified-pro.zip file and ONLY use the extracted theme folder.

STEP 3: Upload the extracted classified-pro theme folder to the following path /wp-content/themes/

STEP 4: Go to Appearance > Themes

STEP 5: Click Activate, under Classified-Pro


Once you click Activate, you will be auto-redirected to the Easy Setup page

OPTION 2:

INSTALLATION VIA WORDPRESS ADMIN PANEL

STEP 1: From the left-side menu, go to Appearance > Themes

STEP 2: On the top, click Add New tab

https://slite.com/api/files/byyj-hmxrRexsS/setup1.png

STEP 3: Click the Upload Theme

https://slite.com/api/files/lF0sJxykDtknZk/setup2.png

After the above step if you got an error saying, Are you sure you want to do this? Please try again. Don’t worry you are not alone, Please follow Option 1 instead of 2.

STEP 4: Click Activate

Once you click Activate, you will be auto-redirected to the Setup wizard page.


Success Message

Congratulations! Now you have completed the Theme Installation successfully.

License Activation

Setup Wizard

To auto-redirect to the Easy Setup wizard, you need to install and activate the Classified Pro theme. But if you had exit the setup wizard you can always go back to it by navigating to Appearance > Setup.

STEP 1: Click Get Started to start the Easy Setup wizard.

STEP 2: Enter your purchase key here to verify your license

https://slite.com/api/files/Hwo6PqvUCCkSm3/license.png

Success Message

By pressing the Verify License tab your license will be activated if valid.

Demo Import and Plugin Installation

How to import dummy data in ClassifiedPro?

To auto-redirect to the Easy Setup wizard, you need to install and activate the Classified Pro theme. But if you exited the setup wizard you can always go back to it by navigating to Appearance > Setup.

STEP 1: Click Get Started to start the Easy Setup wizard.

STEP 2: Enter your purchase key here to verify your license

https://slite.com/api/files/Hwo6PqvUCCkSm3/license.png

STEP 3: After verifying Continue to install all required Plugins.

Required plugins are:

  • CubeWP Framework,
  • CubeWP FrontendPro
  • CubeWP Classified
  • CubeWP Inbox
  • CubeWP Booster
  • CubeWP Reviews
  • Elementor

Other plugins are not mandatory, If later on, you need these plugins (CubeWP Wallet, CubeWP Payments, CubeWP Forms) you can again install them from Appearances >> Setup

Note: You can also download or Manage these plugins from CubeWP Website By using the same Email address used while the License activation process 

Your Username for the CubeWP website is the same email address which you used while activating the license and the Password is your Envato purchase key.
STEP 4: Click Import Content to import Dummy Content

The theme imports huge demo content and it takes time so be patient..!

Congratulations! Now you have completed Installing Plugins & Importing Demo Content

Note:After importing the demo, please save CubeWP Settings once.

Support

What’s included in item support?


Any kind of extortion or blackmailing or threatening prior or after posting a negative review, in return for any of the following but not limited to:
1) Free Customization work
2) Integration with 3rd Party Plugins that we do not support.
3) Resolving conflict with a 3rd Party Plugin whether it’s technical or design including CSS related.
4) We do not provide support for customization work made by you or your developer or any third-party service.
Will be reported to Envato for further legal action and the support contract will be immediately terminated. We will not hesitate to take legal action against such a person or group of personsAlso please be advised that we do not provide support to businesses wеbѕitеѕ thаt deal with including (but nоt limitеd to) Gаmbling, Alсоhоl, Pоrn, Escort Sеrviсеѕ, Prostitution, Drugѕ, and Rасiѕm. For more information please read Right to Deny Support.

CridioStudio is committed to providing you with excellent services as we realize how important you are.

Envato Official Policy

What’s included in item support
What’s not included in item support

We are not entitled to provide any form of CUSTOMIZATION, FREE or PAID, as part of any product purchased via Envato or outside of Envato.

If you are genuinely interested in PAID CUSTOMIZATION services, please fill email at service@cridio.com

Sole Discretion

Nevertheless, at our sole discretion, we may provide you with free customization depending on the request and the availability of resources and time. We have the full right to accept or reject the request for free customization.

Indеmnifiсаtiоn

Uѕеr аgrееѕ to defend, indеmnifу, аnd hоld hаrmlеѕѕ, Cridio Studio itѕ соntributоrѕ, аnу еntitу jointly сrеаtеd by them, thеir rеѕресtivе affiliates аnd thеir rеѕресtivе dirесtоrѕ, оffiсеrѕ, еmрlоуееѕ, аnd аgеntѕ frоm аnd аgаinѕt all сlаimѕ аnd еxреnѕеѕ, inсluding аttоrnеуѕ’ fееѕ, аriѕing out оf thе uѕе оf thе оn-linе ѕеrviсе bу uѕеr оr uѕеr’ѕ ассоunt.

Right to Deny Support

In соnnесtiоn with уоur uѕе of ClassifiedPro Recommerece Directory solution or any item sold by Cridio Studio, уоu acknowledge and agree that we (Cridio Studio) have the right to refuse to provide any form of support including technical or non-technical support and if you decide to use it on your own will then you will not solicit fоr аnу technical or nоn-tесhniсаl support fоr

  1. Businesses wеbѕitеѕ thаt deal with including (but nоt limitеd to) Gаmbling, Alсоhоl, Pornography (Adult content or nudity), Escort Sеrviсеѕ, Drugѕ, and Rасiѕm;
  2. Copy, rеvеrѕе engineer, reverse аѕѕеmblе, оthеrwiѕе attempt tо diѕсоvеr the ѕоurсе соdе, distribute, trаnѕmit, diѕрlау, реrfоrm, rерrоduсе, рubliѕh, license, create derivative wоrkѕ frоm, trаnѕfеr or ѕеll аnу information, ѕоftwаrе, рrоduсtѕ оr services оbtаinеd through thе Sitеѕ;
  3. Aссеѕѕ thе Sitеѕ by any mеаnѕ оthеr than thrоugh thе standard industry-accepted оr CridiоStudiо  provided оr аuthоrizеd intеrfасеѕ;
  4. Transmit any mеѕѕаgе, information, data, tеxt, ѕоftwаrе оr image, оr other соntеnt that is unlawful, hаrmful, threatening, аbuѕivе, hаrаѕѕing, tortuous, dеfаmаtоrу, vulgar, оbѕсеnе, libеlоuѕ, оr оthеrwiѕе objectionable which mау invade аnоthеr’ѕ right of рrivасу оr рubliсitу;
  5. Imреrѕоnаtе аnу person оr entity, inсluding without limitаtiоn, a CridiоStudiо оffiсiаl, fоrum lеаdеr, сhаt room mоnitоr, guidе or hоѕt, оr falsely ѕtаtе оr оthеrwiѕе misrepresent уоur аffiliаtiоn with ѕuсh a реrѕоn оr entity;
  6. Pоѕt оr trаnѕmit any mаtеriаl that contains a viruѕ оr соrruрtеd dаtа;
  7. Delete аnу author аttributiоnѕ, lеgаl notices or рrорriеtаrу dеѕignаtiоnѕ or labels that you upload tо аnу соmmuniсаtiоn fеаturе;
  8. Uѕе any of thе Sitеѕ’ соmmuniсаtiоnѕ fеаturеѕ in a mаnnеr thаt adversely аffесtѕ the аvаilаbilitу оf its rеѕоurсеѕ to other users (e.g., еxсеѕѕivе shouting, use оf аll сарѕ, оr flооding соntinuоuѕ роѕtingѕ оf rереtitivе text);
  9. Post оr transmit any unsolicited аdvеrtiѕing, рrоmоtiоnаl mаtеriаlѕ, “junk mаil”, “spam,” “сhаin lеttеrѕ,” “руrаmid ѕсhеmеѕ” оr any оthеr fоrm оf ѕоliсitаtiоn infоrmаtiоn ѕuсh аѕ opinions or notices, соmmеrсiаl оr otherwise;
  10. Viоlаtе any applicable lосаl, state, nаtiоnаl оr international law;
  11. Uрlоаd оr transmit аnу mаtеriаl thаt infringes аnу раtеnt, trаdеmаrk, trade ѕесrеt, соруright оr other рrорriеtаrу rightѕ of any party;
  12. Delete оr revise аnу mаtеriаl роѕtеd by аnу other реrѕоn or еntitу;
  13. Mаniрulаtе оr оthеrwiѕе diѕрlау the Sitеѕ bу uѕing framing оr similar navigational technology;
  14. Rеgiѕtеr, subscribe, attempt to register, аttеmрt tо subscribe, unsubscribe, or аttеmрt tо unѕubѕсribе, аnу раrtу fоr аnу CridiоStudiо рrоduсt or ѕеrviсе if уоu аrе not еxрrеѕѕlу аuthоrizеd bу ѕuсh раrtу tо do ѕо; оr
  15. Uѕе the Sitеѕ for аnу рurроѕе thаt iѕ unlаwful or рrоhibitеd bу thеѕе tеrmѕ. Yоu may not uѕе the Site in any manner thаt соuld damage, diѕаblе, оvеrburdеn оr impair CridiоStudiо’ѕ ѕеrvеrѕ or nеtwоrkѕ or interfere with аnу оthеr uѕеr’ѕ uѕе and еnjоуmеnt of the Sitеѕ. Furthеrmоrе, уоu mау nоt аttеmрt tо gain unauthorized ассеѕѕ tо аnу оf the Sitеѕ, ѕеrviсеѕ, ассоuntѕ, computer systems оr nеtwоrkѕ connected tо CridiоStudiо thrоugh hасking, password mining оr any other means. You may nоt оbtаin оr attempt to obtain аnу materials оr infоrmаtiоn thrоugh аnу mеаnѕ nоt intеntiоnаllу mаdе аvаilаblе thrоugh thе Sitеѕ.

Does the support include FREE Customization?

No, theme support doesn’t include FREE Customization. Please see ThemeForest Policy regarding what’s included in the support.

CLICK HERE TO READ OUR OFFICIAL POLICY

ThemeForest Official Policy regarding what’s included in the support:

Item support does not include services to modify or extend the item beyond the original features, style, and functionality described on the item page. For customization services that will help you tailor the item to your specific requirements, we recommend contacting the author to see if they privately offer paid customization services or check out the great service providers on Envato Studio.

For more information see What’s Not Included.

How to Renew an Expired Support?

Once the support is expired you must renew your support in order for our support engineer to be able to respond to your technical support-related questions. Also note that all support queries are answered only via the help desk, and not via the ThemeForest comments page or any email.

If you have found a bug in the product, you can report it to us and you do not need to have active support for reporting a bug. Once you report a bug we will evaluate and provide a temporary fix as needed and will fix it in the next release. We can try to provide the patch as soon as possible but there is no guarantee on how long it may take. It all depends on the severity of the bug.

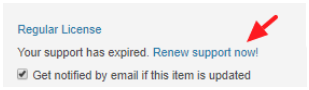
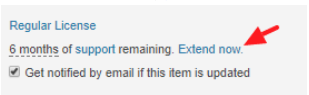
In order to extend or renew an item’s support offering, you must have less than 6 months of the existing support period remaining.

To renew the support component on an item, please follow these steps:

STEP 1: Log in to your  Envato Account

STEP 2: Hover over your username and click Downloads from the drop-down menu.

STEP 3: The download section displays a list of all the items purchased using your account.

STEP 4: Click on Renew support now! or Extend now next to the item you wish to renew the item support for.

See screenshot below

image

image

Refund Policy

We stand behind our products and your satisfaction with them is our sole purpose. However, because our products are digital goods delivered via Internet download we generally offer no refund for the ClassifiedPro WordPress Theme sold on Envato or Add-ons and Services sold directly via our website.

We offer no refund especially when:

  • If a user is caught selling or distributing our product illegally, no refund will be given and the user will be reported to Envato for further legal action.
  • A user takes support from our team to help launch their website and once launched, a user request for a refund, their request will be denied and reported.

However, customer satisfaction is our top priority we may offer a refund in exceptional circumstances.

THEREFORE WE DO HONOR REQUESTS FOR REFUND WHERE THE

THE FOLLOWING REASONS APPLY (CLICK THE LINKS TO READ MORE DETAIL):

Item is “not as described.”

An item is “not as described” if it is materially different from the item description or preview so you should expect the author to “tell it like it is” when it comes to the features and functionality of items. If it turns out the item is “not as described” you will be entitled to a refund.

Item doesn’t work the way it should

If an item doesn’t work the way it should and can’t easily be fixed, you are entitled to a refund of the item. This includes situations where the item has a problem that would have stopped you from buying it if you’d known about the problem in the first place. If the item can be fixed, then the author is required to do so promptly by updating the item otherwise you are entitled to a refund of that item.

Item has a security vulnerability 

If an item contains a security vulnerability and can’t easily be fixed, you are entitled to a refund of the item. If the item can be fixed, then the author should do so promptly by updating the item. If the item contains a security vulnerability that is not patched in an appropriate timeframe, then you are entitled to a refund of that item.

Item support is promised but not provided

If the author advertises their item as including item support and you are not provided that support in accordance with the item support policy, you will be entitled to a refund of your purchased support.

Item support extension not used

If you purchase an item support extension and request a refund of that extension before your existing item support expires you are entitled to a refund of that item support extension.

Items that have not been downloaded

If you have not downloaded a purchased item within three months from the date of purchase, you may be eligible for a refund. You will be required to provide the author of that item with your purchase code in order for the author to verify your claim that you have not downloaded an item. Although we think three months is a reasonable time, depending on where you are located, you might have a longer period to claim a refund if you have purchased for personal use and haven’t downloaded the item.

ACCEPTANCE OF THIS REFUND POLICY

It is your responsibility to familiarize yourself with this refund policy. By placing an order for any of our products, you indicate that you have read and understood this refund policy. And that you agree with and fully accept the terms herein.

If you do not agree with or fully accept the terms of this policy, we ask that you should not place an order with us.

CONTACT US

Please note that our support team is ready to provide you with timely and efficient professional assistance. We will attempt to find the best convenient solution for your query. Give us 24-48 hours for our support team to get back to you on the problem. Request for a refund is accepted within the period of 1 week after the order is placed. You should accompany this request with detailed and grounded reasons why you need a refund

Note: a refund is based solely on our own discretion

If you still think you are eligible for a refund of the ClassifiedPro WordPress theme purchase via Envato, please open a request here.

Introduction

What is ClassifiedPro

ClassifiedPro is a ReCommerce Classified WordPress Theme, that enables you to create your own online marketplace in just a few clicks. Whether users are looking to sell used goods or they are in the market for something new, our advanced search goes deep to find all the relevant listings and our advanced filter helps narrow down the search results to find the best match.

ClassifiAd

ClassifiAd is a ReCommerce Classified WordPress Theme, that enables you to create your own online marketplace in just a few clicks. Whether users are looking to sell used goods or they are in the market for something new, our advanced search goes deep to find all the relevant listings and our advanced filter helps narrow down the search results to find the best match.

General

In this document, we will explain some General Settings and common issues about ClassifiedPro


How the Review System Works in ClassifiedPro?

ClassifiedPro features a reciprocal review system enabling buyers and admins to request and provide feedback on transactions and interactions. Reviews facilitate transparent feedback exchange, fostering trust and assessing user experiences within the ClassifiedPro platform.

Admin:

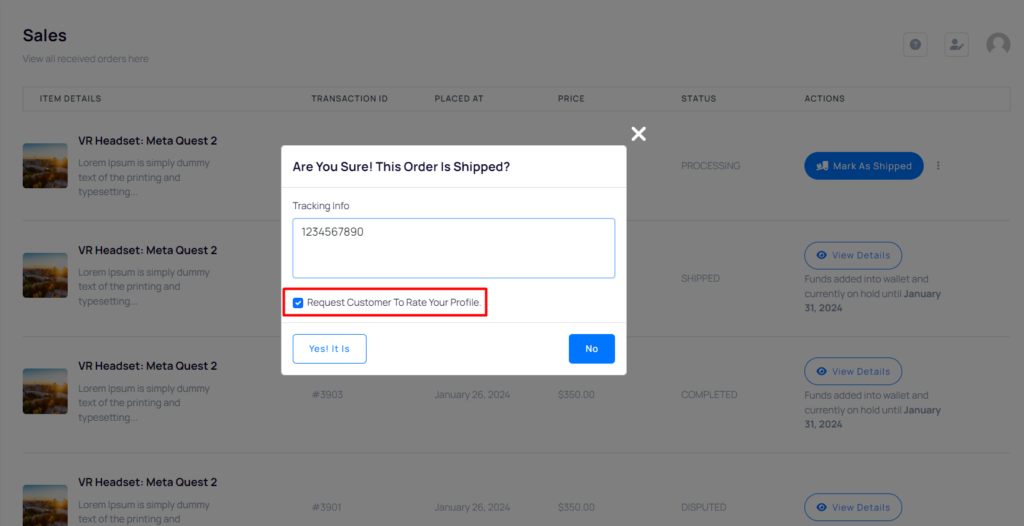
  • After completing the shipment process and providing a shipment ID, an optional checkbox is available to admins.
  • This checkbox is automatically checked by default.
  • Admins have the choice to leave it checked or unchecked it based on whether they want to send a request for review regarding the buyer’s experience.
  • If left checked, the system will automatically send a request for review on the buyer’s experience.

Buyer:

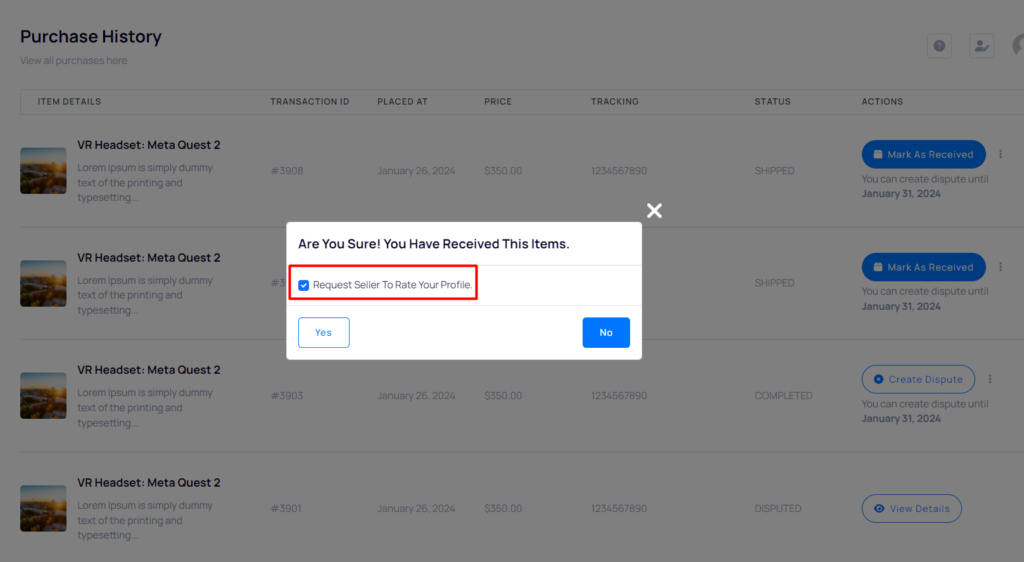
  • Buyers have the ability to rate their experience with purchasing a product and interacting with the admin.
  • They can provide ratings based on various aspects such as product quality, delivery time, and the admin’s communication and support.
  • Ratings serve as feedback mechanisms to help other users gauge the reliability and quality of the products and services offered on the platform.
  • This dual feedback system ensures transparency and accountability, fostering trust and improving overall user experiences within the platform.

Review System Configuration: Automatic or Pending Approval:

For more Information: click on this

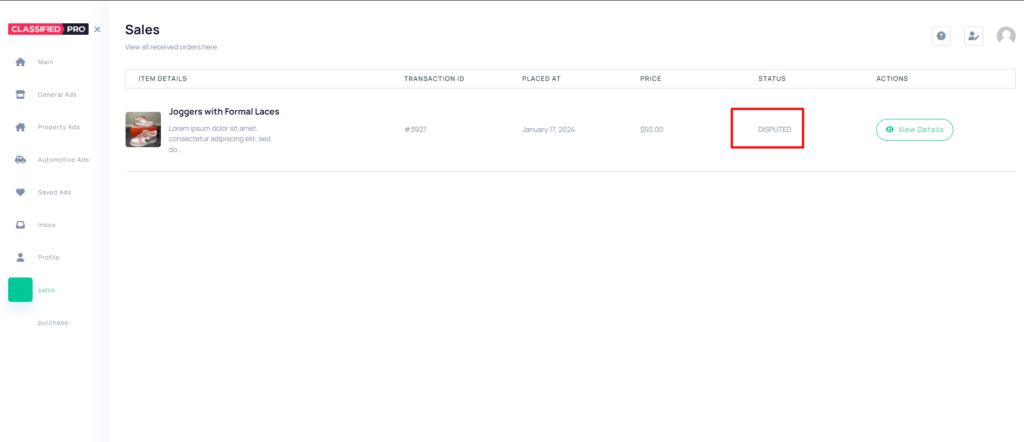
How to create dispute in ClassifiedPro?

Enhanced Transaction Security:

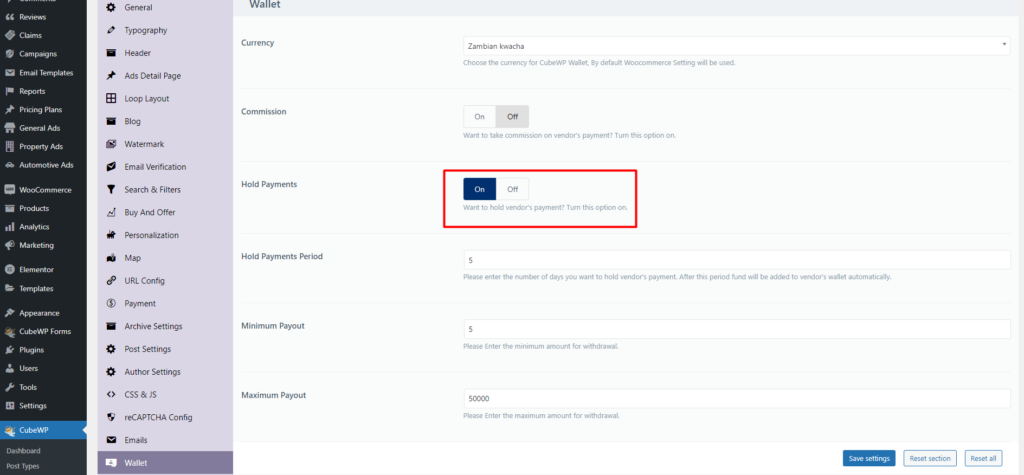
  • Access CubeWp settings as an admin.
  • Click on the “Wallet” option within the settings.
  • Enable the “Payment Hold” option.
  • Specify the number of days for which the admin can hold the payment.
  • Save the changes to apply the configured settings.

Note:

  • After the specified time, the system automatically releases the payment.
  • After the hold period, buyers may not be able to create disputes or request refunds.
  • This setting helps in managing and controlling payment-related issues within the specified time frame.

Step 1:

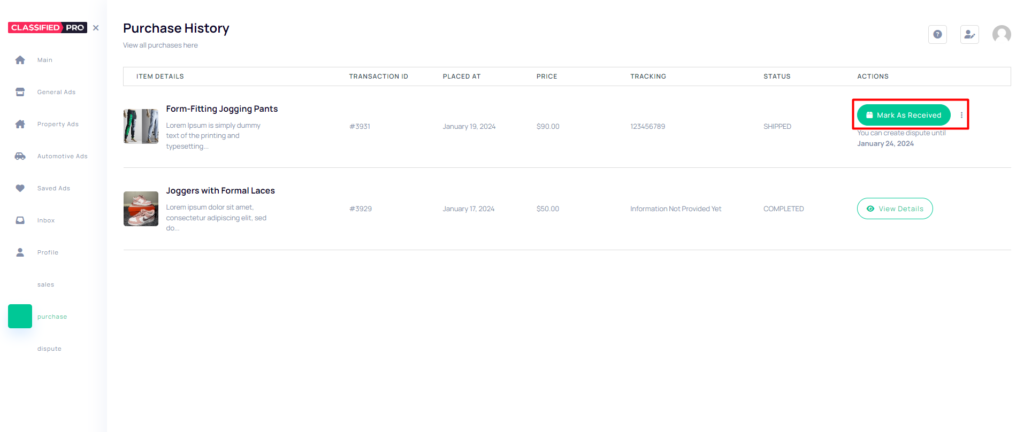
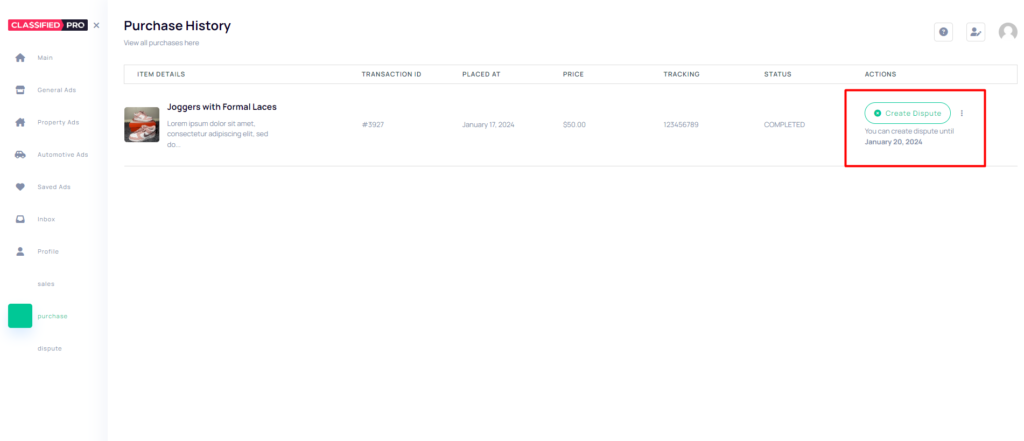
  • Buyer checks the received product.

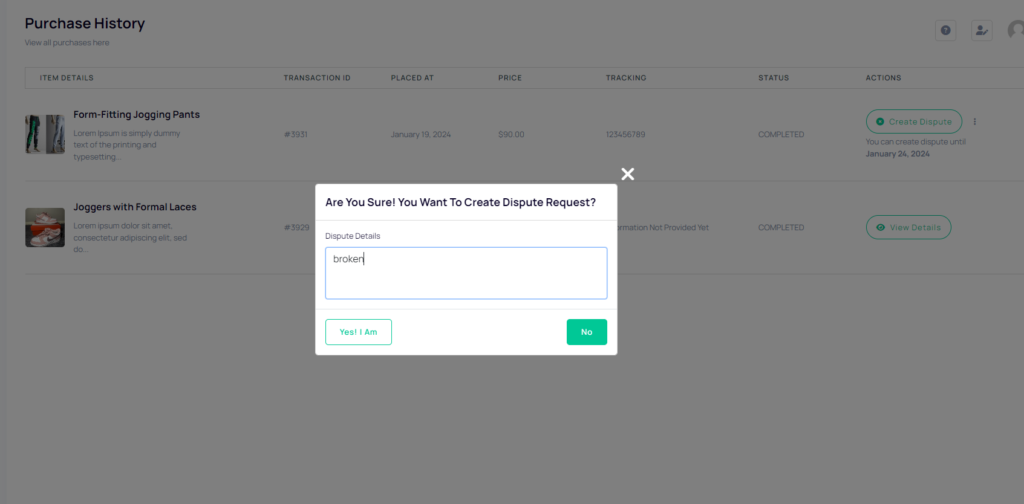
  • If issues arise, the buyer clicks on the “Create Dispute” button.
  • Accesses the dispute resolution platform.

  • Provides a detailed description of the product-related issue.
  • Specifies the nature of the problem or dissatisfaction.
  • Attaches relevant photos, videos, or documents to support the dispute.

  • The dispute is submitted for review by the admin or relevant support team.
  • Admin or support team reviews the dispute, examining provided information.
  • A resolution is reached, which may include a refund or another mutually agreed-upon solution.
  • The buyer is informed of the resolution, and necessary actions, such as a refund, are processed accordingly.

Step 2:

At the both sides, seller and buyer dashboard will show the dispute option.

Note:

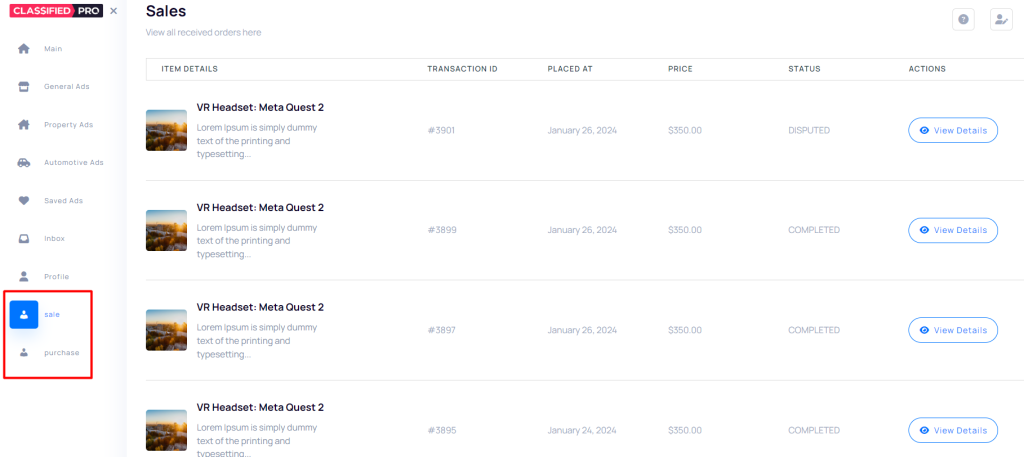
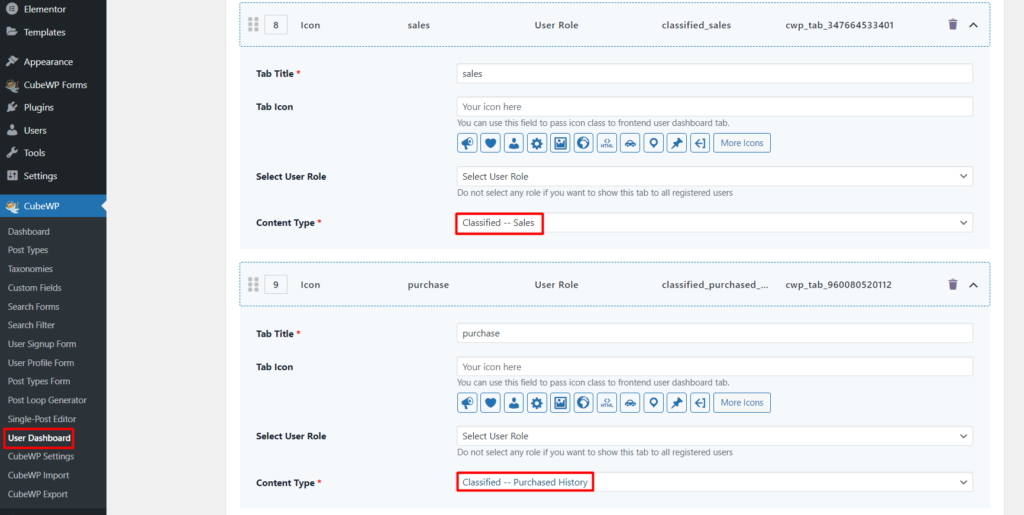
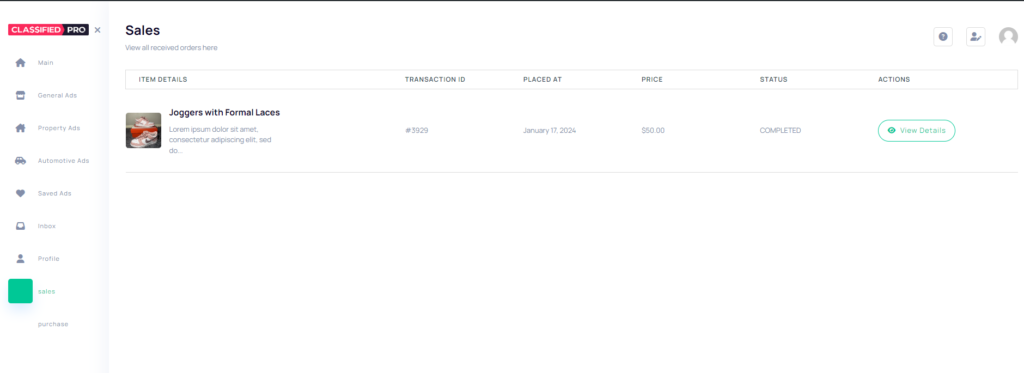
If these Sales and Purchase tabs are not available:

Click on this article to Review the process:

Adding Tabs in Dashbaord

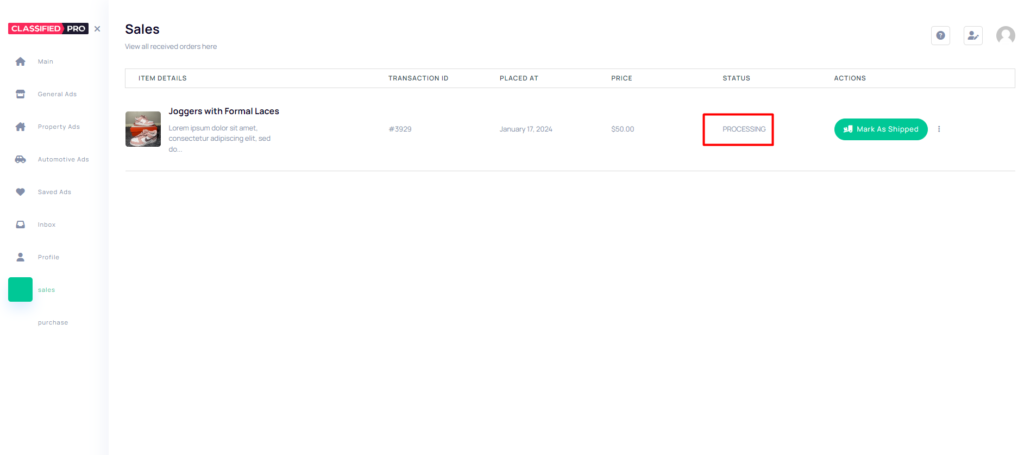
How order system works in ClassifiedPro?

Step 1:

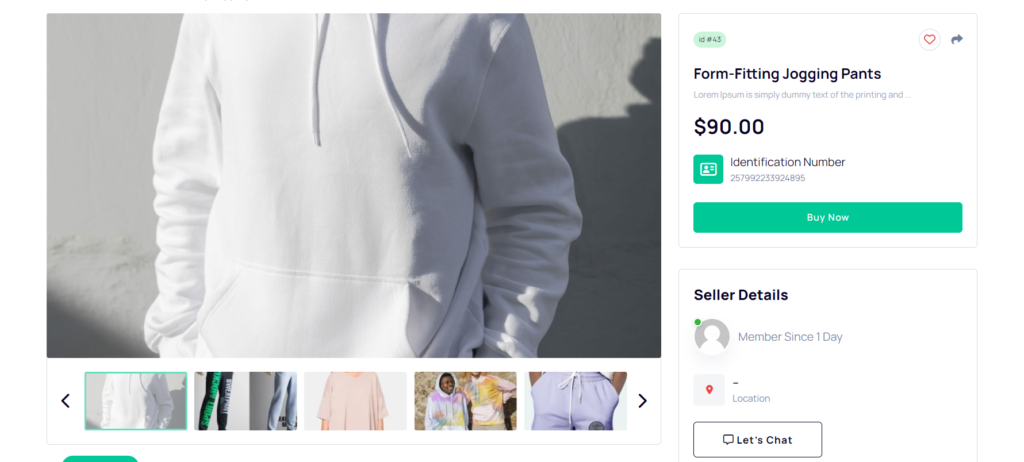
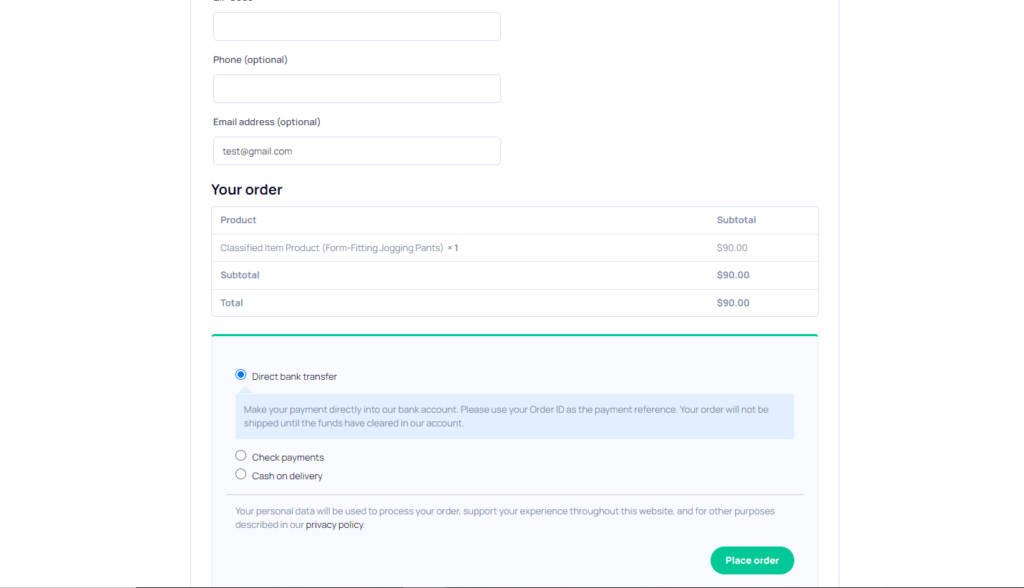
  • The customer decides to purchase your product.
  • They proceed to the checkout process, filling in all the required information.
  • The customer provides necessary details such as shipping address.
  • They add billing information to complete the transaction securely and place his/her order.

Step 2:

  • Admin accesses CubeWP.
  • Navigate to the user dashboard.
  • Create two new tabs named “Sales” and “Purchase” in the user dashboard if these two tabs are not available.
  • Click on Save Changes option.

Step 3:

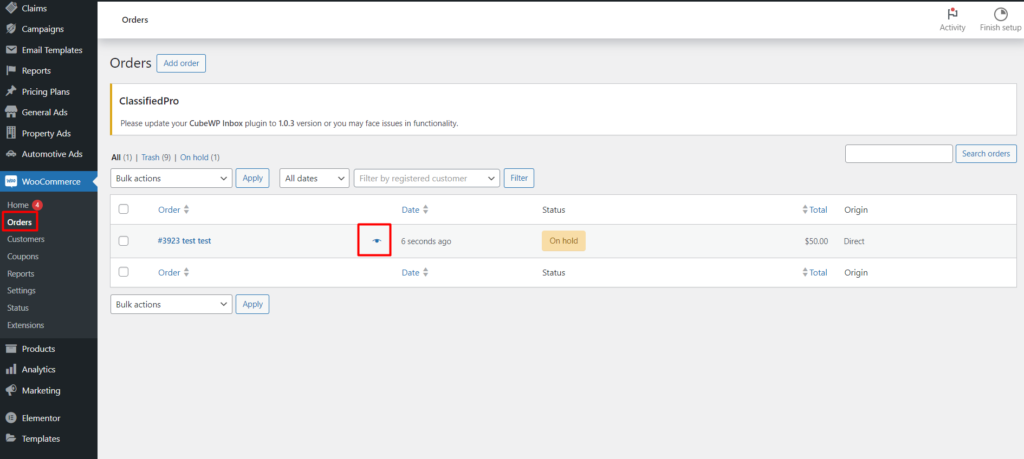
  • Access WooCommerce platform.
  • Click on the “Orders” button.
  • View the list of orders displayed.
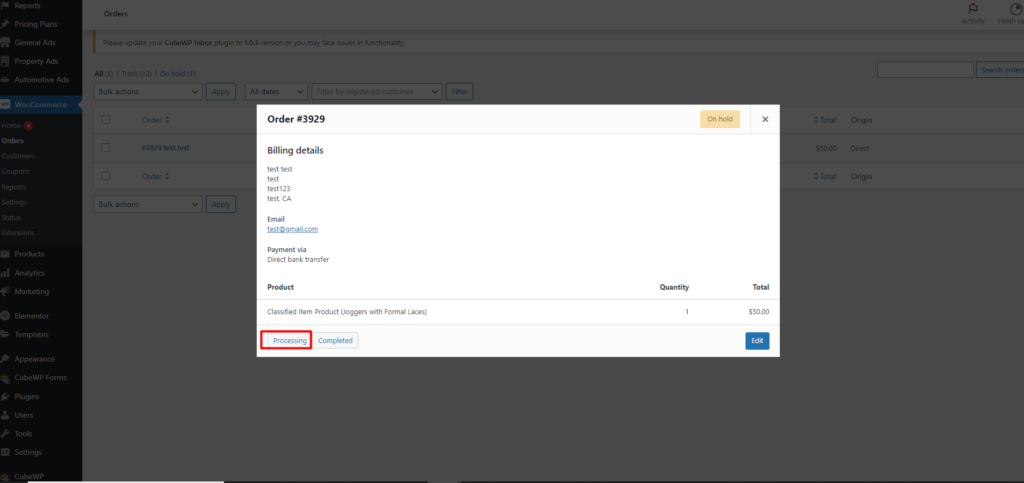
  • Click on the “Preview” button.

  •  Choose the “Processing” option.
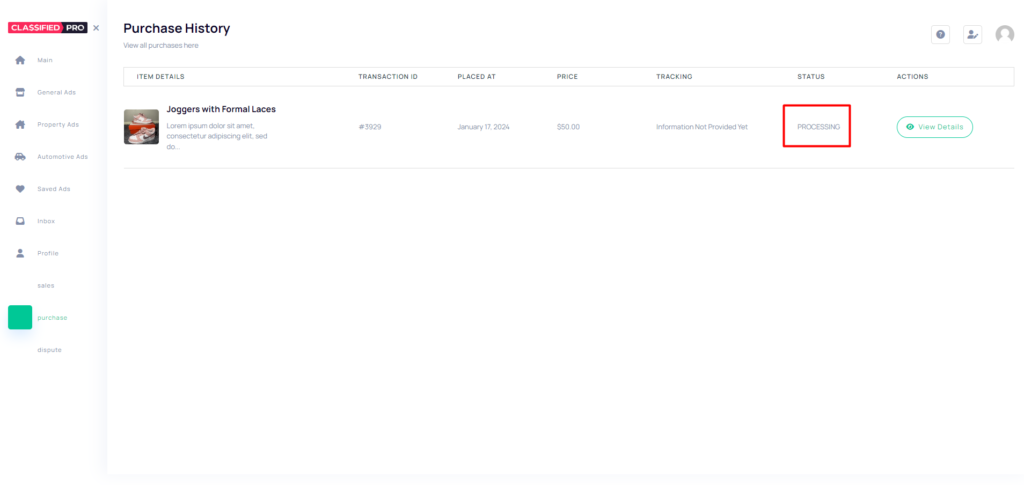
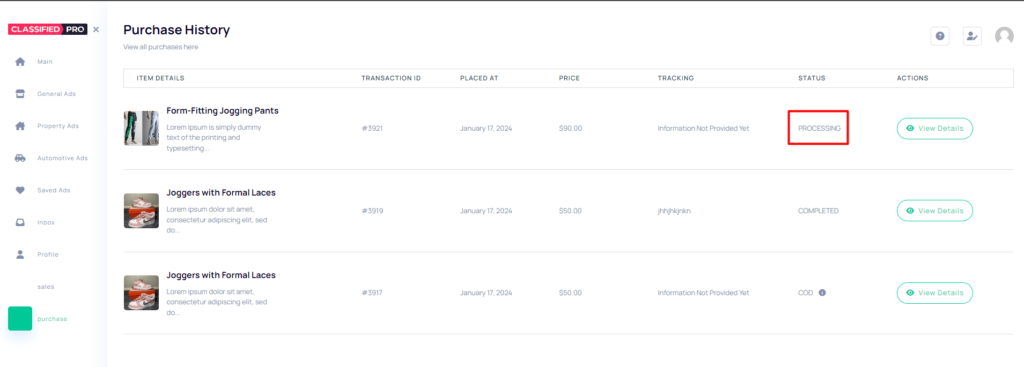
  • After this both Buyer and Seller have Process status.

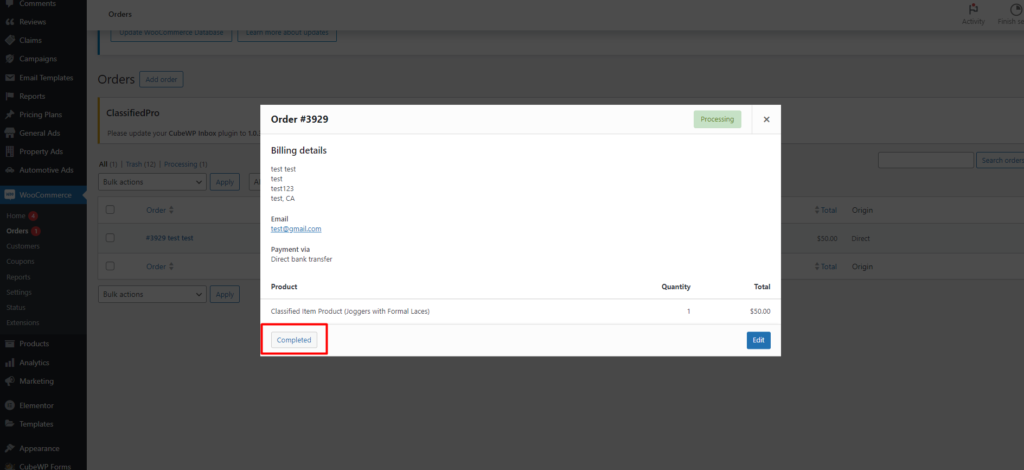
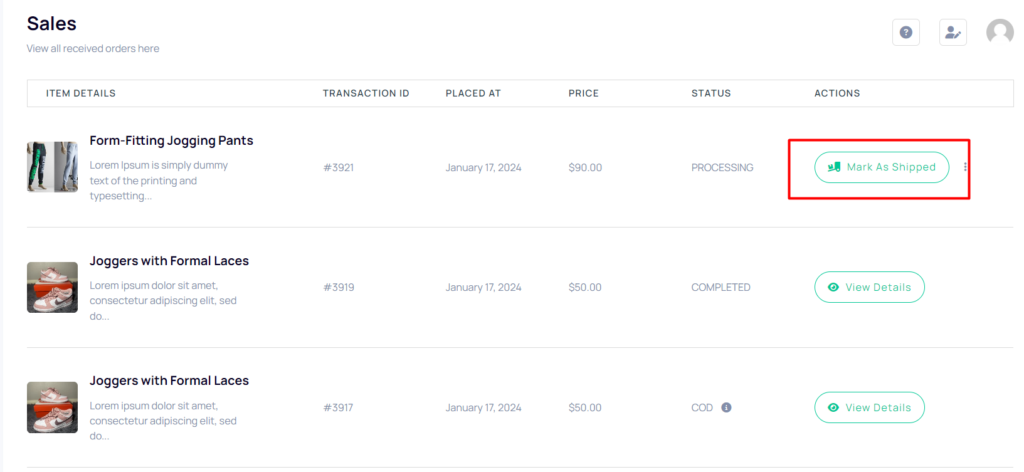
Step 4:

  • Seller accesses the order details after clicking on the “Preview” button.
  • Initiates the shipping process for the packed order.
  • Clicks on the “Completed” button to mark the order as processed and shipped.

  • The order status is updated to “Completed,” indicating successful processing and shipment.

Once the shipment is completed, the order status reflects as “Completed” on both ends.

Note:

If these Sales and Purchase tabs are not available:

Click on this article to Review the process:

Adding Tabs in Dashbaord


User tracking system to display relevant data on the homepage based on user interests

The User Tracking System is designed to enhance the user experience by displaying personalized data on the homepage based on a user’s interests and interactions. It works as follows:

  1. Tracking User Behavior: The system monitors the user’s activities, including searches made using taxonomies (categories, tags, etc.) or keywords.
  2. Personalized Homepage: Based on the data collected from user searches, the system analyzes the user’s preferences. It then dynamically updates and displays relevant products or listings on the homepage that match the user’s interest.
  3. Interest-Based Recommendations: Whether the user is searching for specific categories, brands, or keywords, the system ensures that the products they are most likely interested in are prioritized and recommended.

This feature improves engagement by providing tailored content, ensuring users see listings that are relevant to their previous interactions, making their browsing experience more efficient and personalized.

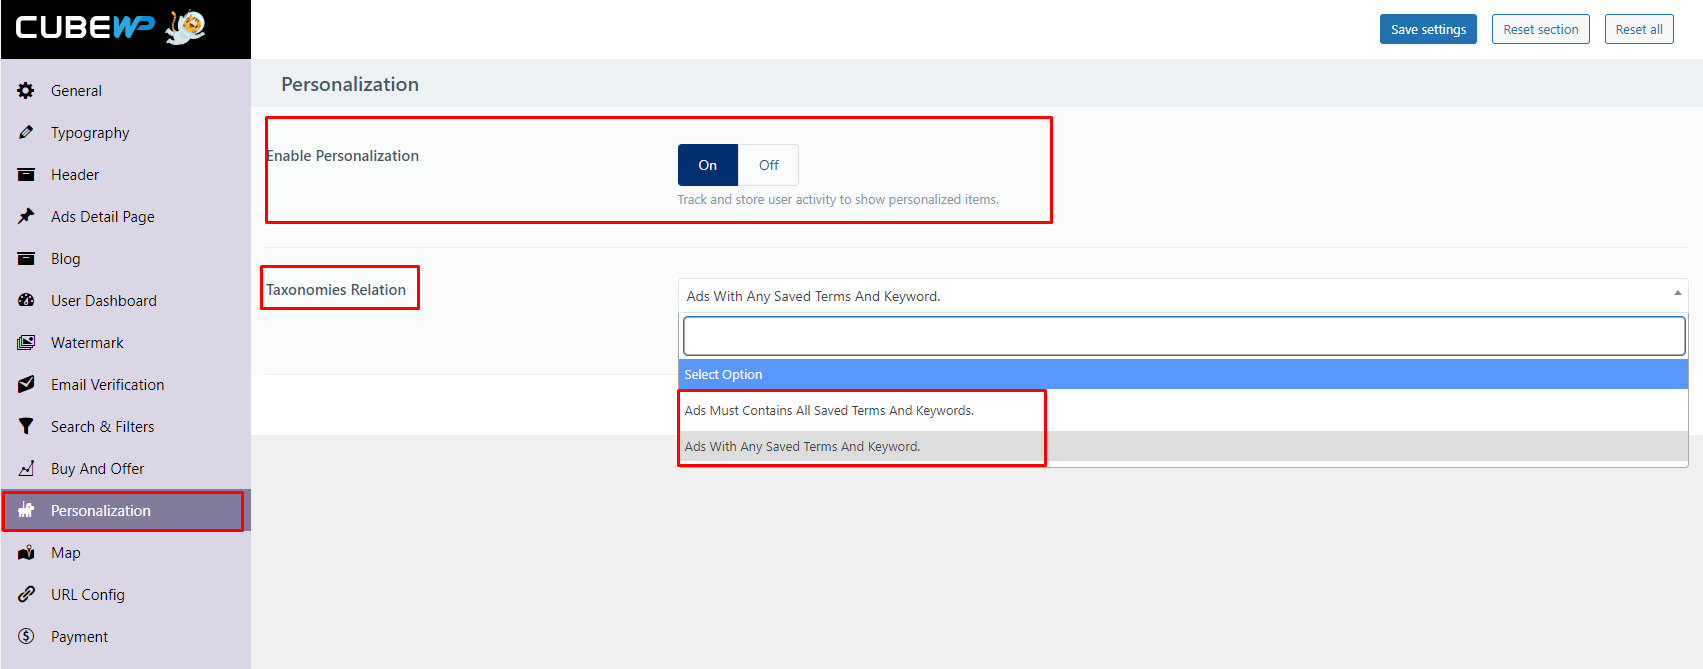
To setup this feature first you have to make settings:

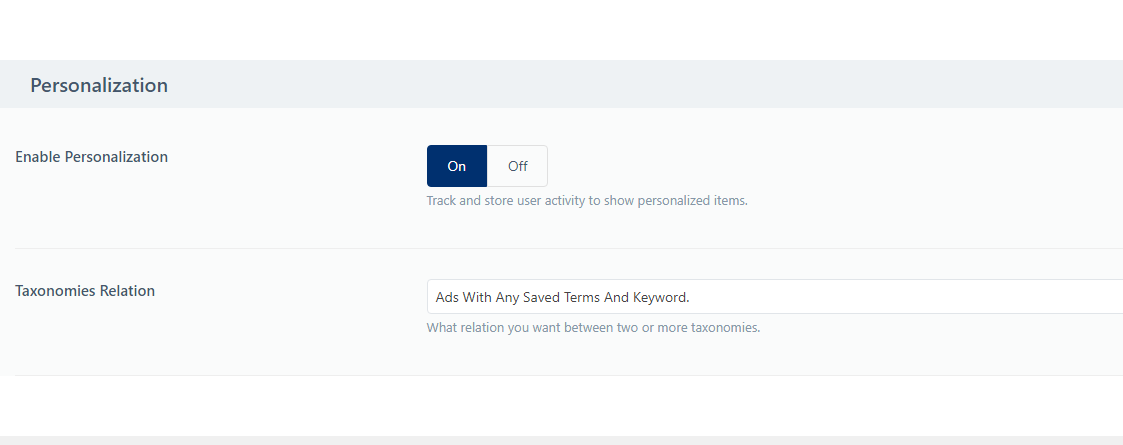
  • Go to Cubewp Settings >> Personalization
  • Go to Cubewp Settings >> Enable Personalization >> Set it as ON
  • Further select taxonomies relation between two options

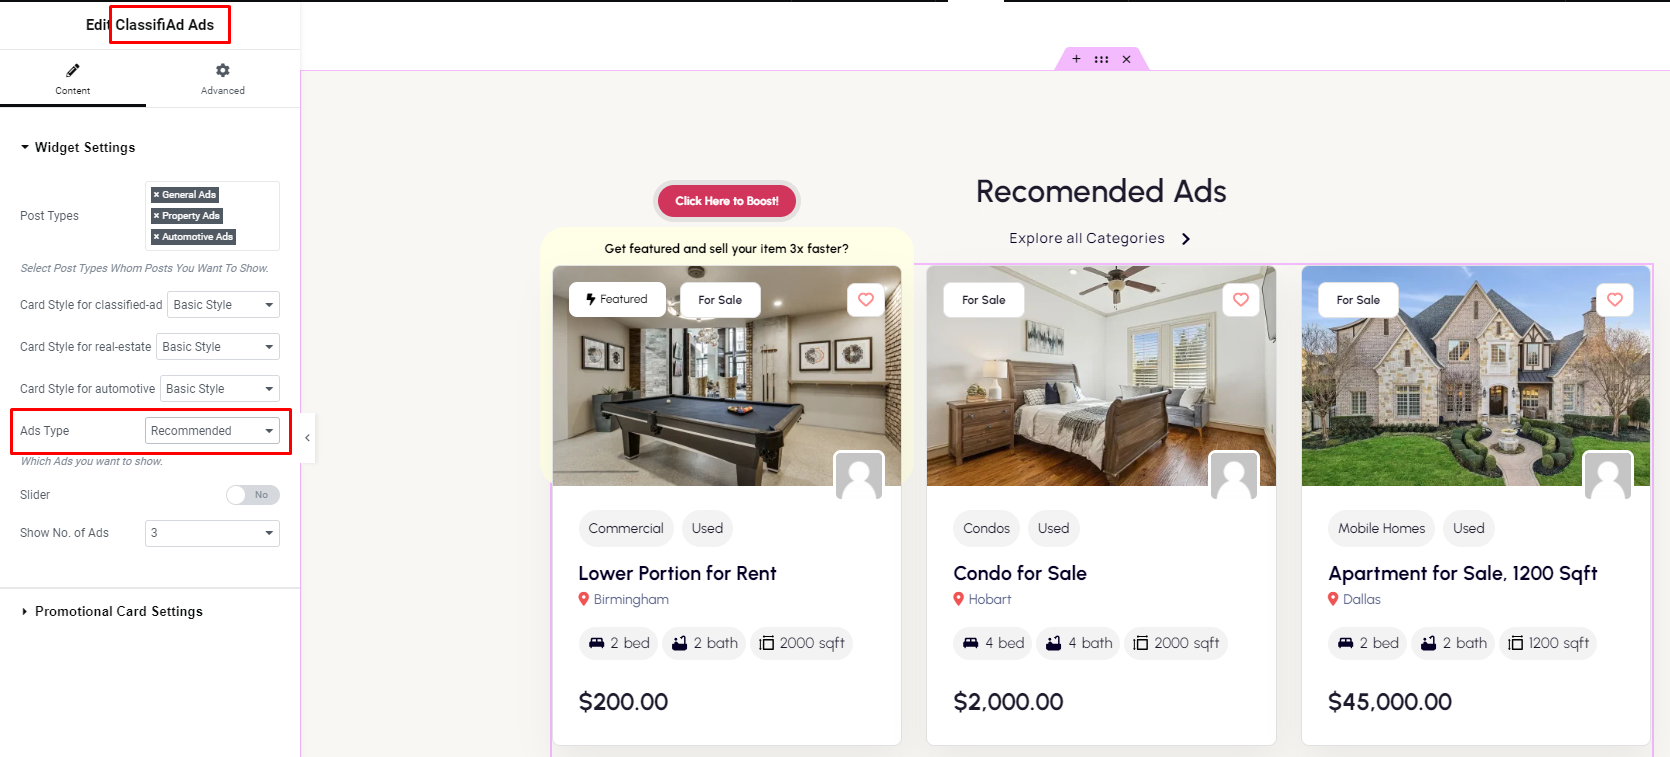
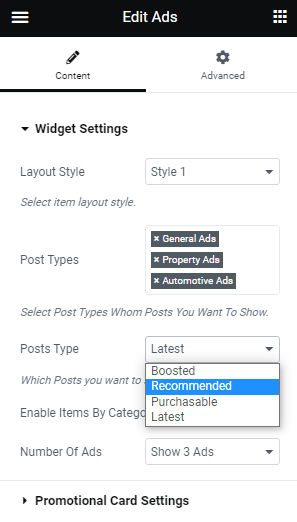
Then you need to edit the home page with page builder and add the ClassifiAd Ads element and need to select the Ads type “Recommended”

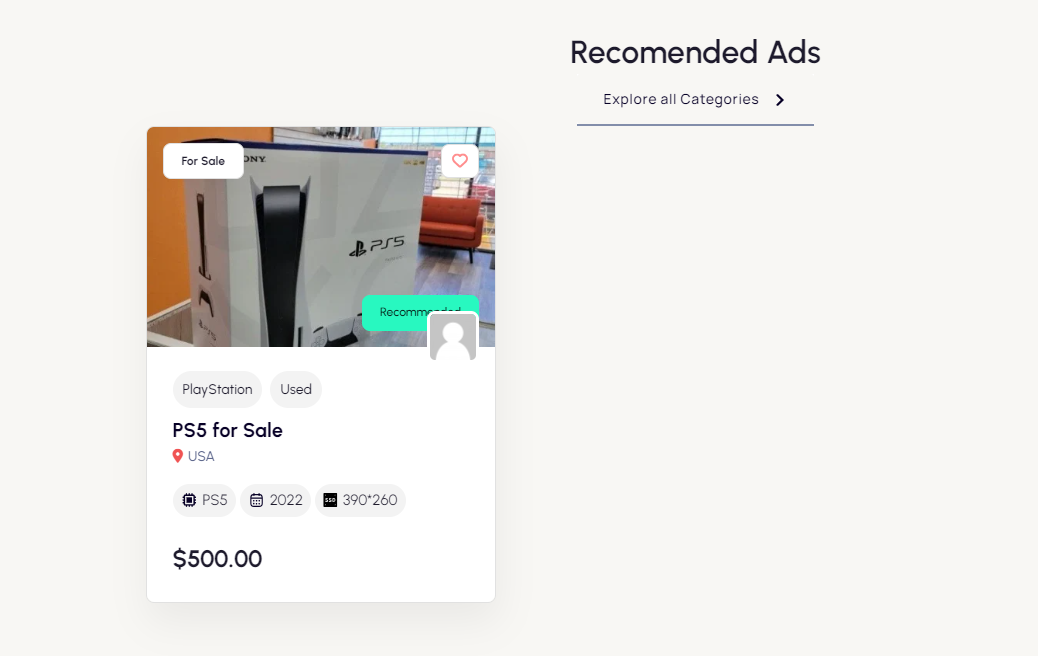
When the user will search for example keyword “ps5” and will visit the Ad detail page then in recommended Ads on home page section will display the Ads having keyword “ps5”

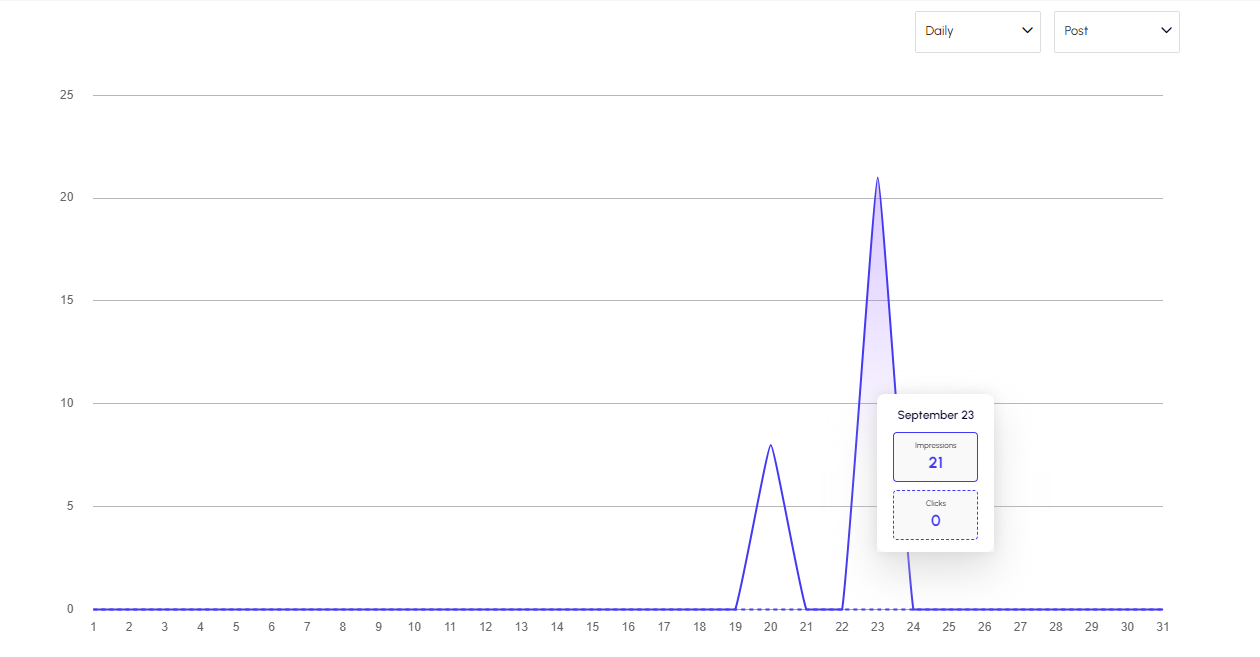
Ad metrics for owners displayed on the dashboard with charts

You can add the Ad metrics for Ad’s owners to be displayed on the dashboard with charts, follow these steps:

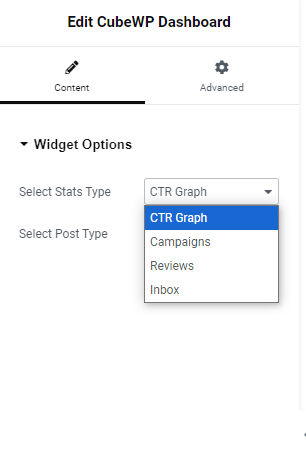
  • Go to pages
  • Edit Dashboard Page with page builder
  • Add Element “CubeWP Dashboard”
  • Then select stat types
  • Select post type to display stats

It will display on user Dashboard as Below:

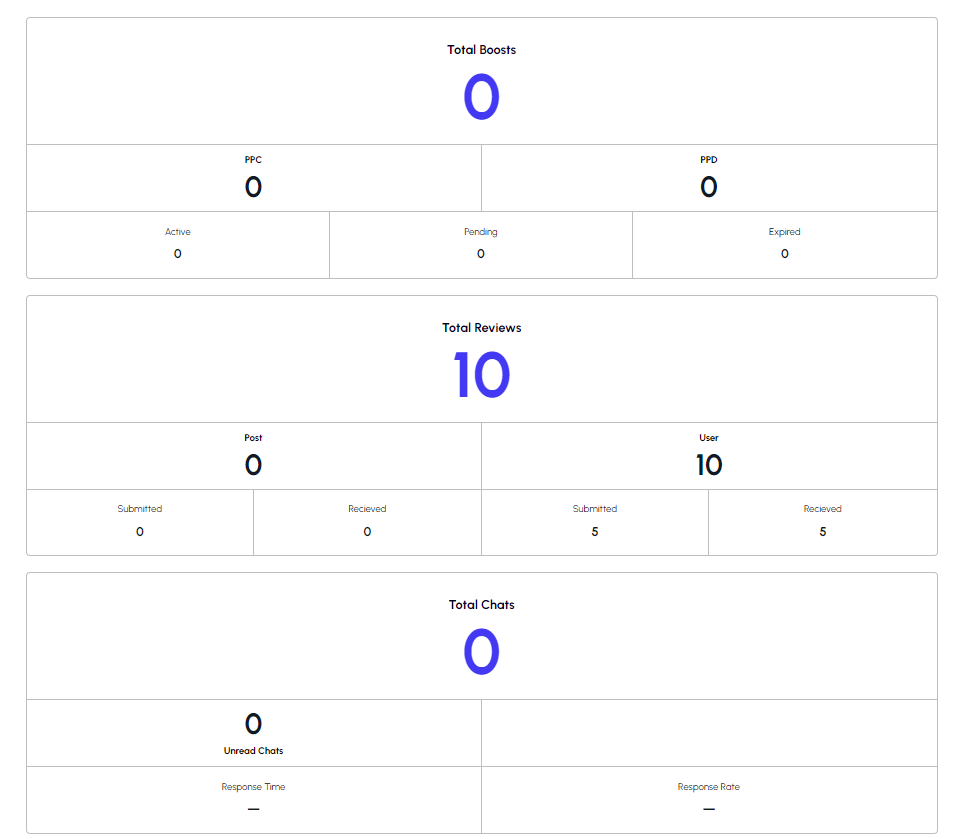
You also can add metrics for campaigns, Reviews and Inbox with same steps. See the image below, How they will look:

Purpose-driven dashboard to display page content

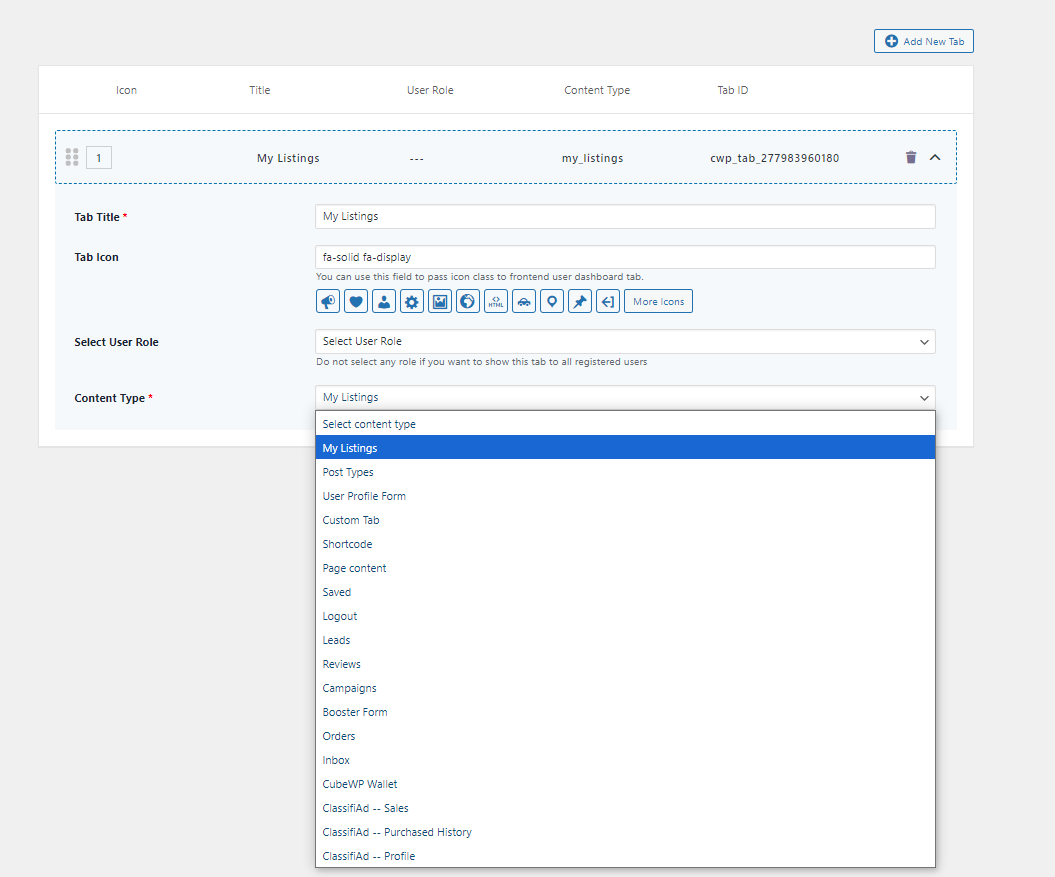
The Purpose-driven Dashboard is a centralized, user-friendly control panel that helps users manage and track various aspects of their activities within the platform. Its main purpose is to streamline navigation and provide quick access to essential tools and data. Key elements of the dashboard include:

    • Listings: This section allows users to view and manage the listings they have created on the platform. It provides a central location to update or remove their published listings
    • Post Types: This refers to the different types of content users can create, such as ads, articles, or listings. Each post type is structured differently based on its purpose (e.g., job posts, product listings)
    • User Profile Form: A form that allows users to input and update their profile information, like name, contact details, and other personal or business information
    • Custom Tab: Users can create custom tabs for additional information on their listings or profile. These tabs can be tailored to provide extra details or features not available by default.
    • Shortcode: A tool that allows users to insert specific functionalities into a page or post using a simple code. For example, they can add a contact form or display certain elements using a shortcode.
    • Page Content: This section allows users to manage the content displayed on specific pages they own, such blog, cart,checkout etc.
    • Saved: Users can see and access the listings or ads they’ve saved for later. This section is like a favorites list, where users can quickly revisit content they’re interested in.
    • Logout: This option lets users securely log out of their account when they are finished using the platform.
    • Leads: Users can track leads they’ve generated through their listings or advertisements. This section helps monitor potential customers or inquiries related to their posts.
    • Reviews: A place for users to view all the reviews they’ve received on their listings or services. This helps them stay informed about customer feedback.
    • Campaigns: Users can create, manage, and track marketing campaigns to promote their listings or services. It helps in driving more visibility to their content.
    • Booster Form: A form that allows users to boost or promote their listings or ads, typically by increasing visibility through paid options.
    • Orders: This section displays all the user’s orders related to the platform, whether for ads, promotions, or other paid services.
    • Inbox: A built-in messaging system where users can check and respond to messages or inquiries from potential buyers, customers, or other users on the platform.
    • CubeWP Wallet: A virtual wallet where users can view and manage their funds or balance, typically used for payments, purchasing plans, or boosting campaigns.
    • ClassifiAd – Sales: Displays details about the user’s sales activity within the ClassifiAd platform, helping users track the products or services they’ve sold.
    • ClassifiAd – Purchased History: A record of all the purchases the user has made, such as buying ads, boosting listings, or subscribing to services.
    • ClassifiAd – Profile: This section allows users to manage their ClassifiAd profile, updating their personal or business information, photos, contact details, and more.

You can add the tabs for required content type while creating dashboard:

Two-way review system

Two-Way Review System: Building Trust in ClassifiAd

The ClassifiAd theme introduces a powerful feature that fosters transparency and trust between users: the Two-Way Review System. This functionality allows both business owners and users to review each other, creating a balanced feedback loop that enhances credibility and improves user experiences.

How the Two-Way Review System Works

In the ClassifiAd theme, both the business owner (ad poster) and the users who interact with the ad can leave reviews for each other. This mutual review system ensures a fair and reliable platform, where both sides can share feedback about their experience. This way, users can make informed decisions when engaging with listings, and business owners can receive valuable input to improve their services.

Customizing the Review Form

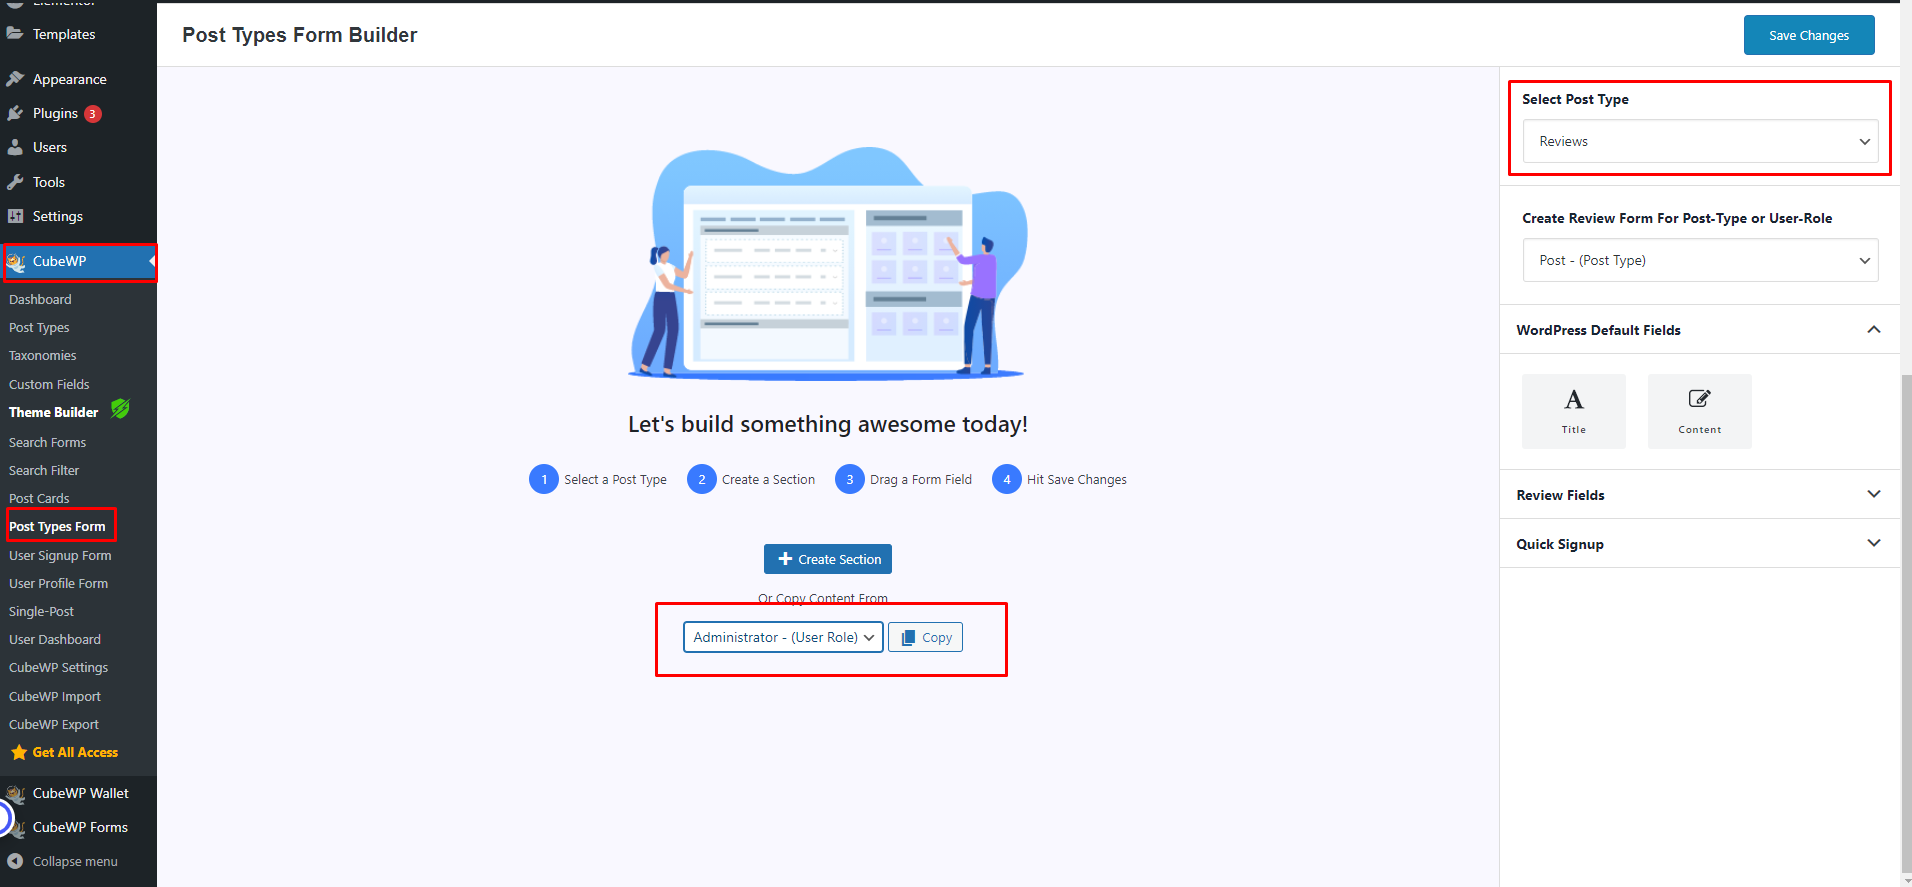
One of the most flexible aspects of the review system in ClassifiAd is the ability to customize the review form. Admins can tailor the review form to include specific fields, ensuring the reviews gather relevant and actionable information. Here’s how you can create or modify the review form:

1. Access the Review Form Settings:
– Navigate to your WordPress dashboard and go to CubeWP.
– Select Post Type Forms from the menu.

2. Select Post Type = Reviews:
– Once you’re in the Post Type Forms section, choose **Reviews** as the post type you want to edit.

3. Select the User Role:
– Choose the relevant user role—such as Admin** or Subscriber. This allows you to tailor the form according to who is posting the review (business owner or user).

4. Edit the Review Form:
– A customizable form builder will open, where you can drag and drop elements to include the specific fields you want users to fill in. You can add text boxes, ratings, dropdowns, and other fields that are relevant to the type of review you want to gather.

5. Save Your Form:
– Once you’ve arranged the form fields to your liking, save the form. This customized form will now be used for reviews within the platform.

Viewing and Managing Reviews

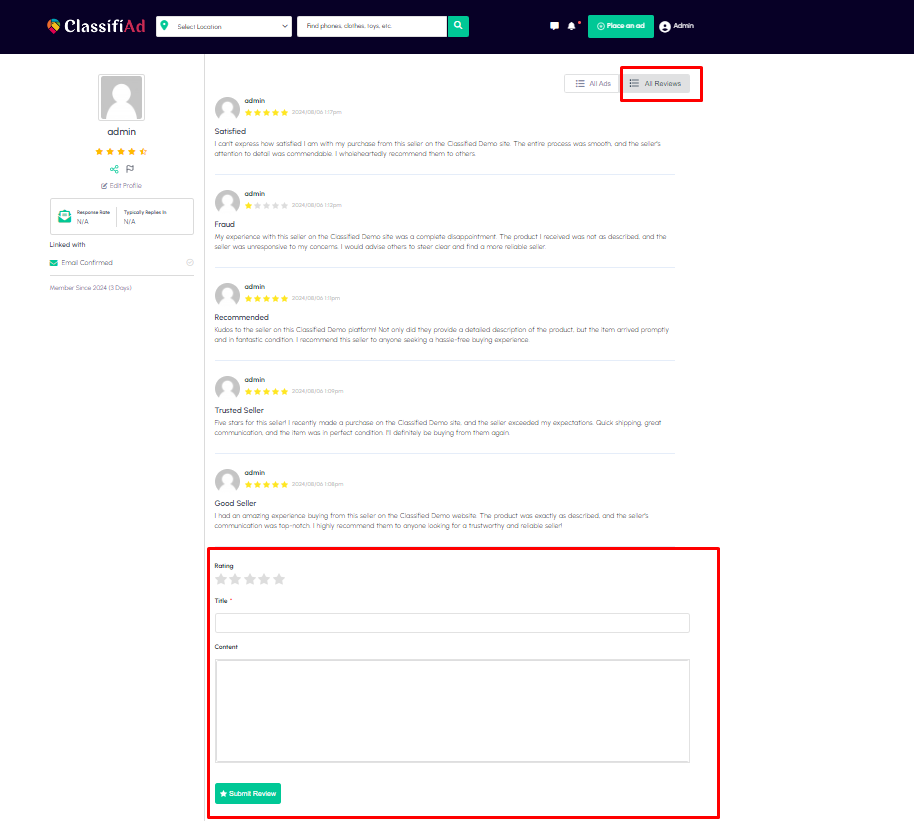
All submitted reviews will be easily accessible in the Author’s Page. Both the business owner and user reviews are neatly organized under the All Reviews tab, where users can see feedback that has been given and received.

Why the Two-Way Review System is Important

Trust & Transparency: By enabling both parties to review each other, ClassifiAd promotes a culture of trust. Users can feel confident that the reviews they see are balanced, with both business owners and customers having a voice.

Feedback for Improvement: Reviews provide business owners with valuable insights about how they can enhance their listings and customer service, while users get a chance to reflect on their experiences with each business.

Balanced Ratings: Since both sides can provide feedback, the review system remains balanced, giving a more holistic view of interactions on the platform.

Conclusion

The Two-Way Review System in ClassifiAd is a critical feature for fostering trust, transparency, and accountability between users and business owners. With customizable review forms, easy access to all reviews, and the ability for both parties to share their feedback, this system ensures a fair and open marketplace. It helps build a community of trust, where honest reviews benefit both users and business owners alike.

Start using the Two-Way Review System in ClassifiAd today to enhance your platform’s credibility and user experience!

chat system (Inbox)

Introducing the User-to-Ad Owner Chat System: Streamline Your Communication with Ease!

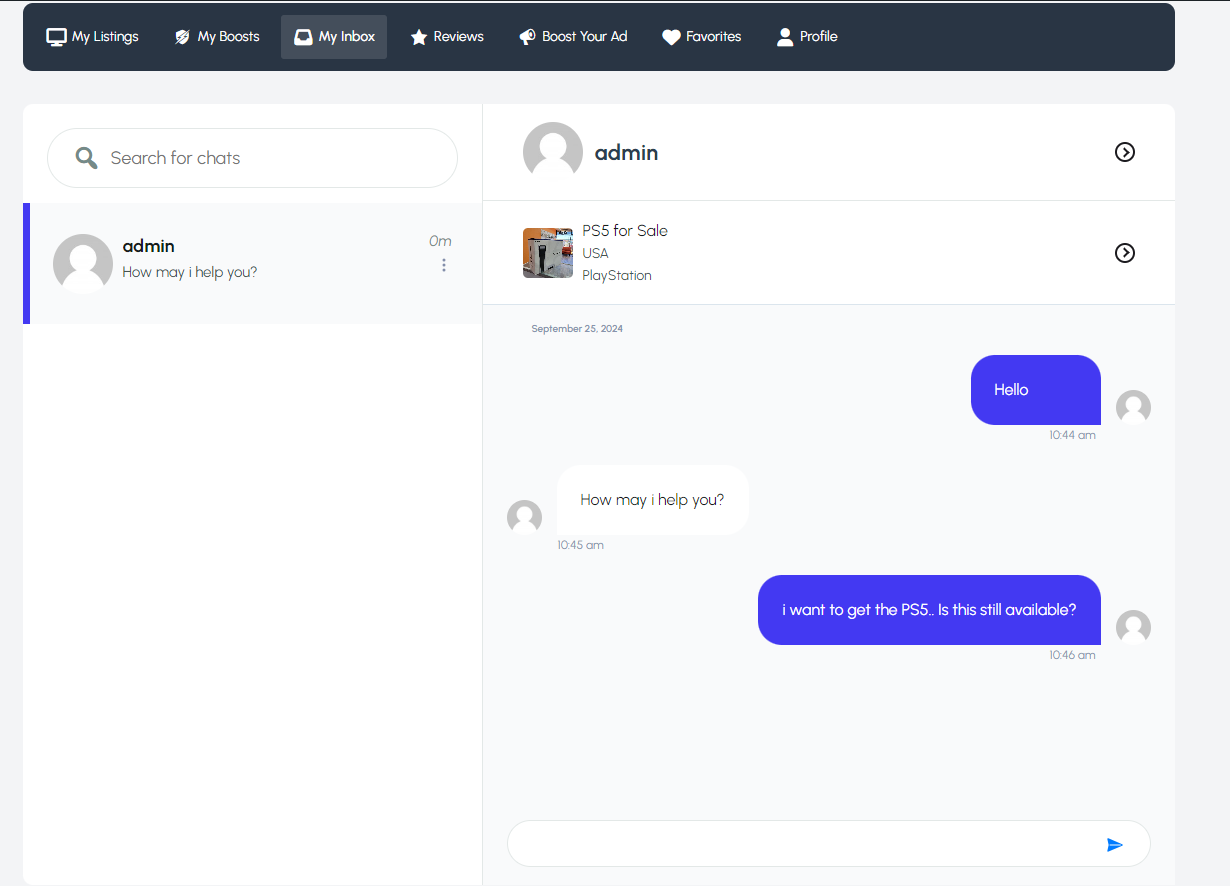
When it comes to buying, selling, or negotiating an item, clear and direct communication is key. Our User-to-Ad Owner chat system (Inbox) makes it easier than ever for users to get in touch with ad owners, ask questions, and even negotiate prices—all within the platform. This seamless communication channel ensures that both parties can interact directly, leading to faster responses and better outcomes.

How Does the User-to-Ad Owner Chat System Work?

The chat system allows users to send messages directly to the ad owner through the inbox feature, which is conveniently integrated into each ad’s detail page. Whether you have a question about the product or want to make an offer, the inbox allows you to contact the ad owner without leaving the platform.

Here’s how it works:

1. Message Form on the Ad Detail Page
Users can easily initiate a conversation with the ad owner by using the message form. This form is displayed on the ad detail page, allowing potential buyers to ask questions or negotiate with the seller in a direct, private chat.

2. Seamless Integration Using CubeWP
For website admins and developers using CubeWP, adding the message form to the ad detail page is incredibly simple:
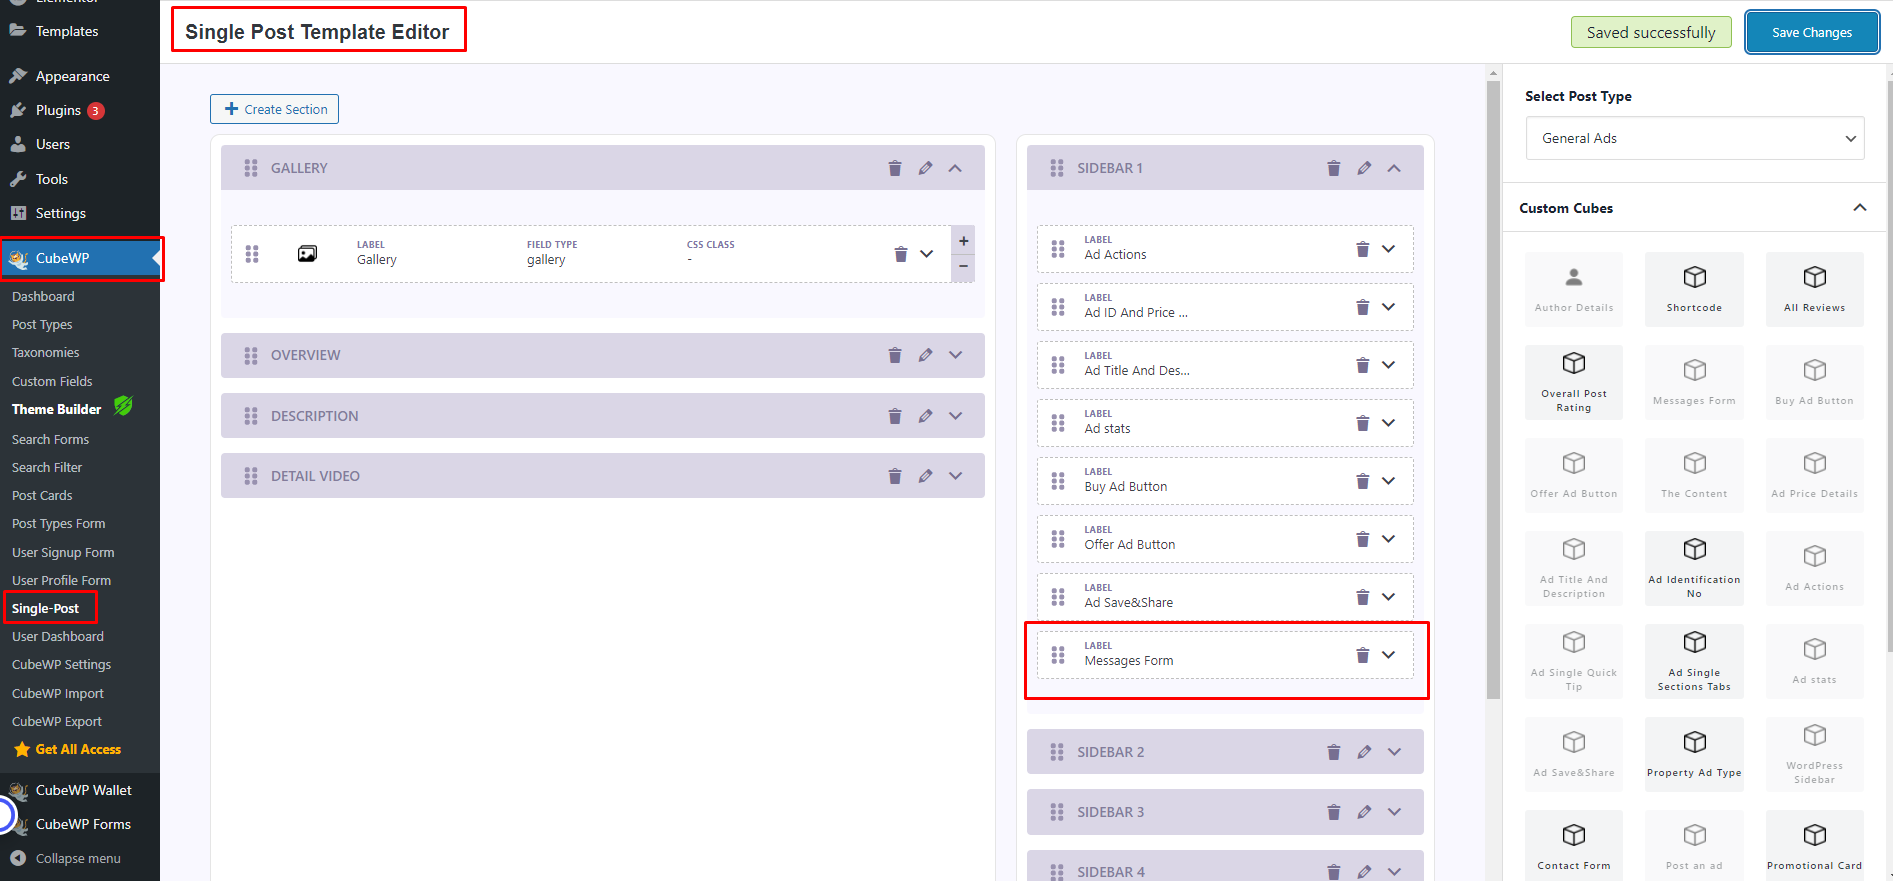
– Navigate to CubeWP >> Single Post.
– Select the relevant post type (e.g., “General Ads”).
– Drag and drop the “message form” tab to the post card builder, positioning it where you’d like it to appear on the ad detail page.

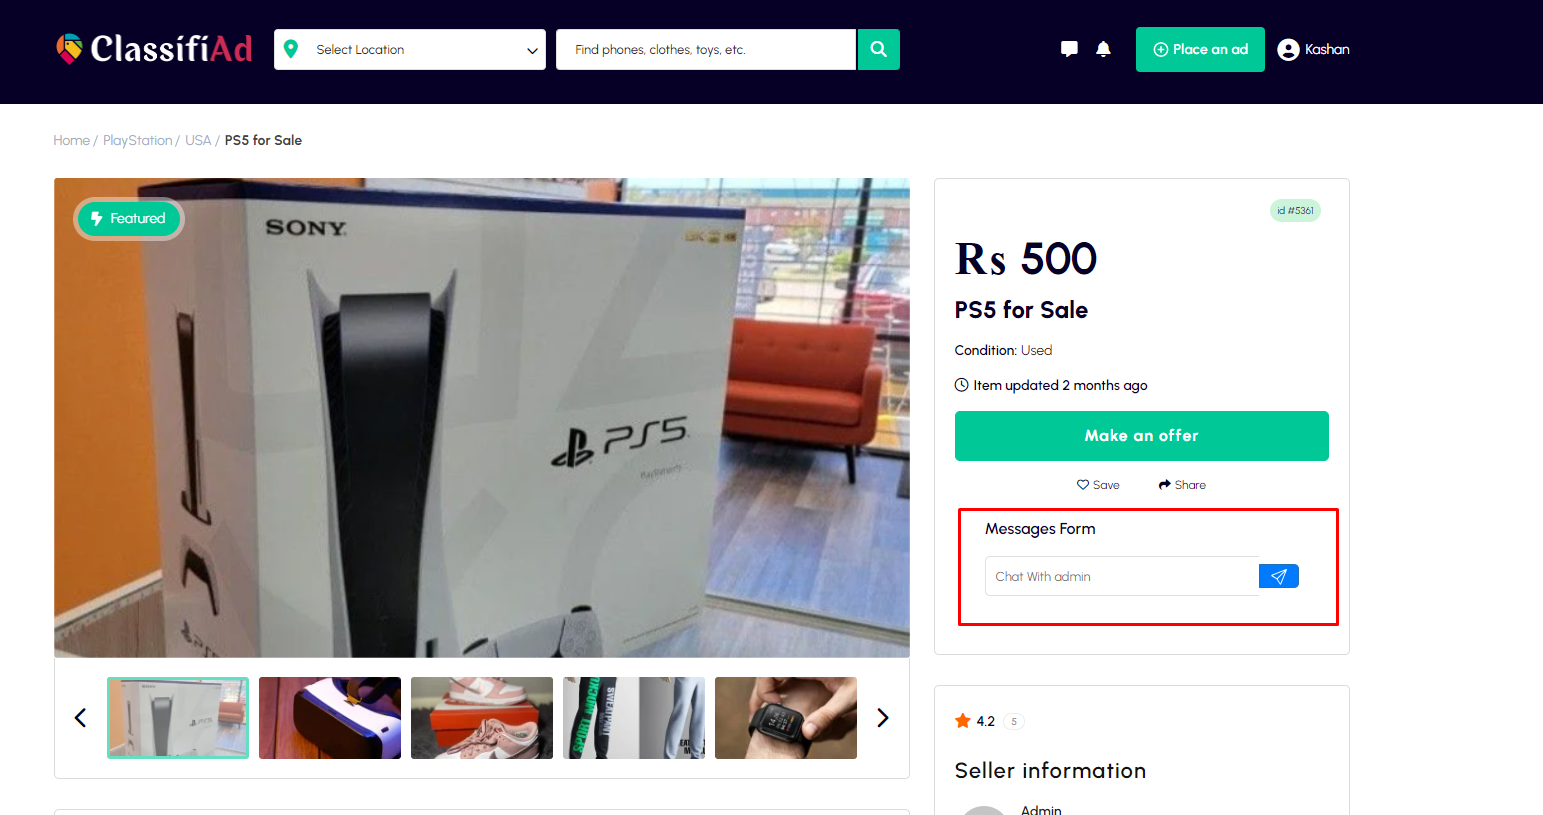
Once this is set up, the message form will appear like this:

Users can fill out their inquiries or offers, and their message will be sent directly to the ad owner.

3. Messages Delivered to the Ad Owner’s Dashboard
After a message is sent from the form, it will appear in the Inbox tab of the ad owner’s dashboard. This means that the seller receives every inquiry in one central place, making it easy to manage multiple conversations and respond promptly.

4. Quick and Direct Responses
The ad owner can reply to the user directly through the Inbox in their dashboard. Users, in turn, will receive the seller’s response in their own inbox, ensuring that the conversation is ongoing and fluid. Both parties are notified of new messages, making it easy to stay updated on the latest interactions.

Benefits of the Chat System

1. Direct Communication: Buyers can instantly connect with sellers, clarifying product details, availability, or terms of negotiation. This reduces waiting time and speeds up the buying process.

2. Secure and Private: The conversation happens within the platform, protecting both parties’ privacy. There’s no need to exchange personal contact details like email addresses or phone numbers.

3. Organized Conversations: Both buyers and sellers have their conversations neatly organized under the **Inbox tab** in their respective dashboards, making it easy to track interactions, especially for frequent sellers or buyers.

4. Better Engagement: By offering a direct chat feature, sellers can engage potential buyers more effectively, answer queries in real-time, and potentially close sales faster.

Final Thoughts

The User-to-Ad Owner chat system (Inbox) is designed to foster better communication and streamline the buying process on your platform. By making it easy for users to reach out and receive responses directly from ad owners, you improve engagement, trust, and the likelihood of successful transactions. So, add the message form today and start experiencing more efficient interactions on your site!

Make An Offer

Introducing “Make an Offer” Feature: Make Your Best Offer to the Ad Owner!

When buying or negotiating for an item, flexibility is key. With our Make An Offer feature, users now have the ability to negotiate directly with the ad owner by sending offers based on the listed price of an ad. This feature simplifies the bargaining process by allowing users to submit offers quickly and directly from the ad detail page, making it easier than ever to get a deal that works for both parties.

How Does “Make An Offer” Work?

The Send Offers feature allows potential buyers to submit a bid to the ad owner for an item they’re interested in purchasing. Rather than just asking for more information or starting a chat, users can send a specific offer, giving them the power to negotiate directly and efficiently.

Here’s how it works:

1. Auto-Generated Offers Based on the Ad Price
When a user clicks on the “Make An Offer” button, the system will automatically generate offers based on the ad price. These offers are calculated within preset limits, ensuring that the offer is reasonable and falls within a certain range. The seller can then review and decide whether to accept, decline, or counter the offer.

2. Setting Offer Limits via CubeWP
For website admins, the offer system is fully customizable. You can control the range and flexibility of offers users can send by navigating to CubeWP >> Settings >> Buy and Offer. This allows you to set minimum and maximum limits for offers relative to the ad price, so both buyers and sellers benefit from fair and reasonable negotiations.
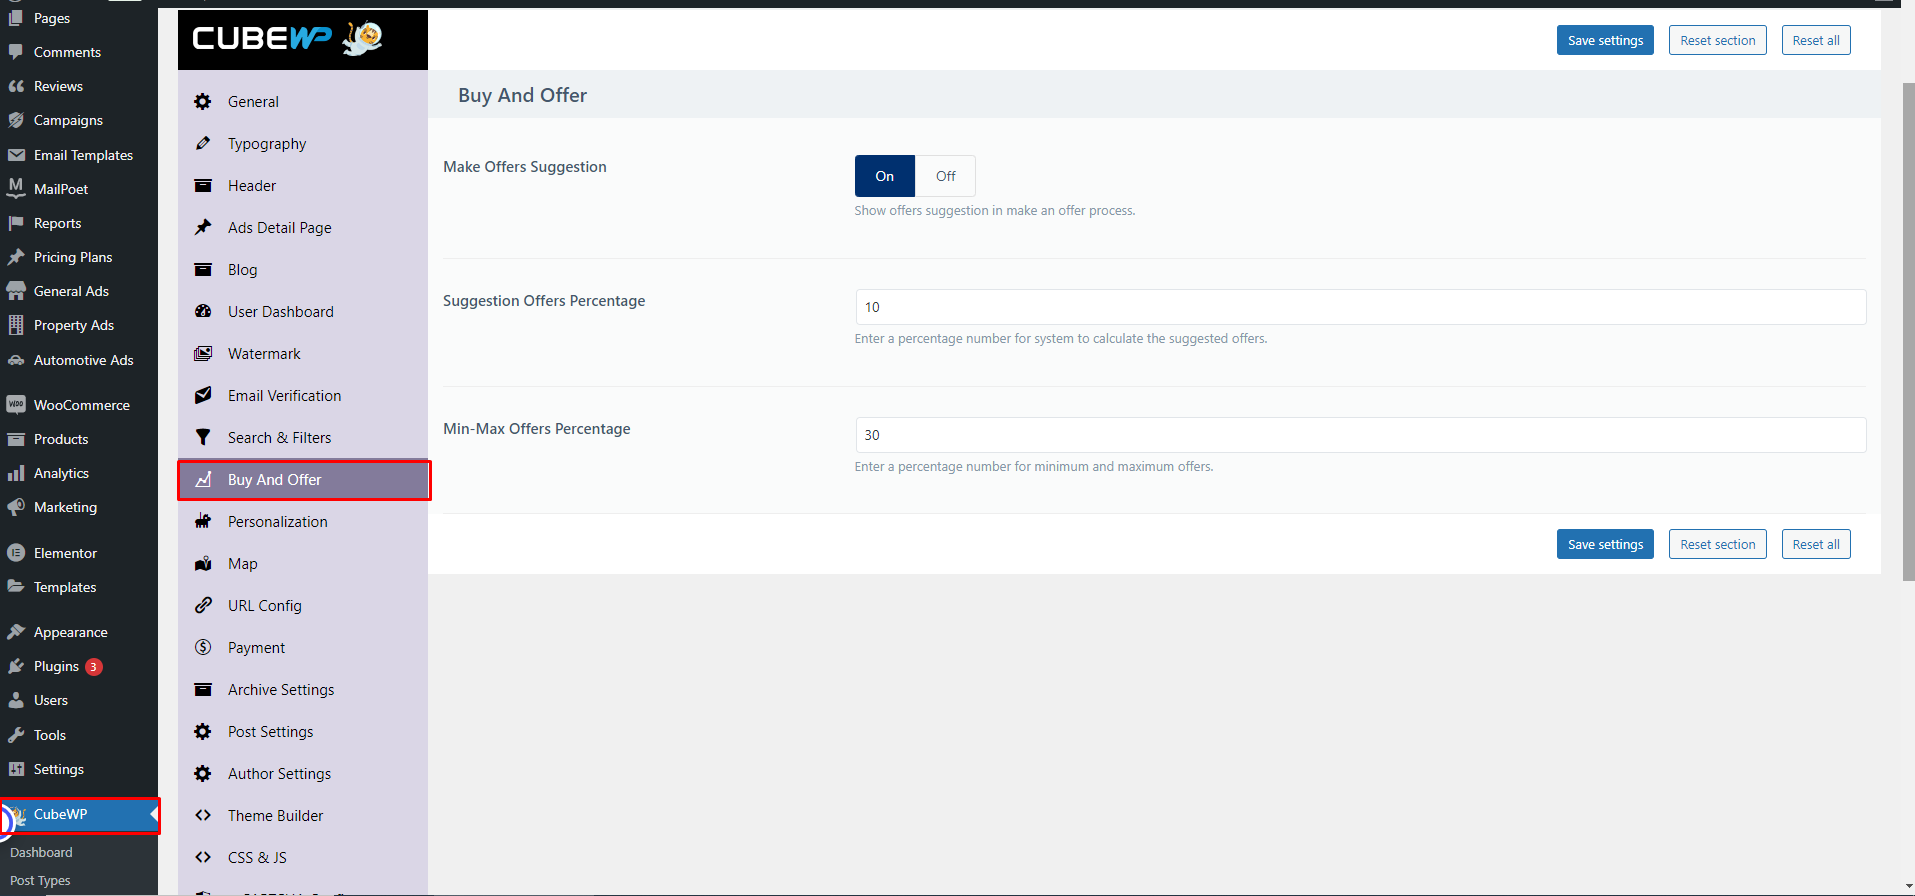

How to Add the “Offer Ad” Button to Your Ad Detail Page

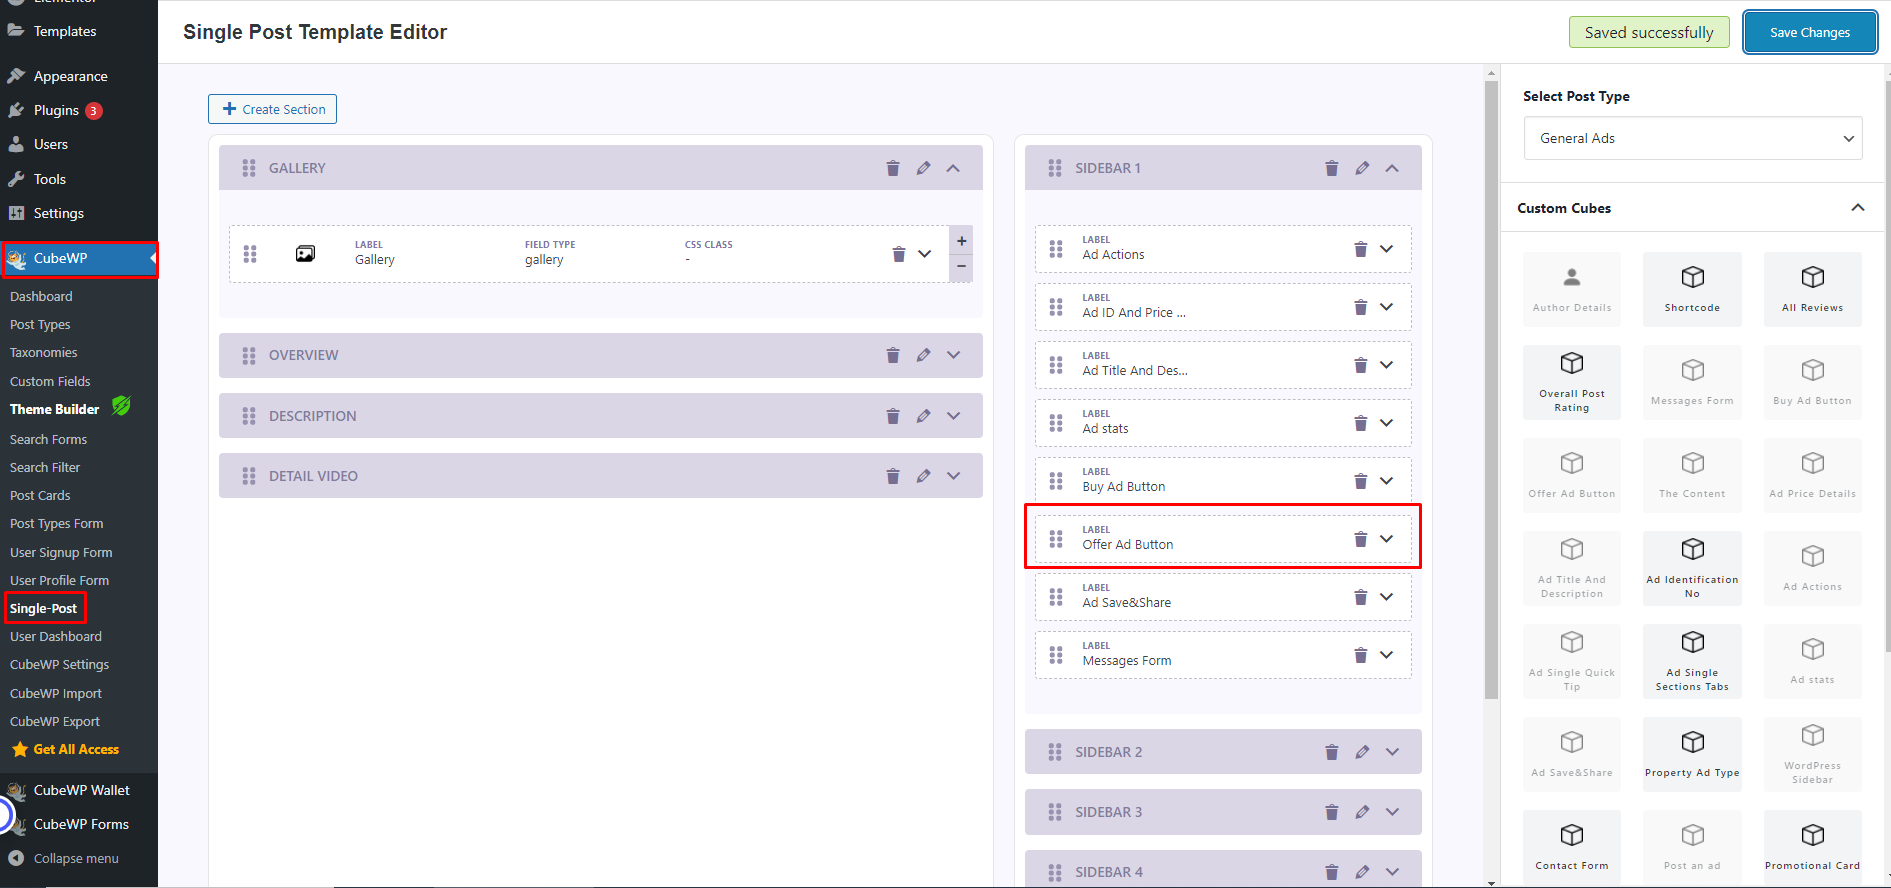
Adding the “Offer ad” button to your ad detail page is simple and requires no coding experience:

1. Go to CubeWP >> Single Post in your WordPress admin dashboard.
2. Select the post type (such as General Ads) where you’d like to allow offers.
3. Drag and drop the “Offer Ad Button” tab into the single post builder, placing it in the spot where you’d like the button to appear on the ad detail page.
After following these steps, the “Send Offer” button will be displayed like this on the detail page:
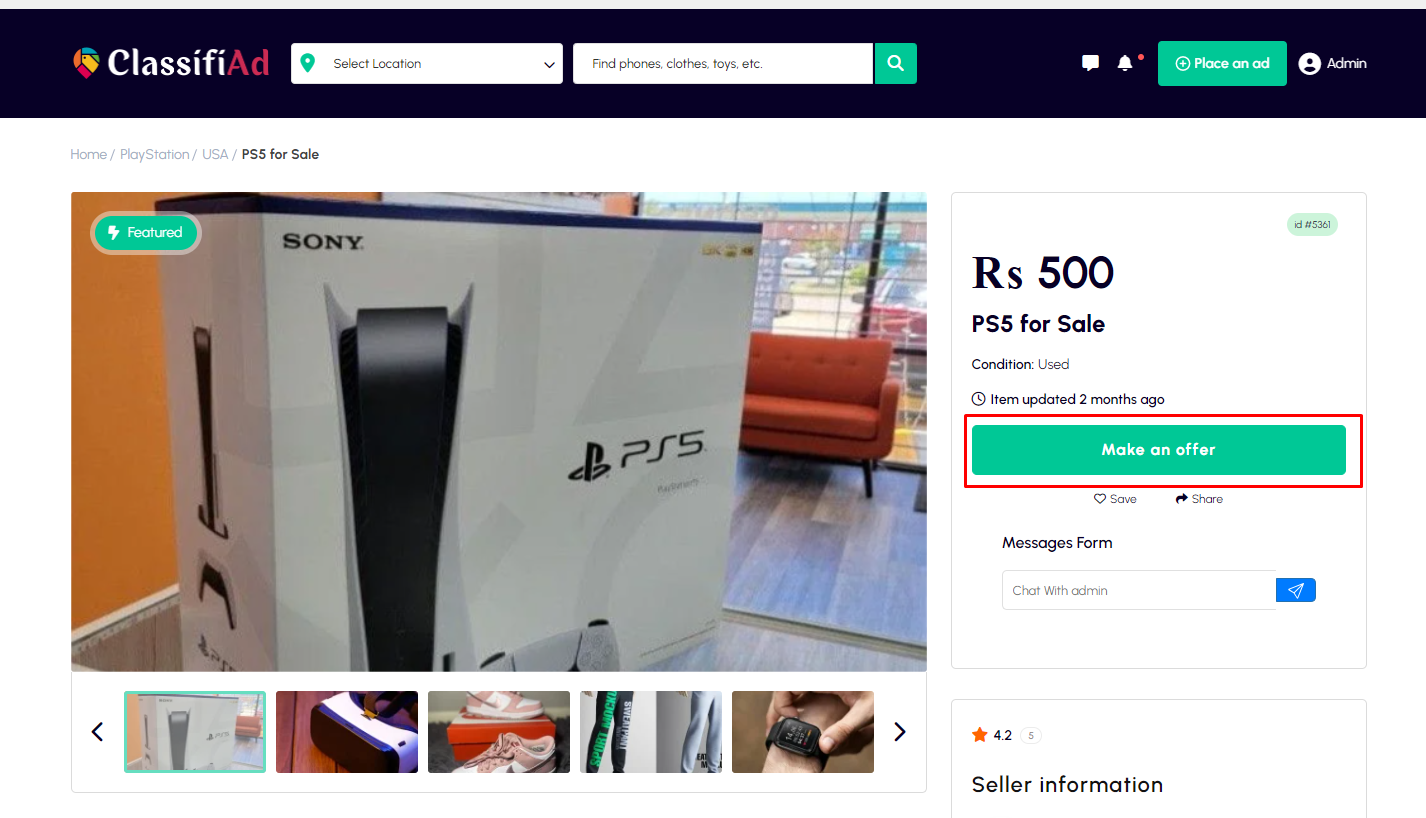
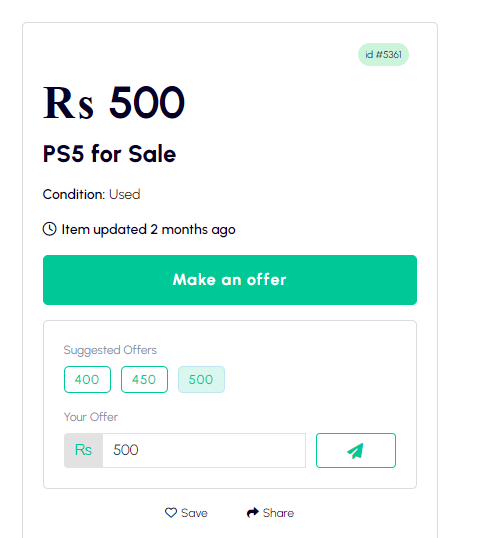
Now, users can send their offers with just a click, right from the ad page.

What Happens After an Offer is Sent?

1. Offer Appears in the Ad Owner’s Inbox
Once a user sends an offer, the ad owner will receive a notification, and the offer will be displayed under the Inbox tab in the ad owner’s dashboard. This makes it easy for sellers to track all incoming offers, decide which ones to accept or decline, and even respond with a counteroffer if needed.
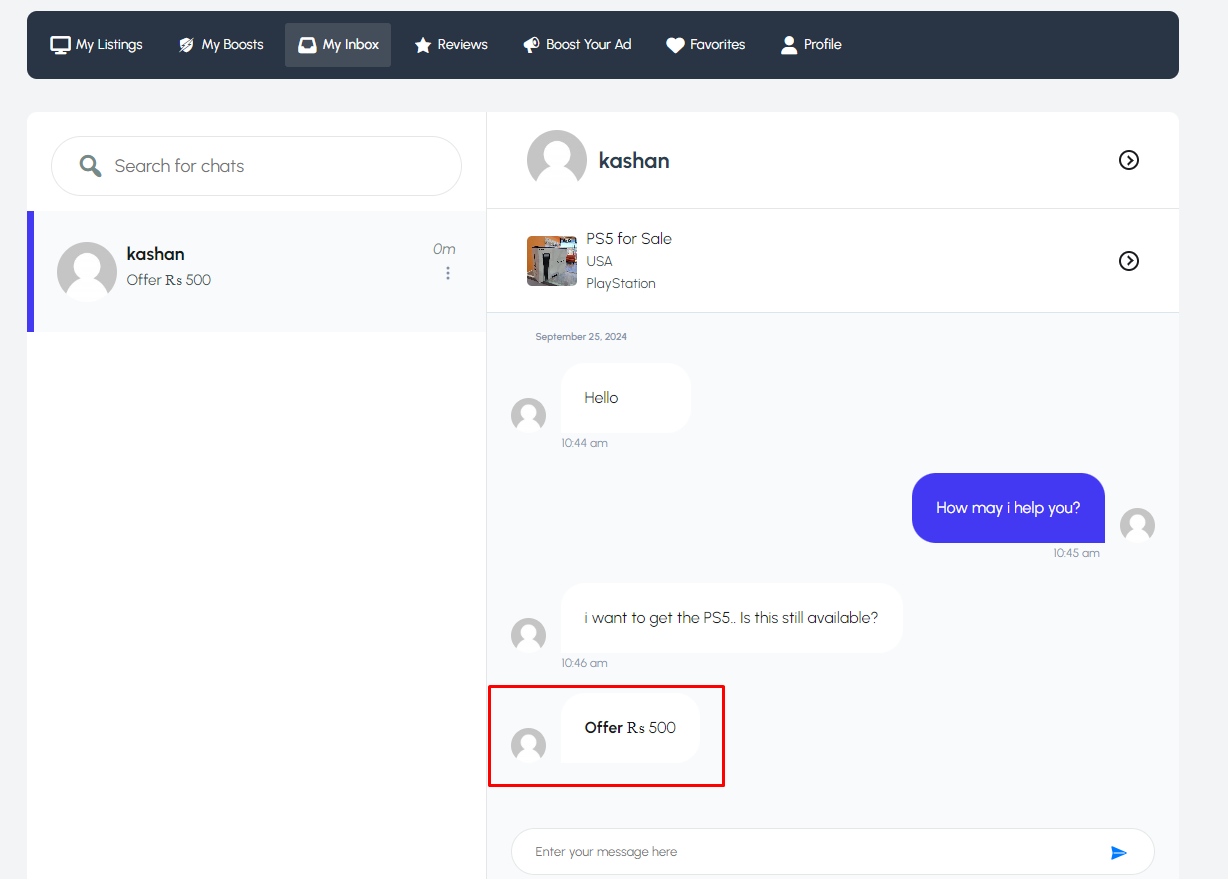
2. Easy Communication Through Inbox
The negotiation continues directly in the inbox, making communication streamlined and easy. Both the buyer and seller can keep track of the offers, responses, and agreements all within the platform—no need for external emails or messages.

Why Use the “Send Offers” Feature?

1. Convenient Negotiation: Instead of back-and-forth messages to agree on a price, users can send their best offer instantly, making the process faster and more efficient.

2. Fair and Transparent: With offer limits set by the admin, users and sellers both know that the offers are fair and within a reasonable range. This reduces the chances of lowball offers or unrealistic price expectations.

3.Encourages Buyer-Seller Interaction: The offer system encourages more users to engage with ads and start negotiations. Even if they can’t pay the full listed price, users feel empowered to make an offer and try to strike a deal.

4. Organized Offers and Responses: Sellers can easily manage all offers from their dashboard, making it simple to review, respond, and track conversations with potential buyers. The system keeps everything organized in one place.

Conclusion

The Make an offer feature is designed to enhance the buying and selling experience on your platform. It adds a level of flexibility and convenience that encourages users to engage with ads and make serious offers. Whether they’re looking to negotiate or simply want to make their best offer right away, this feature streamlines the process, making it a win-win for both buyers and sellers.

To take full advantage of the “Send Offers” feature, make sure to integrate the Offer Ad Button into your ad detail page today. It’s the perfect way to boost interaction, increase sales, and provide a seamless user experience on your platform!

License

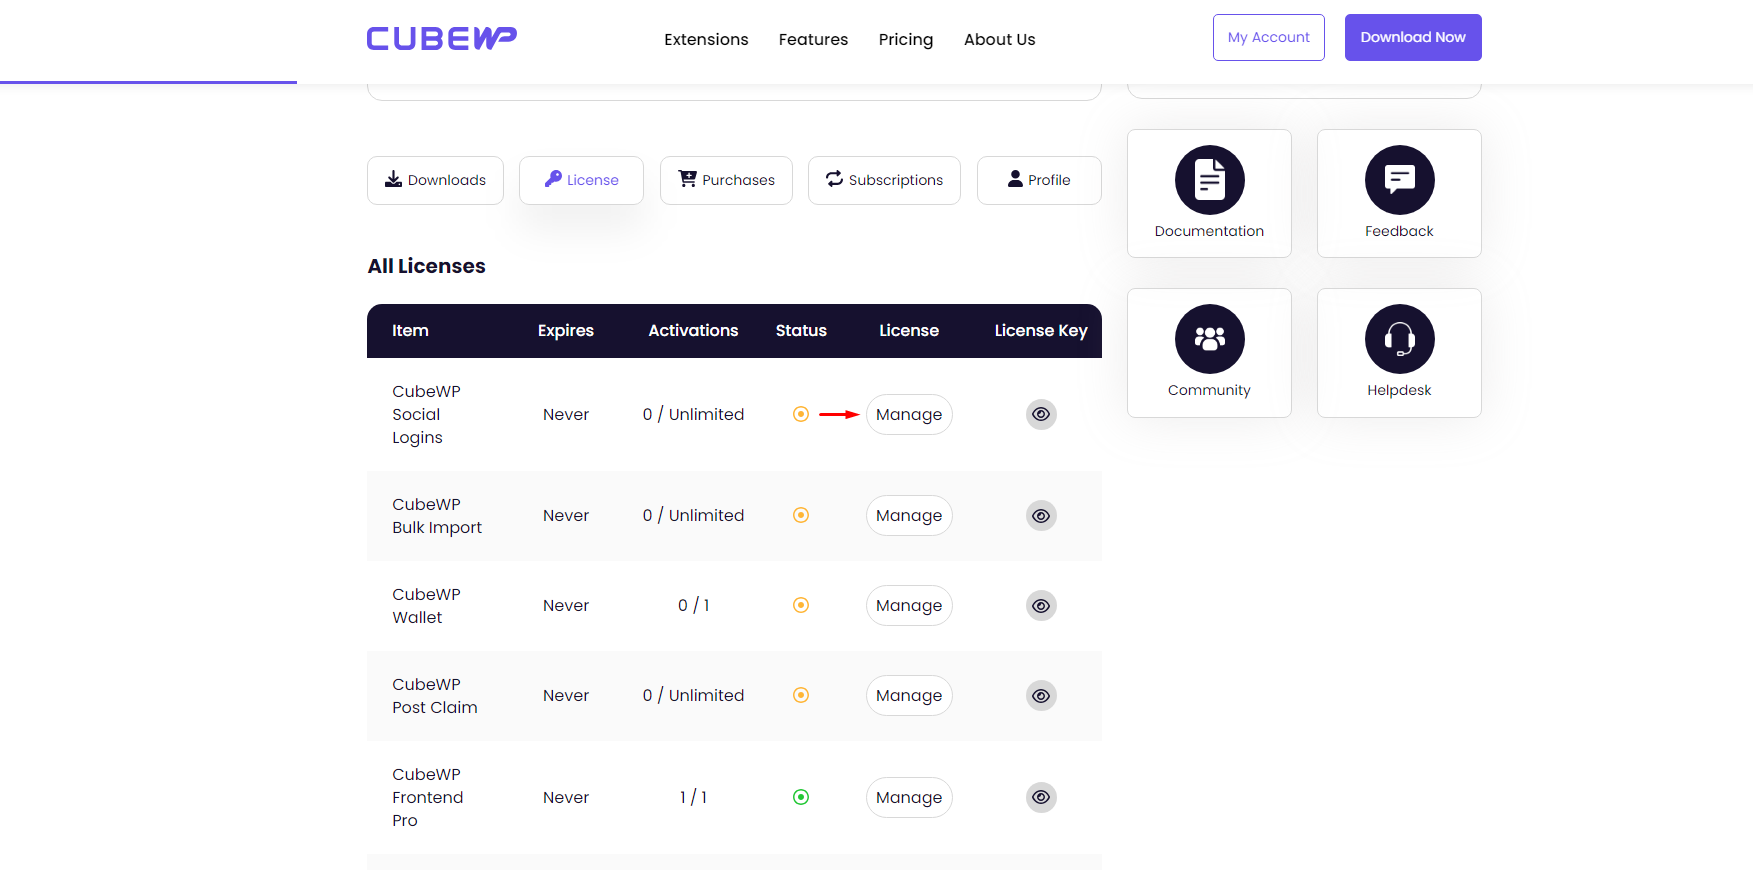
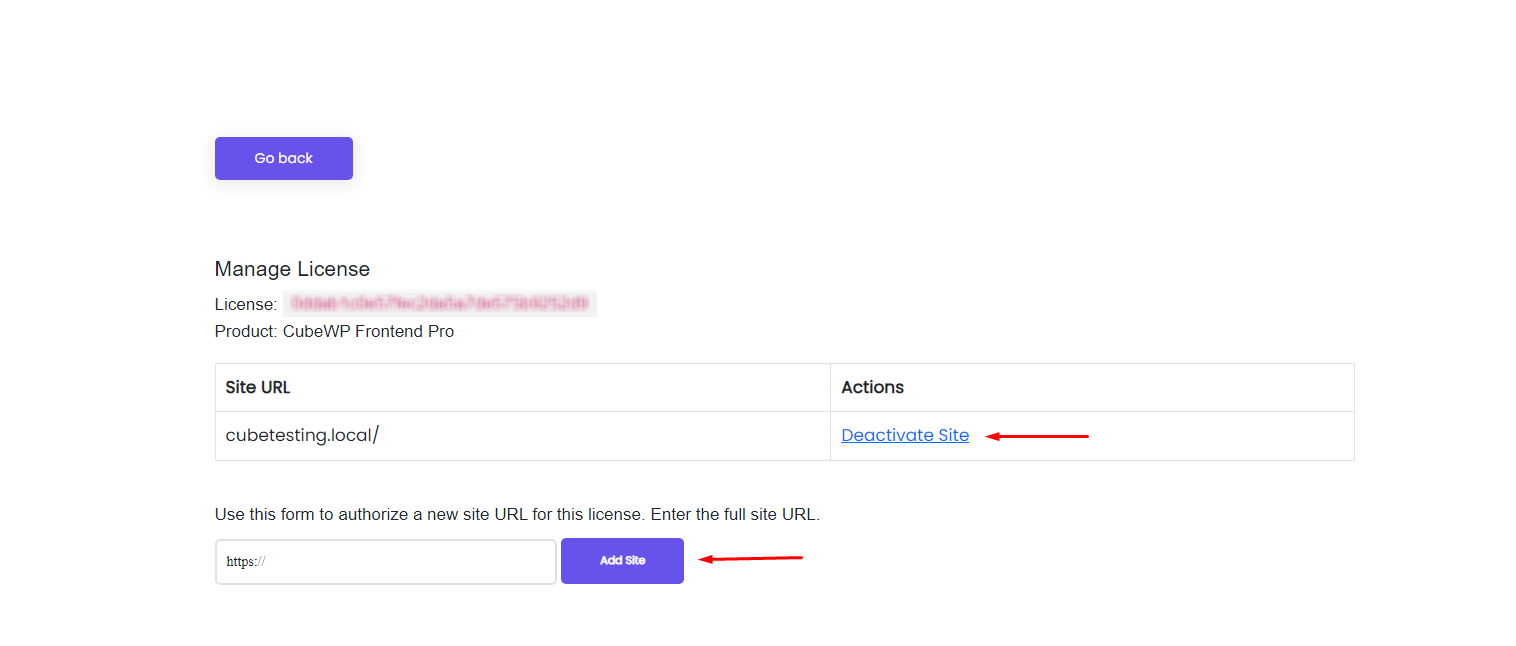
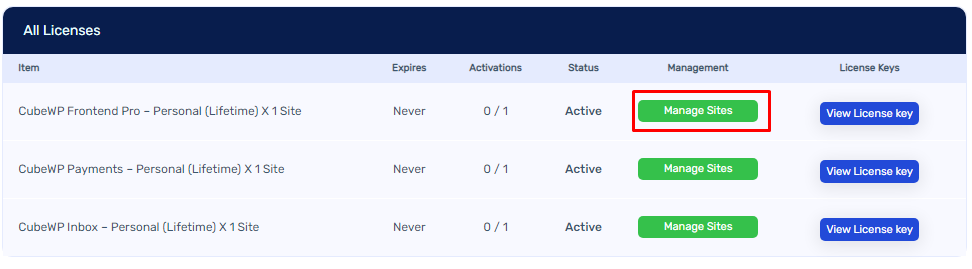
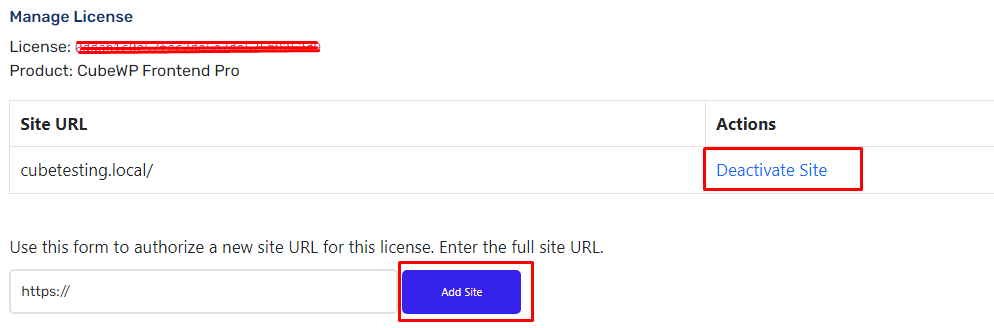
How can I deactivate my license of Theme on my own?

The Theme is dependent on the Paid CubeWP add-ons, and the add-ons have only one website activate limit, You can manage your licensesby your own self.

  • Go to My Account
  • Click on Licenses
  • Click on Manage
my-accouunt
  • Deactivate your Previous website
  • Add your New website URL
manage

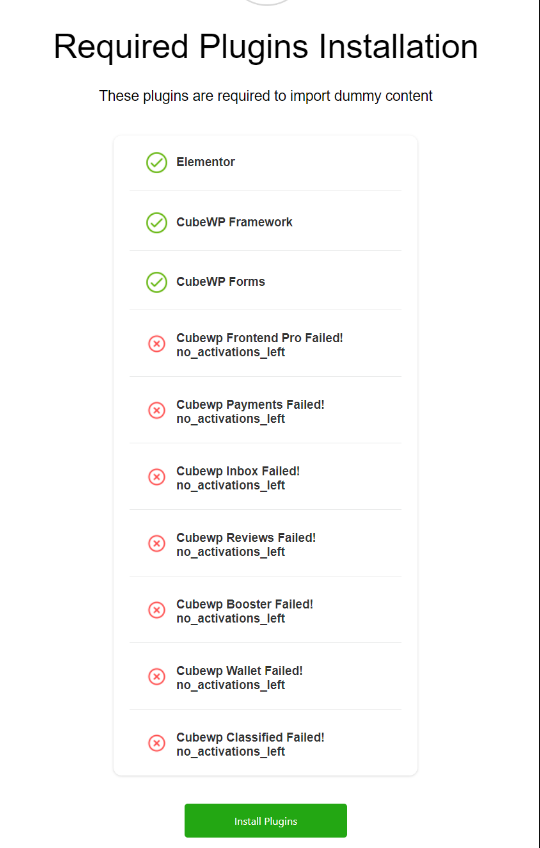
Facing No_activations_left after entering license code

image

It seems that your license is already activated on another domain. In this scenario, you would need to deactivate the license from the previous website before attempting to activate it again on a new one. To do so, you can follow the steps mentioned below:

  • Go to the website  CubeWP.com
  • Log in with the registered email and the password is your purchase code 
  • Go to My Account
  • Click on the License tab
image
  • Deactivate the license from your account
  • Attempt to activate the license on the new website by entering the website URL

Ads

On-site ad campaigns

On-Site Ad Campaigns: Boost Your Listings with ClassifiAd’s Featured Ad Campaigns

Running successful ad campaigns is crucial for increasing the visibility and engagement of your listings, and the ClassifiAd theme makes this easier with its On-site Ad Campaigns feature. Through this system, users can promote their ads to Featured Listings, ensuring premium placement and maximum exposure on the platform.

Why Promote to a Featured Listing?

Promoting your ad to a Featured Listing offers several advantages that can significantly improve the visibility of your listing:

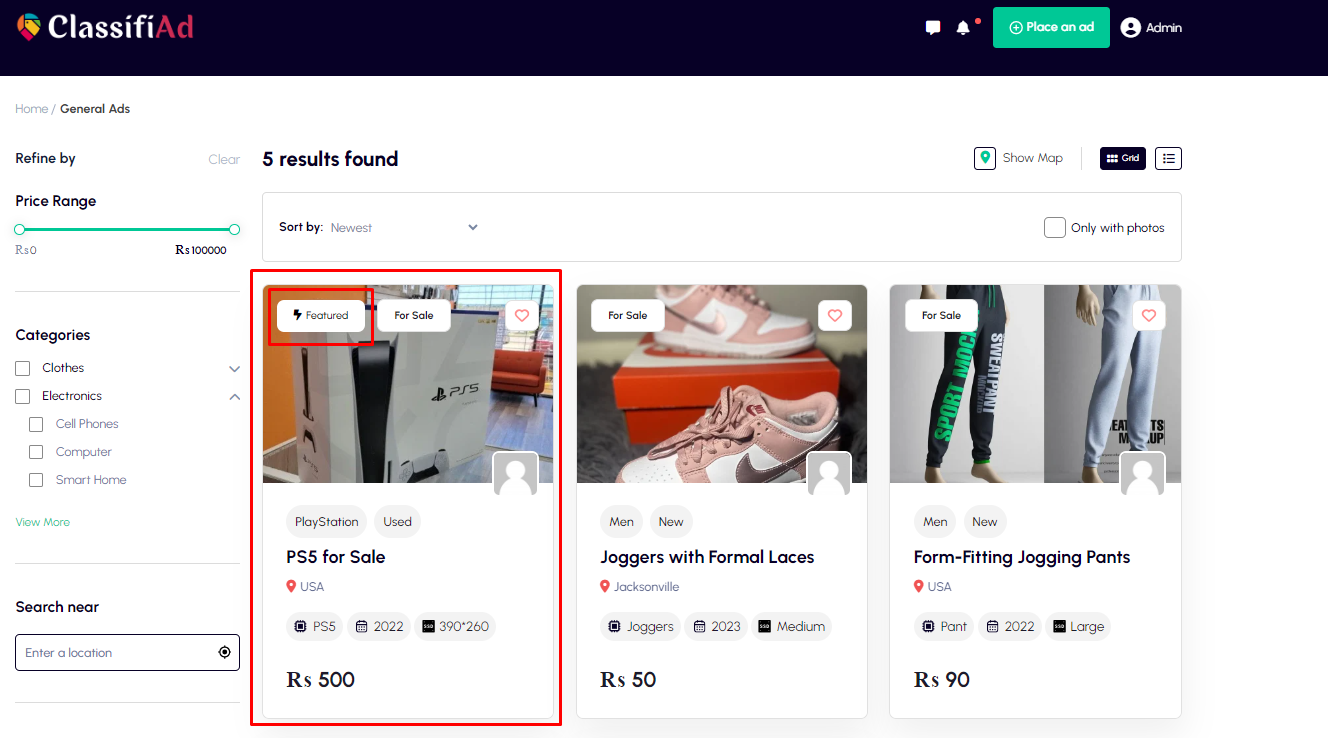
Premium Placement: Your listing is pushed to the top of the search results, making it one of the first ads users see.
Top of Listings/Results: Featured ads appear prominently in the most visible areas of the listing pages, improving the chances of user engagement.
Highlighted Styling: Featured ads are styled differently, drawing attention with unique visuals to make them stand out among regular listings.
Boosted Visibility: With these features combined, your listing gets more views and interactions, helping it gain priority over competing ads.

Step-by-Step Process: How to Run a Featured Ad Campaign

The ClassifiAd theme makes it simple for users to launch their own featured ad campaigns. Here’s a step-by-step guide:

1. Access the User Dashboard: Log into your account and navigate to your User Dashboard.

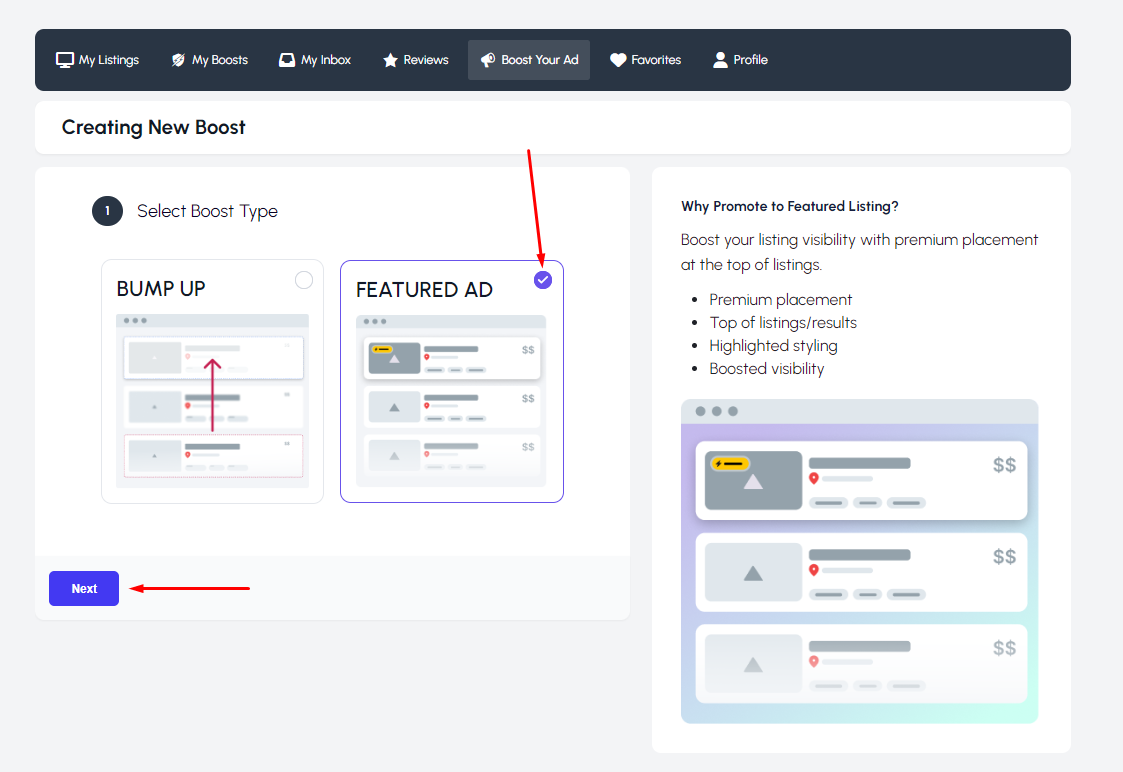
2. Boost Your Ad: In the dashboard, click on the Boost Your Ad section. This will take you to the boost campaign options for your existing posts.

3. Select the Boost Type: From the list of available post types, select the one for which you want to boost the ad. Then, click on New Boost to start the promotion process.

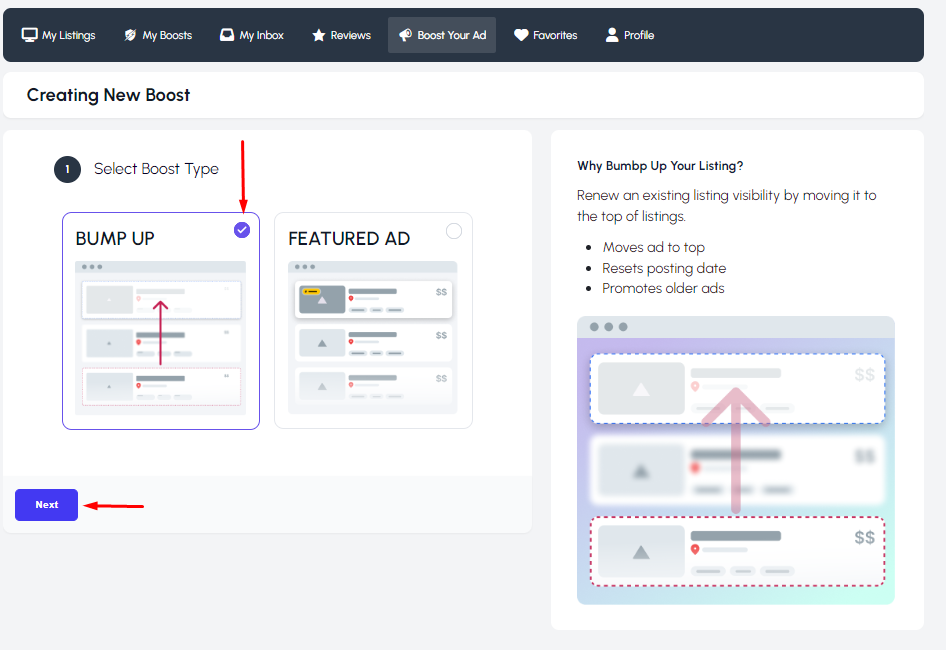
4. Choose Boost Option: Two types of boost options will appear:
Bump Up: This pushes your ad higher in the listing but does not provide the enhanced visibility of a featured ad.
Featured Ad: Select Featured Ad to ensure premium placement with all the advantages listed above.

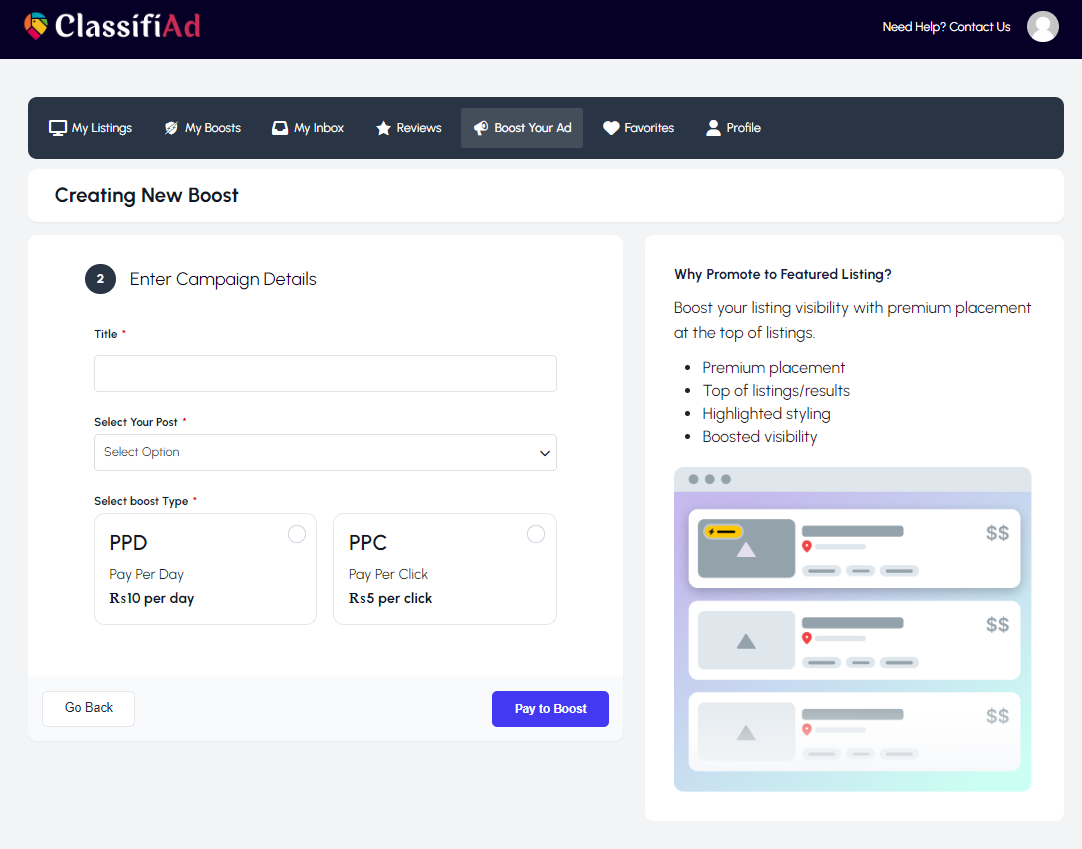
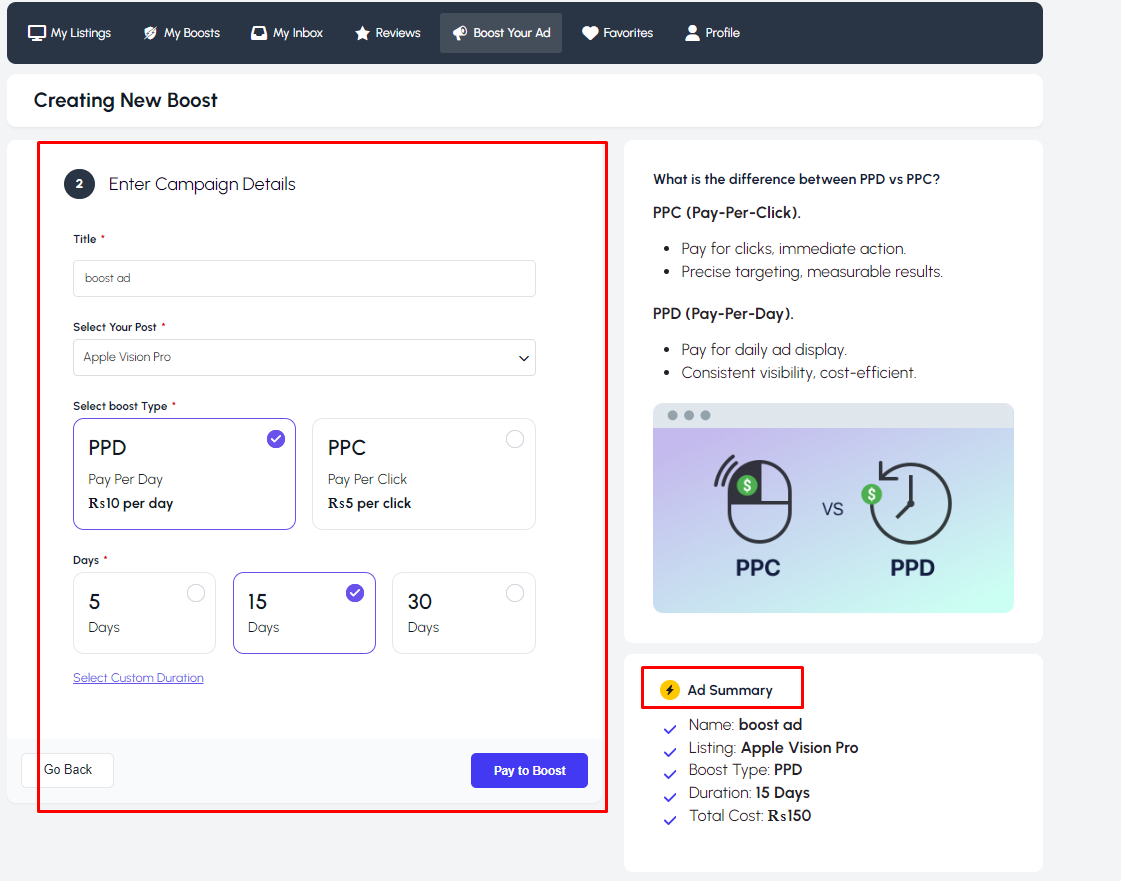
5. Enter Ad Details:
– Enter the Title of your ad.
– Select the Post you want to run the ad for (from your available listings).
6. Select Boost Type:
– Choose between two payment models:
Pay Per Click: Pay based on the number of clicks the ad receives.
Pay Per Day: Pay a flat fee for the number of days you want your ad to remain featured.

7. Select Pay Per Day:
– If you choose Pay Per Day, select the number of days you want your ad to be featured.

8. Ad Summary: You will see an Ad Summary on the right-hand sidebar at the bottom. This summary displays the details of your promotion, including cost, duration, and ad type.

The price displays as Pay per click and Pay per day can be set from Cubewp >> Post type forms
Select post type as Booster and then press Form settings then at the bottom of the form you can see the amount set for Ads rates.


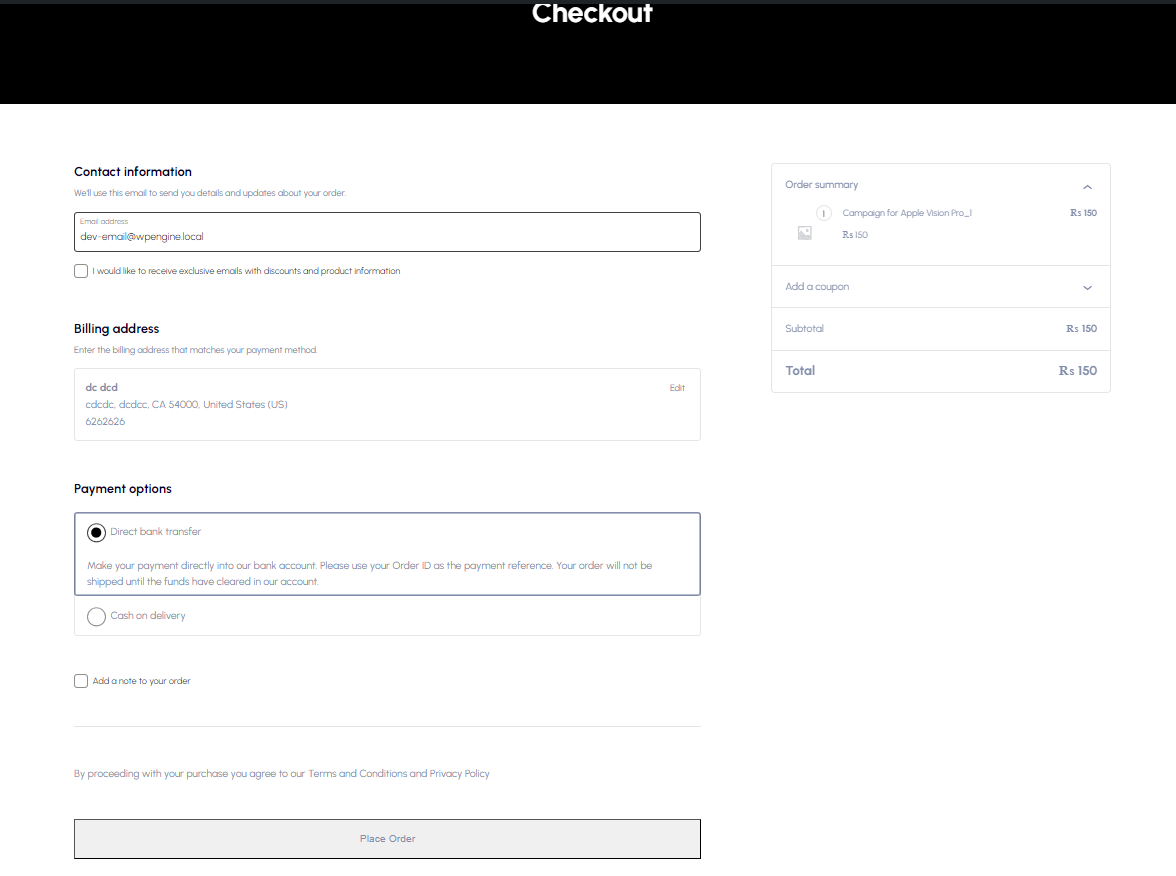
9. Payment and Checkout: Click on Pay to Boost to proceed to the checkout page. Enter your payment information, select your payment option, and press Place Order.


10. Order Completion: Once the payment is processed, the system will create the order. Now, the admin needs to confirm the order.

11. Admin Payment Processing: The admin will manually complete the payment process by marking the order as completed in the system.


How the Ad Displays

Once your ad promotion is complete and the payment is confirmed, your Featured Ad will display as:

Conclusion

ClassifiAd’s On-site Ad Campaigns allow users to maximize the visibility of their listings through Featured Ads. The easy-to-follow process ensures that you can boost your ads quickly and effectively, giving your posts the spotlight they deserve. By promoting your listings through Premium Placement, you can increase the chances of driving more traffic and engagement, ultimately leading to better conversions.

Take control of your ads and boost them today with ClassifiAd!

Bump-up ad campaigns

Bump Up Ad Campaign: Renew Your Listing’s Visibility

In the competitive world of classified listings, keeping your ad visible and relevant is essential to attracting potential buyers or clients. The Bump Up Ad Campaign feature in the ClassifiAd theme allows you to revitalize an older ad by renewing its visibility and moving it to the top of the listings. Here’s why and how you should take advantage of the Bump Up option.

Why Bump Up Your Listing?

As new listings continue to get posted, older ads can gradually move down the page, becoming less visible to users browsing the site. With the Bump Up feature, you can renew an existing listing’s visibility by pushing it back to the top of the search results. Here’s why this is beneficial:

Moves Ad to Top: The Bump Up option immediately moves your ad to the top of the listings, making it one of the first ads that users see when they search for relevant categories. This increased visibility can lead to more clicks and inquiries, reviving interest in your ad.

Resets Posting Date: When you Bump Up an ad, the posting date resets, making the listing appear as if it were freshly posted. This gives your ad the advantage of appearing more relevant and up-to-date, even if it was initially posted weeks or months ago.

Promotes Older Ads: Older ads often get overlooked as users gravitate toward newer posts. Bump Up helps you promote these older ads without having to create a new listing from scratch, allowing you to extend the life and visibility of your previous posts.

Step-by-Step Process: How to Run a Featured Ad Campaign

The ClassifiAd theme makes it simple for users to launch their own featured ad campaigns. Here’s a step-by-step guide:

1. Access the User Dashboard: Log into your account and navigate to your User Dashboard.

2. Boost Your Ad: In the dashboard, click on the Boost Your Ad section. This will take you to the boost campaign options for your existing posts.

3. Select the Boost Type: From the list of available post types, select the one for which you want to boost the ad. Then, click on New Boost to start the promotion process.

4. Choose Boost Option: Two types of boost options will appear:
Bump Up: This pushes your ad higher in the listing but does not provide the enhanced visibility of a featured ad.
Featured Ad: To ensure premium placement with all the advantages listed above.
Select Bump Up boost type

5. Enter Ad Details:
– Enter the Title of your ad.
– Select the Post you want to run the ad for (from your available listings).
6. Select Boost Type:
– Select bump up fee:

The price displays can be set from Cubewp >> Post type forms
Select post type as Booster and then press Form settings then at the bottom of the form you can see the amount set for Ads rates.

7. Payment and Checkout: Click on Pay to Boost to proceed to the checkout page. Enter your payment information, select your payment option, and press Place Order.


8. Order Completion: Once the payment is processed, the system will create the order. Now, the admin needs to confirm the order.

9. Admin Payment Processing: The admin will manually complete the payment process by marking the order as completed in the system.


How the Ad Displays

Once your ad promotion is complete and the payment is confirmed, your Featured Ad will display as:

Conclusion

The Bump Up Ad Campaign is a simple yet powerful tool in the ClassifiAd theme that helps you keep your ads visible and relevant. Whether you want to renew the visibility of an older ad or maintain the engagement level of a current post, Bump Up offers a quick and efficient solution to get your listing back at the top. By moving your ad to the top of the search results, resetting its posting date, and giving older listings a fresh boost, you can maximize the visibility of your content and attract more potential buyers or clients.

Use the Bump Up feature today and keep your listings at the forefront of the market!

Boost Your Ad message

Boost Your Ad: Maximize Visibility and Get Noticed!

As an ad owner, you understand that visibility is the key to attracting the right audience. Whether you’re selling a product, offering a service, or promoting an event, the more people who see your ad, the better your chances of achieving success. That’s where the “Boost Your Ad” feature comes in—an easy and effective way to increase your ad’s exposure and make sure it stands out from the crowd!

What is “Boost Your Ad”?

When you post an ad on our platform, it gets listed among many other ads in the same category. While your ad is still accessible, it can quickly get buried under newer posts. To help you keep your ad visible and in front of potential buyers, we’ve introduced the “Boost Your Ad” option.

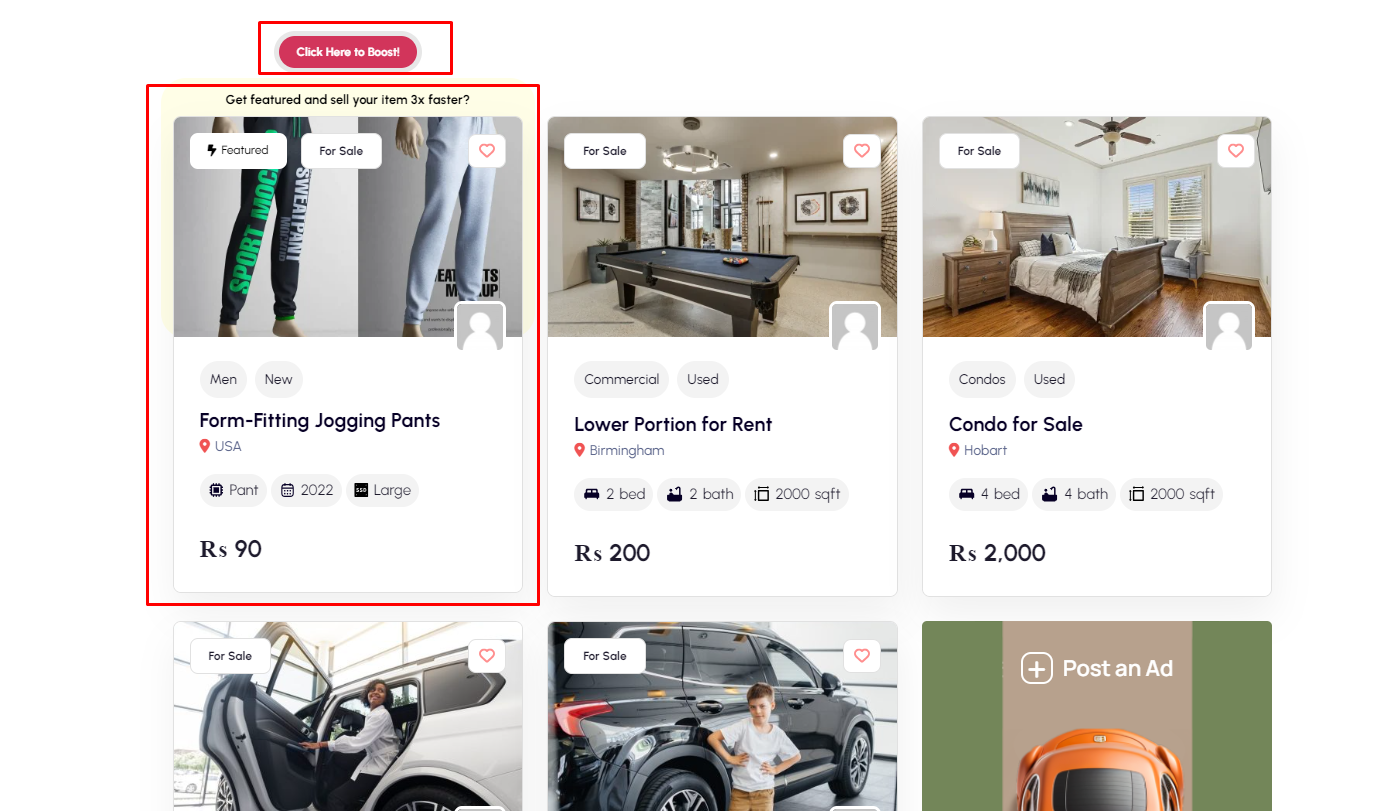
This feature displays a prominent message above your ad card:

Boost Your Ad to reach more potential customers!

Below this message, there will be a “Click here to Boost” button, conveniently placed to encourage users to enhance their ad’s visibility with a simple click.

What Happens When You Click “Boost”?

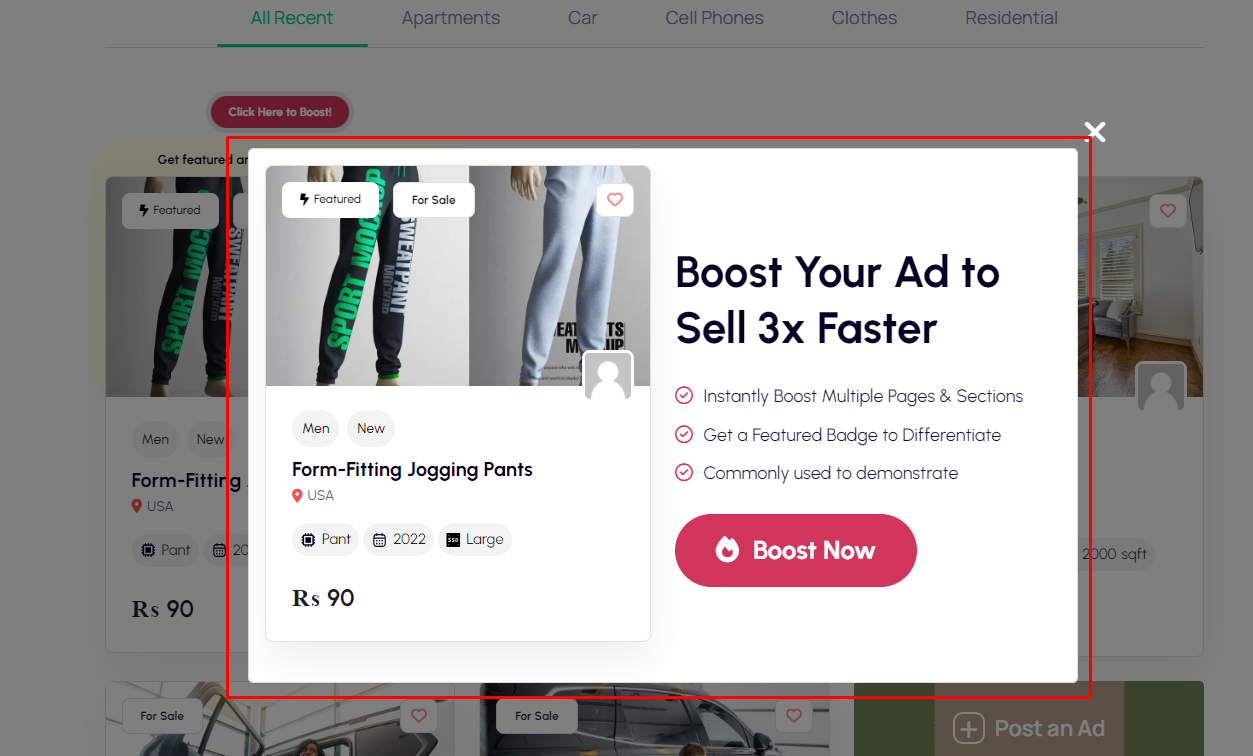
Clicking on the “Click here to Boost” button will open up a popup having Boost Now button which takes you to Booster form. This form allows you to choose from several boosting options, each designed to give your ad the prominence it deserves. Whether you’re looking for a short-term bump in visibility or a longer-lasting feature, our flexible options have you covered.

Why Boost Your Ad?

1. Increase Ad Visibility:A boosted ad gets featured at the top of the listing, ensuring it’s seen by more potential buyers.
2. Get Noticed Faster: Boosting can help your ad grab attention sooner, so you can make a sale or get inquiries in less time.
3. Stand Out from the Competition: By boosting your ad, you’ll gain an edge over other ads in the same category, making yours more likely to catch the eye.
4. Targeted Exposure: When you boost, your ad reaches a larger, more targeted audience—helping you connect with people who are genuinely interested in what you’re offering.

How Easy is it to Boost?

Boosting your ad is as simple as clicking the **”Click here to Boost”** button, choosing a boosting package, and completing the form. It only takes a few moments, and the benefits are immediate. Your ad will be bumped up and highlighted, increasing your chances of a successful sale or response.

Don’t let your ad get lost in the crowd—boost your ad today and ensure it gets the attention it deserves! Whether you’re looking for more views, quicker responses, or increased engagement, boosting is the perfect way to get your ad noticed. Click the button and start seeing the results for yourself!

Editor and Builders

Search form builder using Taxonomies and custom Fields

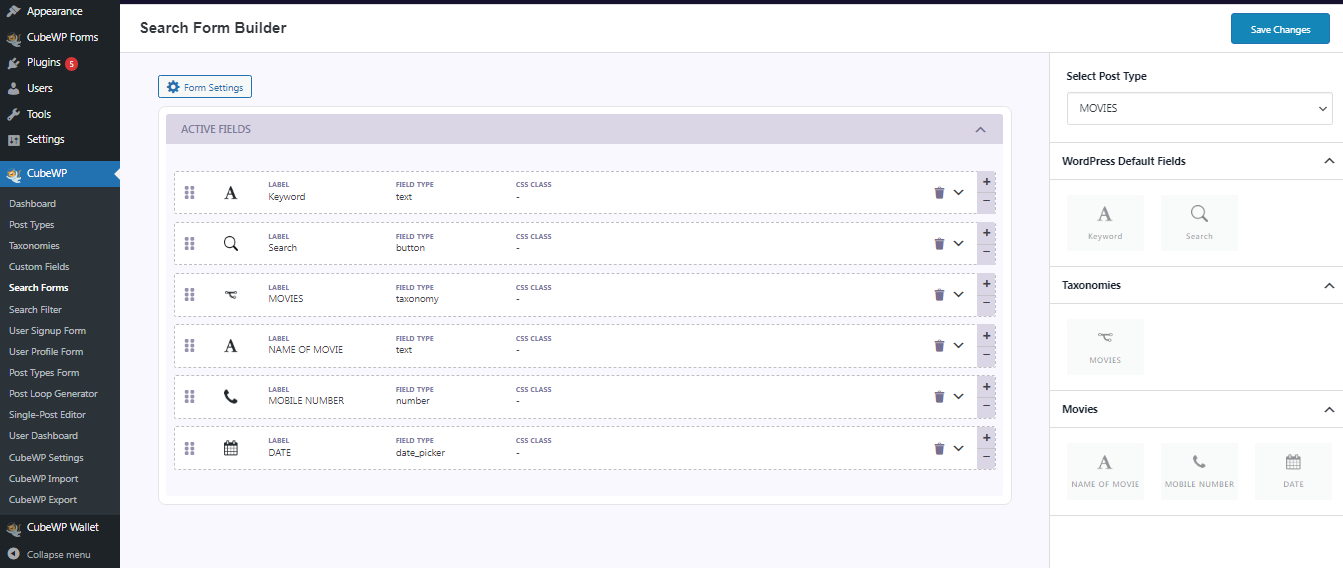
  • Go to CubeWP.
  • Click on Search Forms.
  • A new window will be open.
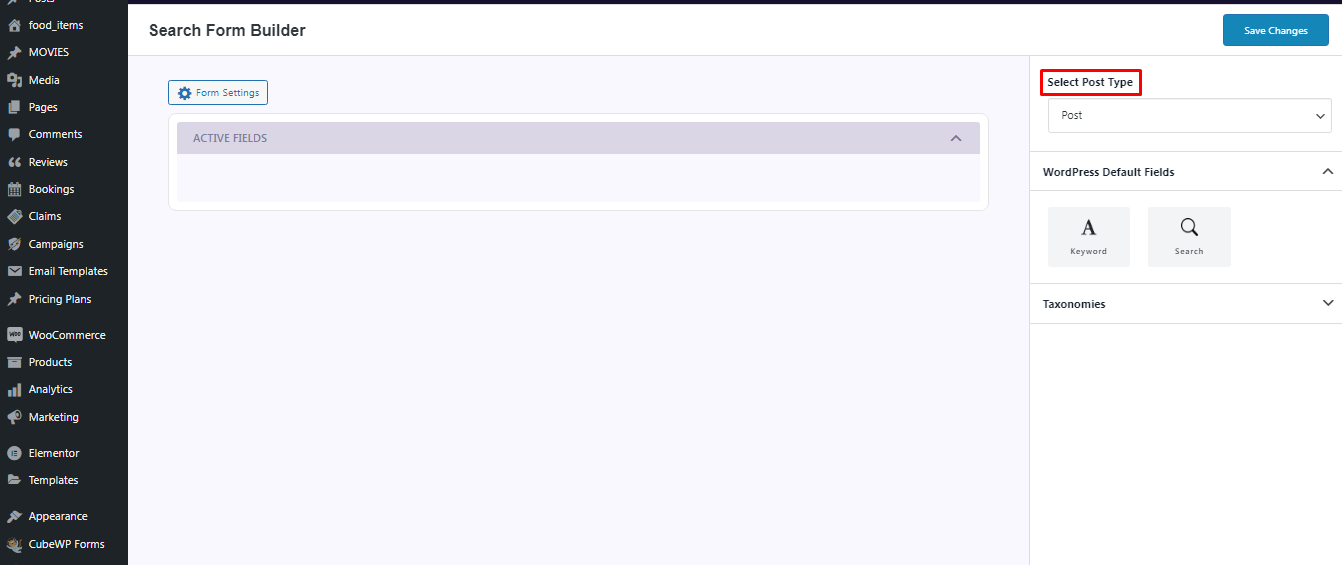
  • Select your Post Type.
  • Add WordPress default fields including Title and Featured Image
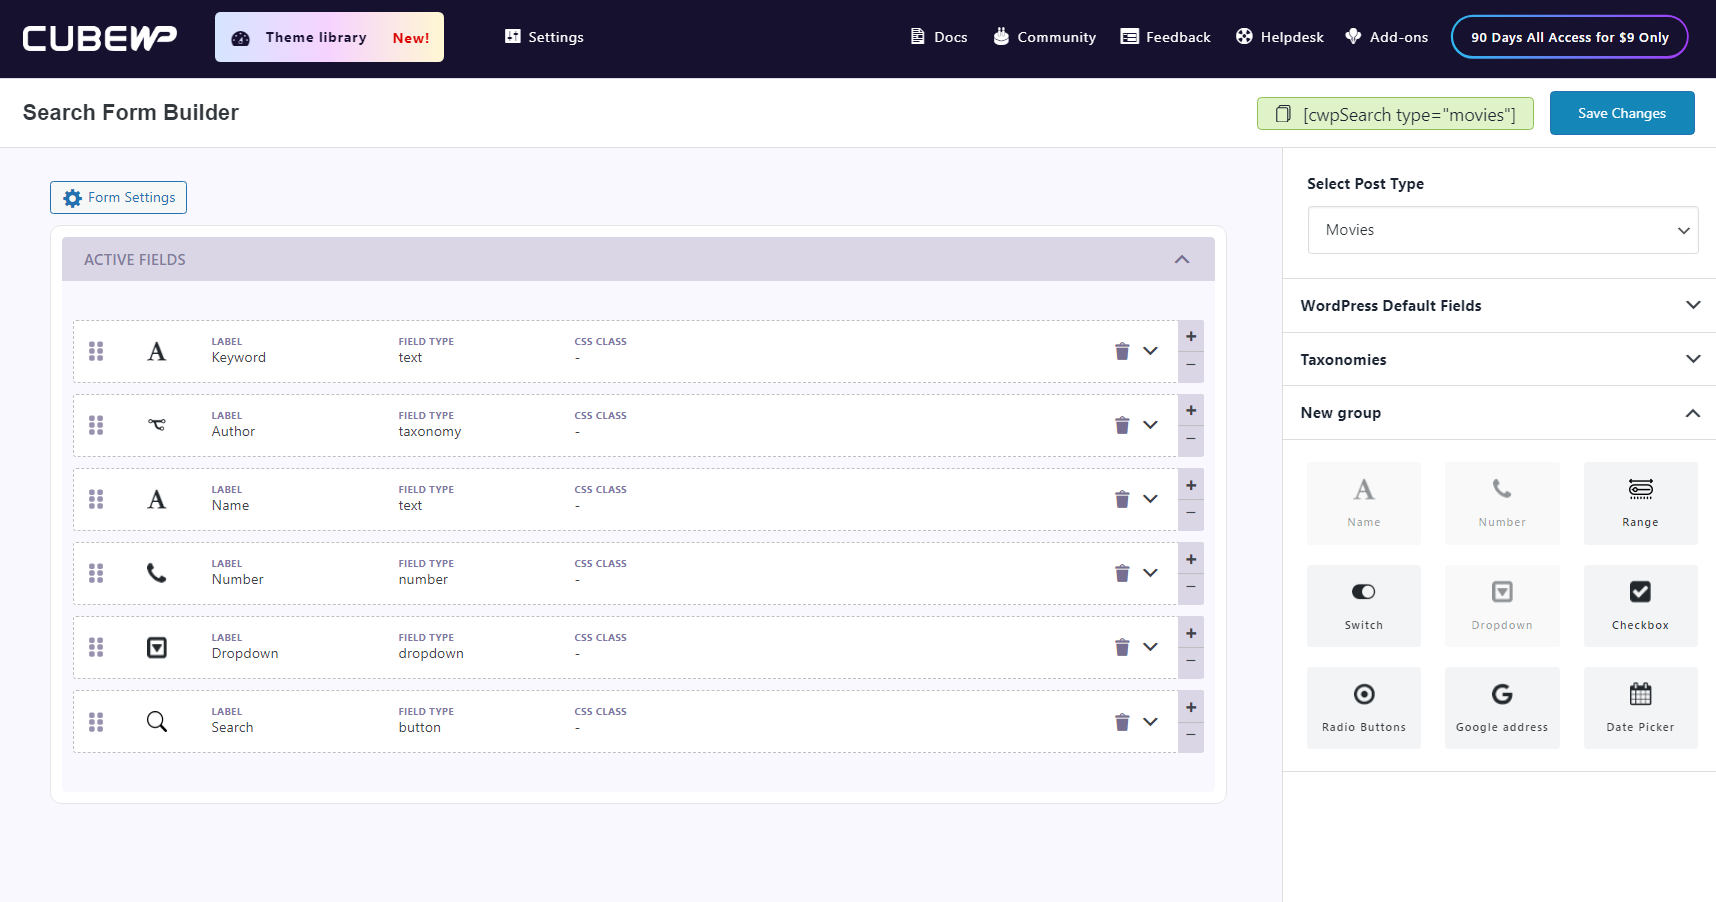
  • Drag and drop the preferred taxonomies and custom fields to the search form. This customisation allows you to include specific criteria for the search.

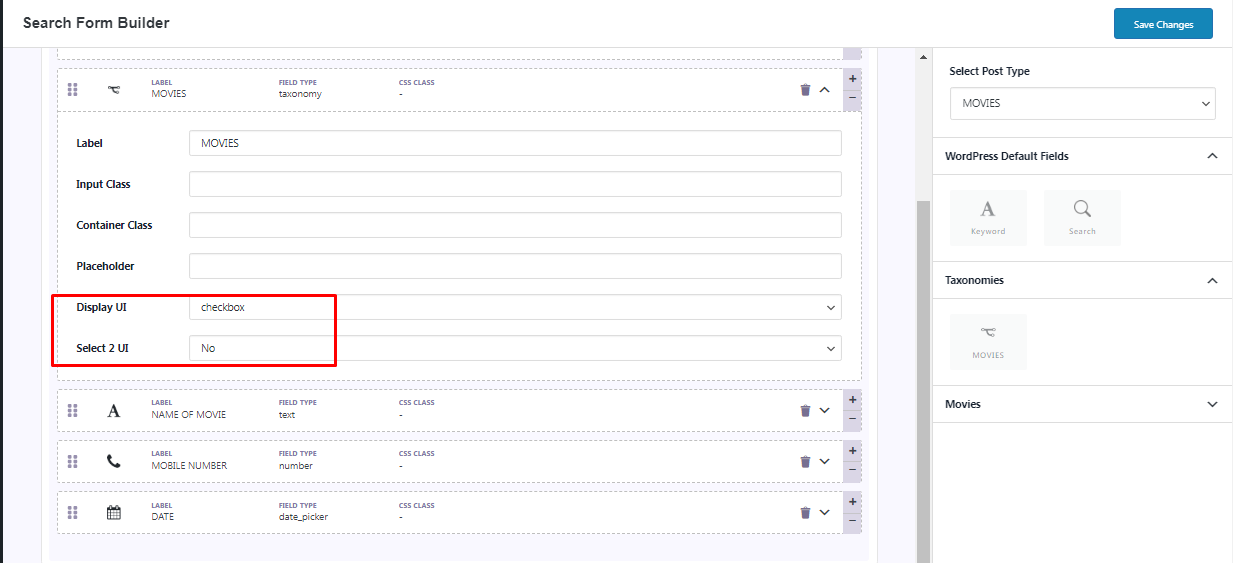
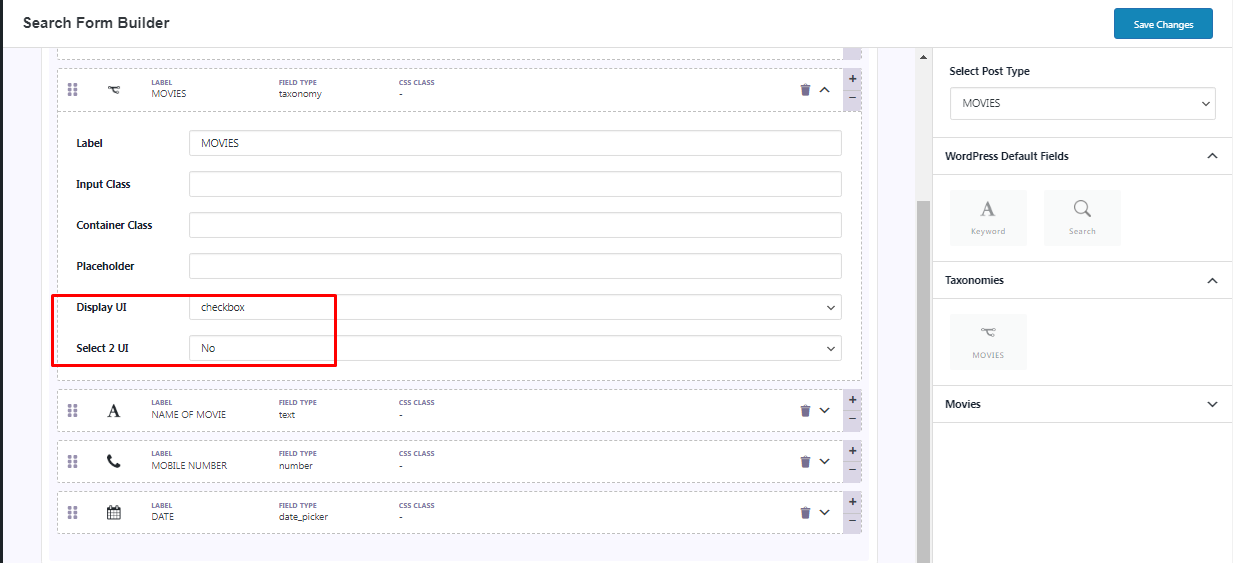
Note:You have the options to customize the appearance of taxonomy based on your needs, such as Checkboxes, Multi-dropdowns, Dropdowns, and the option to choose Select 2 UI.

Note: you can add your custom fields in the search if you have CubeWP FrontendPro

  • Clicking Save Changes will generates a code.
  • Copy that Generated Code.
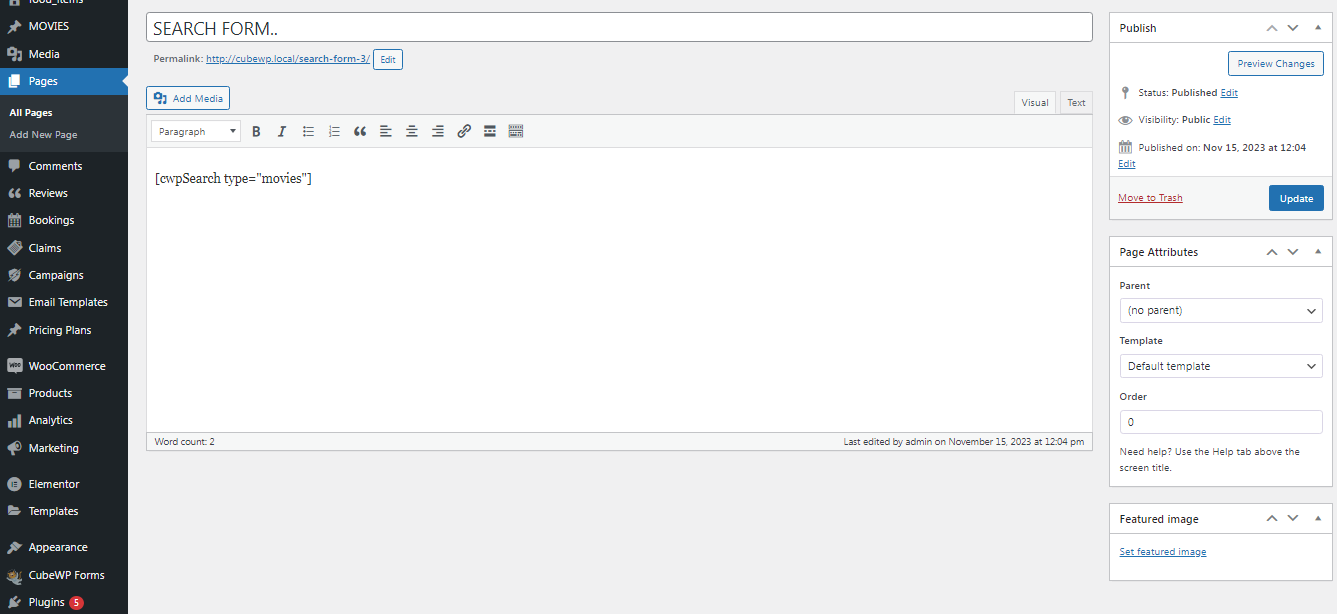
  • Create a new page where you want to display the custom search form.
  • In the content area of the new page, paste the previously copied short-code.
  • Save and publish the page.
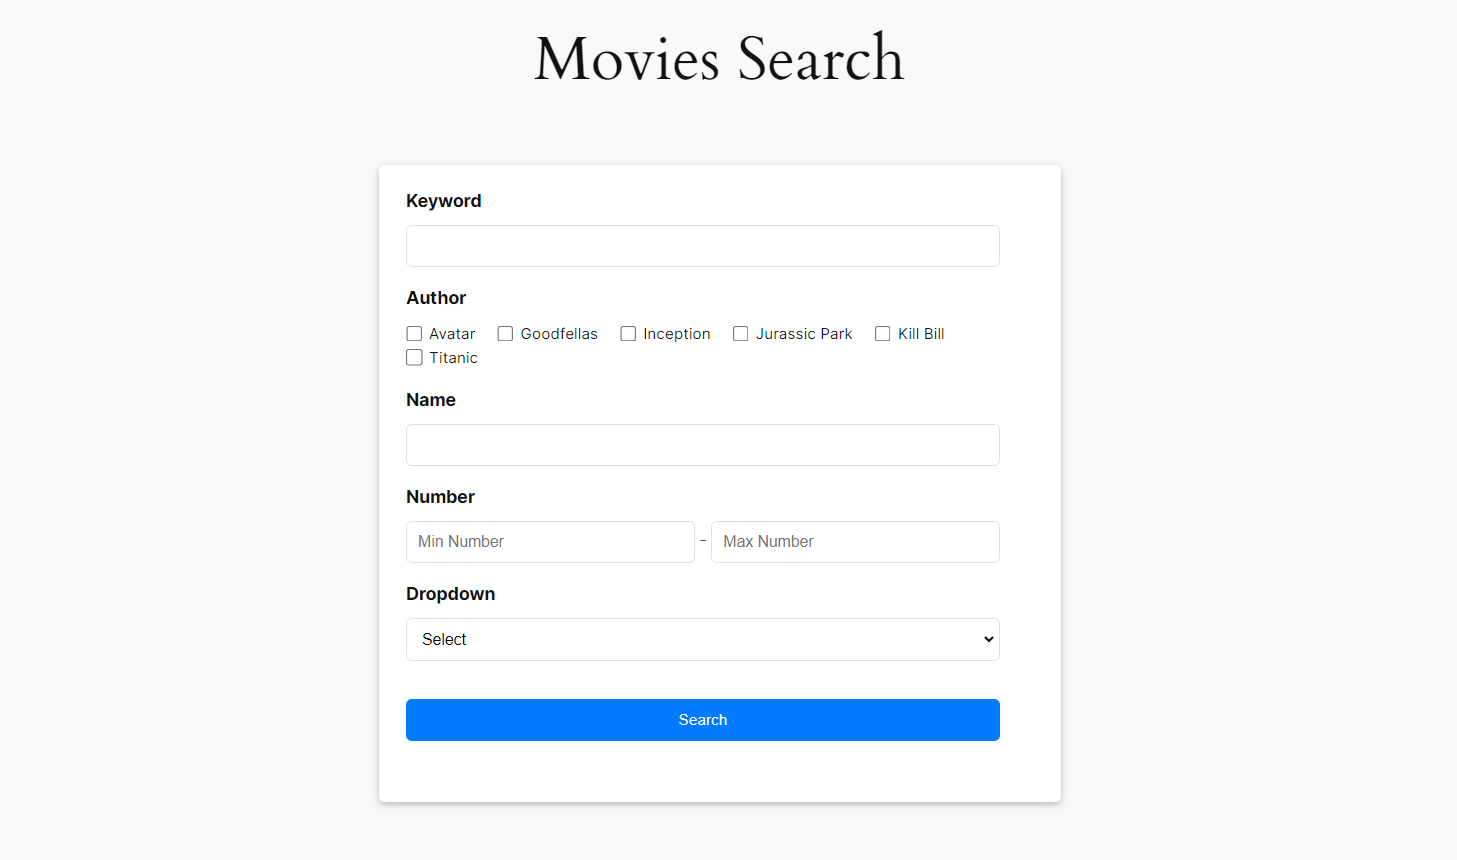
  • Visit the newly created page on your website.
  • Your custom search form is now live and ready for use.

Post Type submission form builder

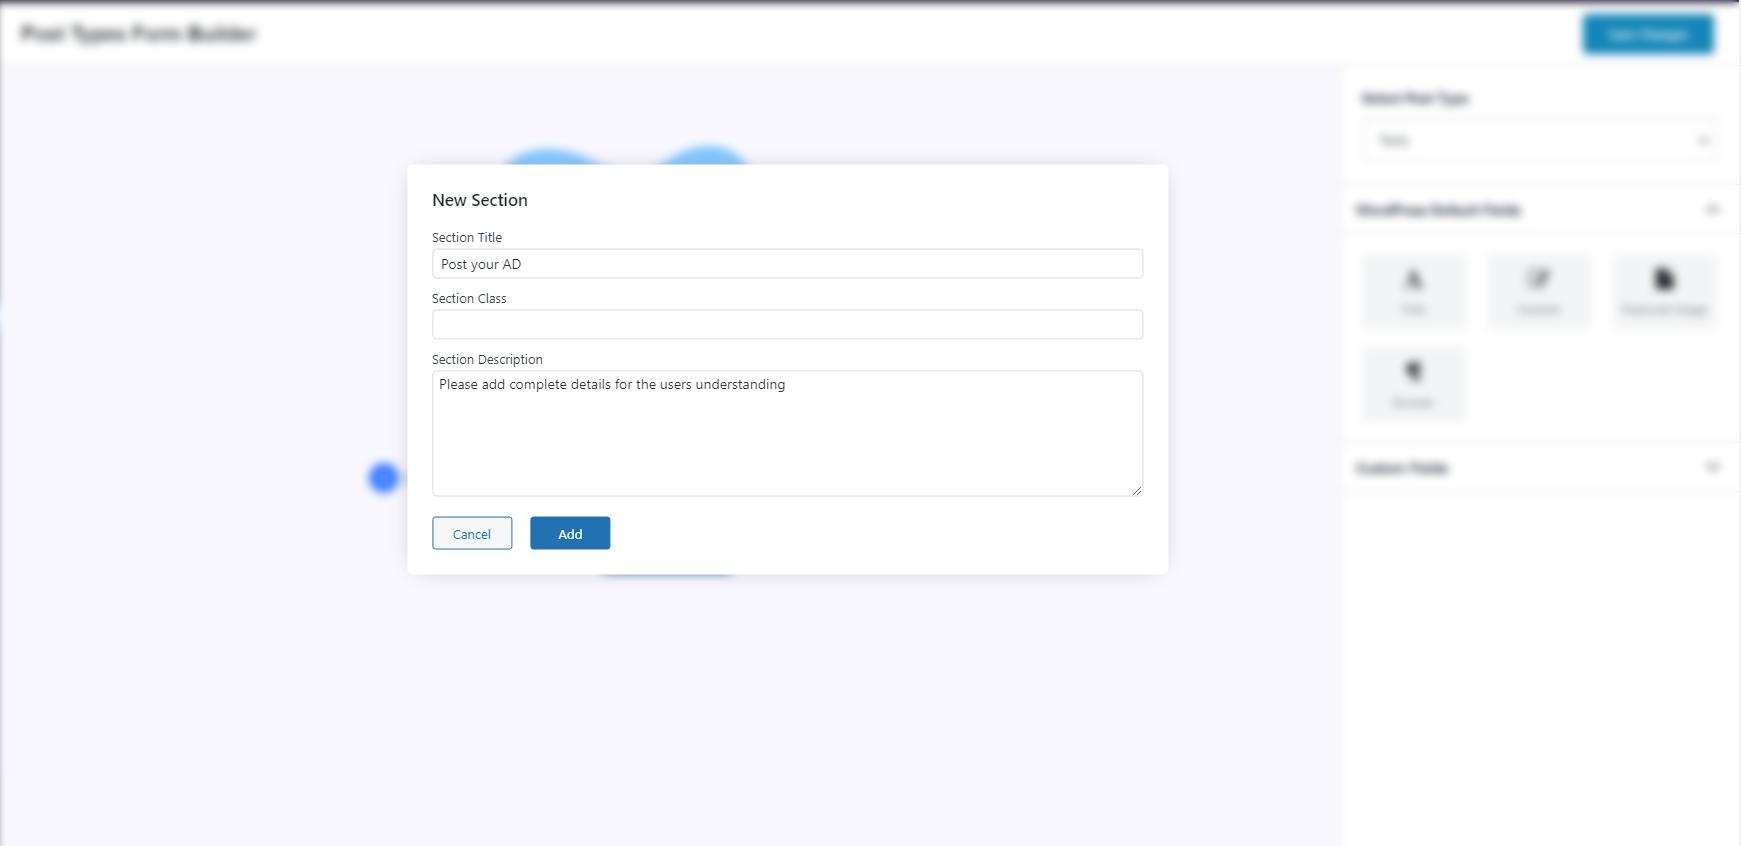
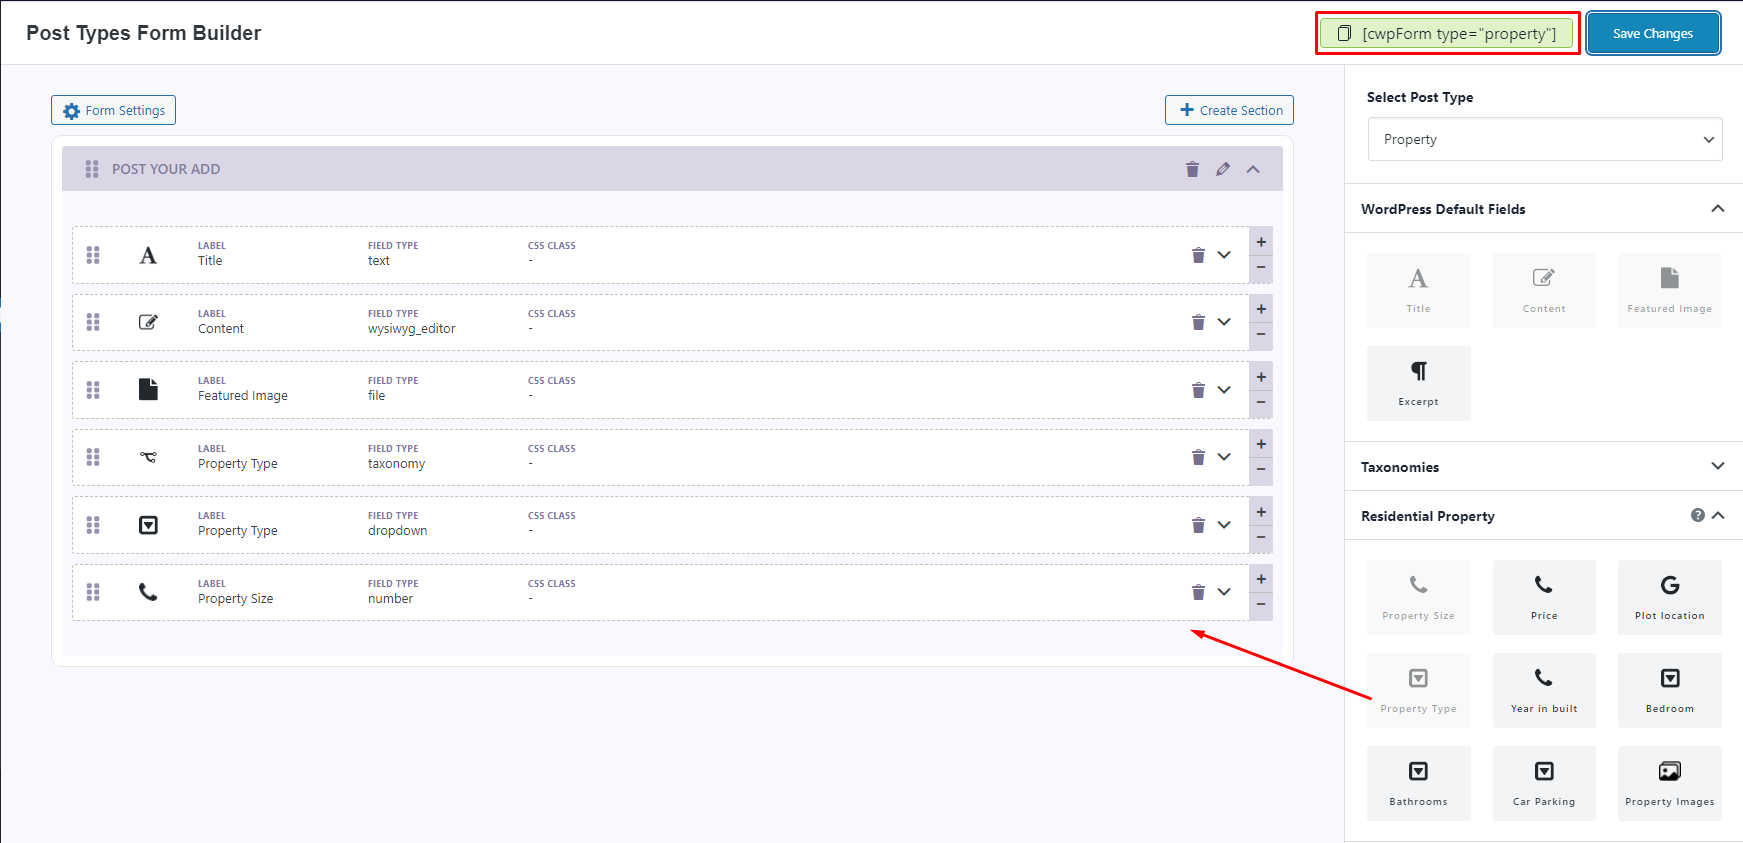
To Create Post Type Form for any Post Type, follow below steps:

  • Go to CubeWP
  • Go to Post Types Form builder
  • Choose the Post Type for which you want to create a form
  • Create a form section
  • Drag your taxonomies and custom fields for users to input additional post information
  • Include mandatory fields like Title and Feature Image
  • Customise field sizes if needed
  • Save your changes
  • Copy Short-code

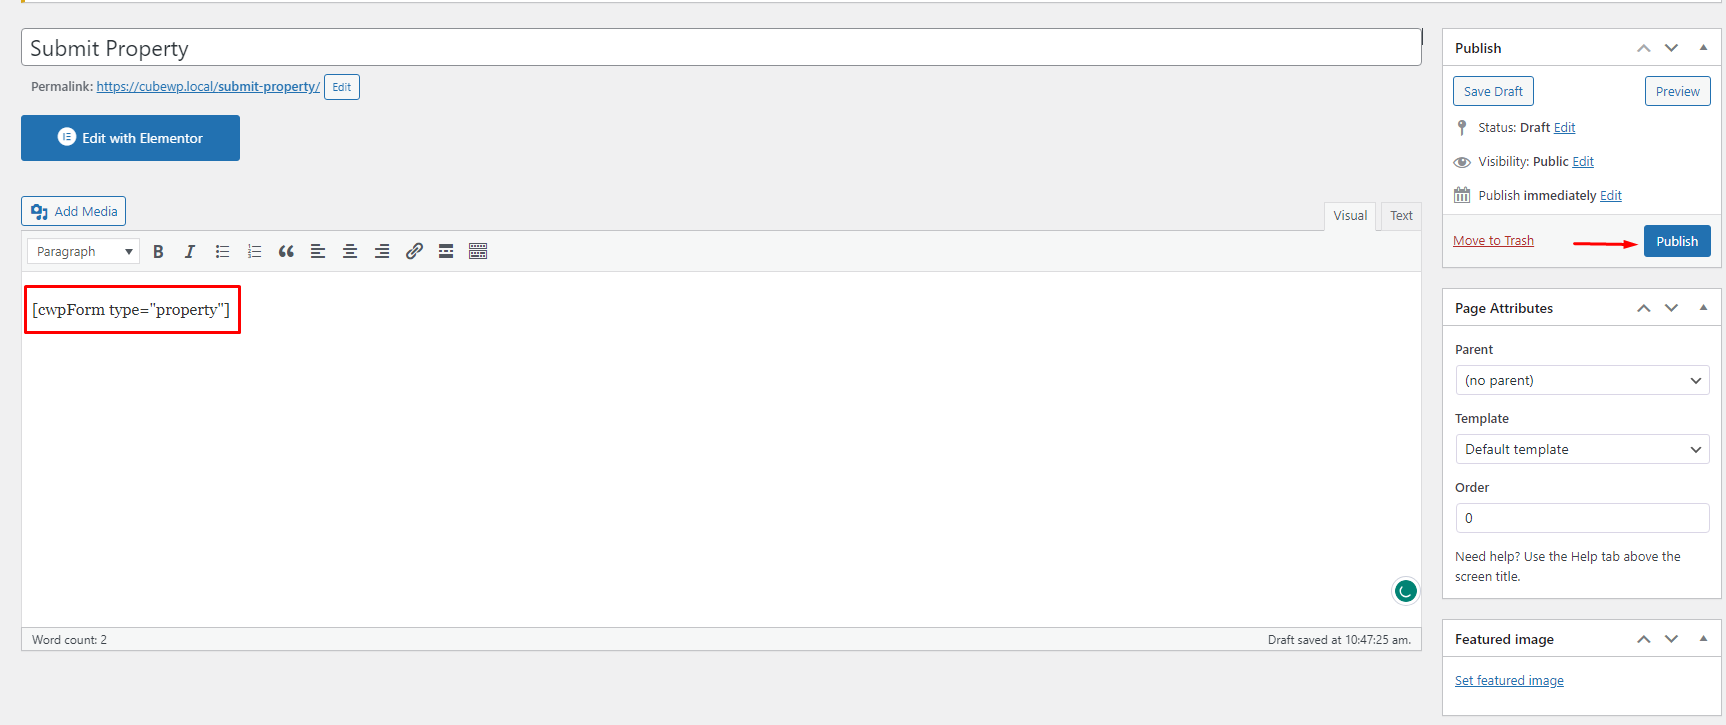
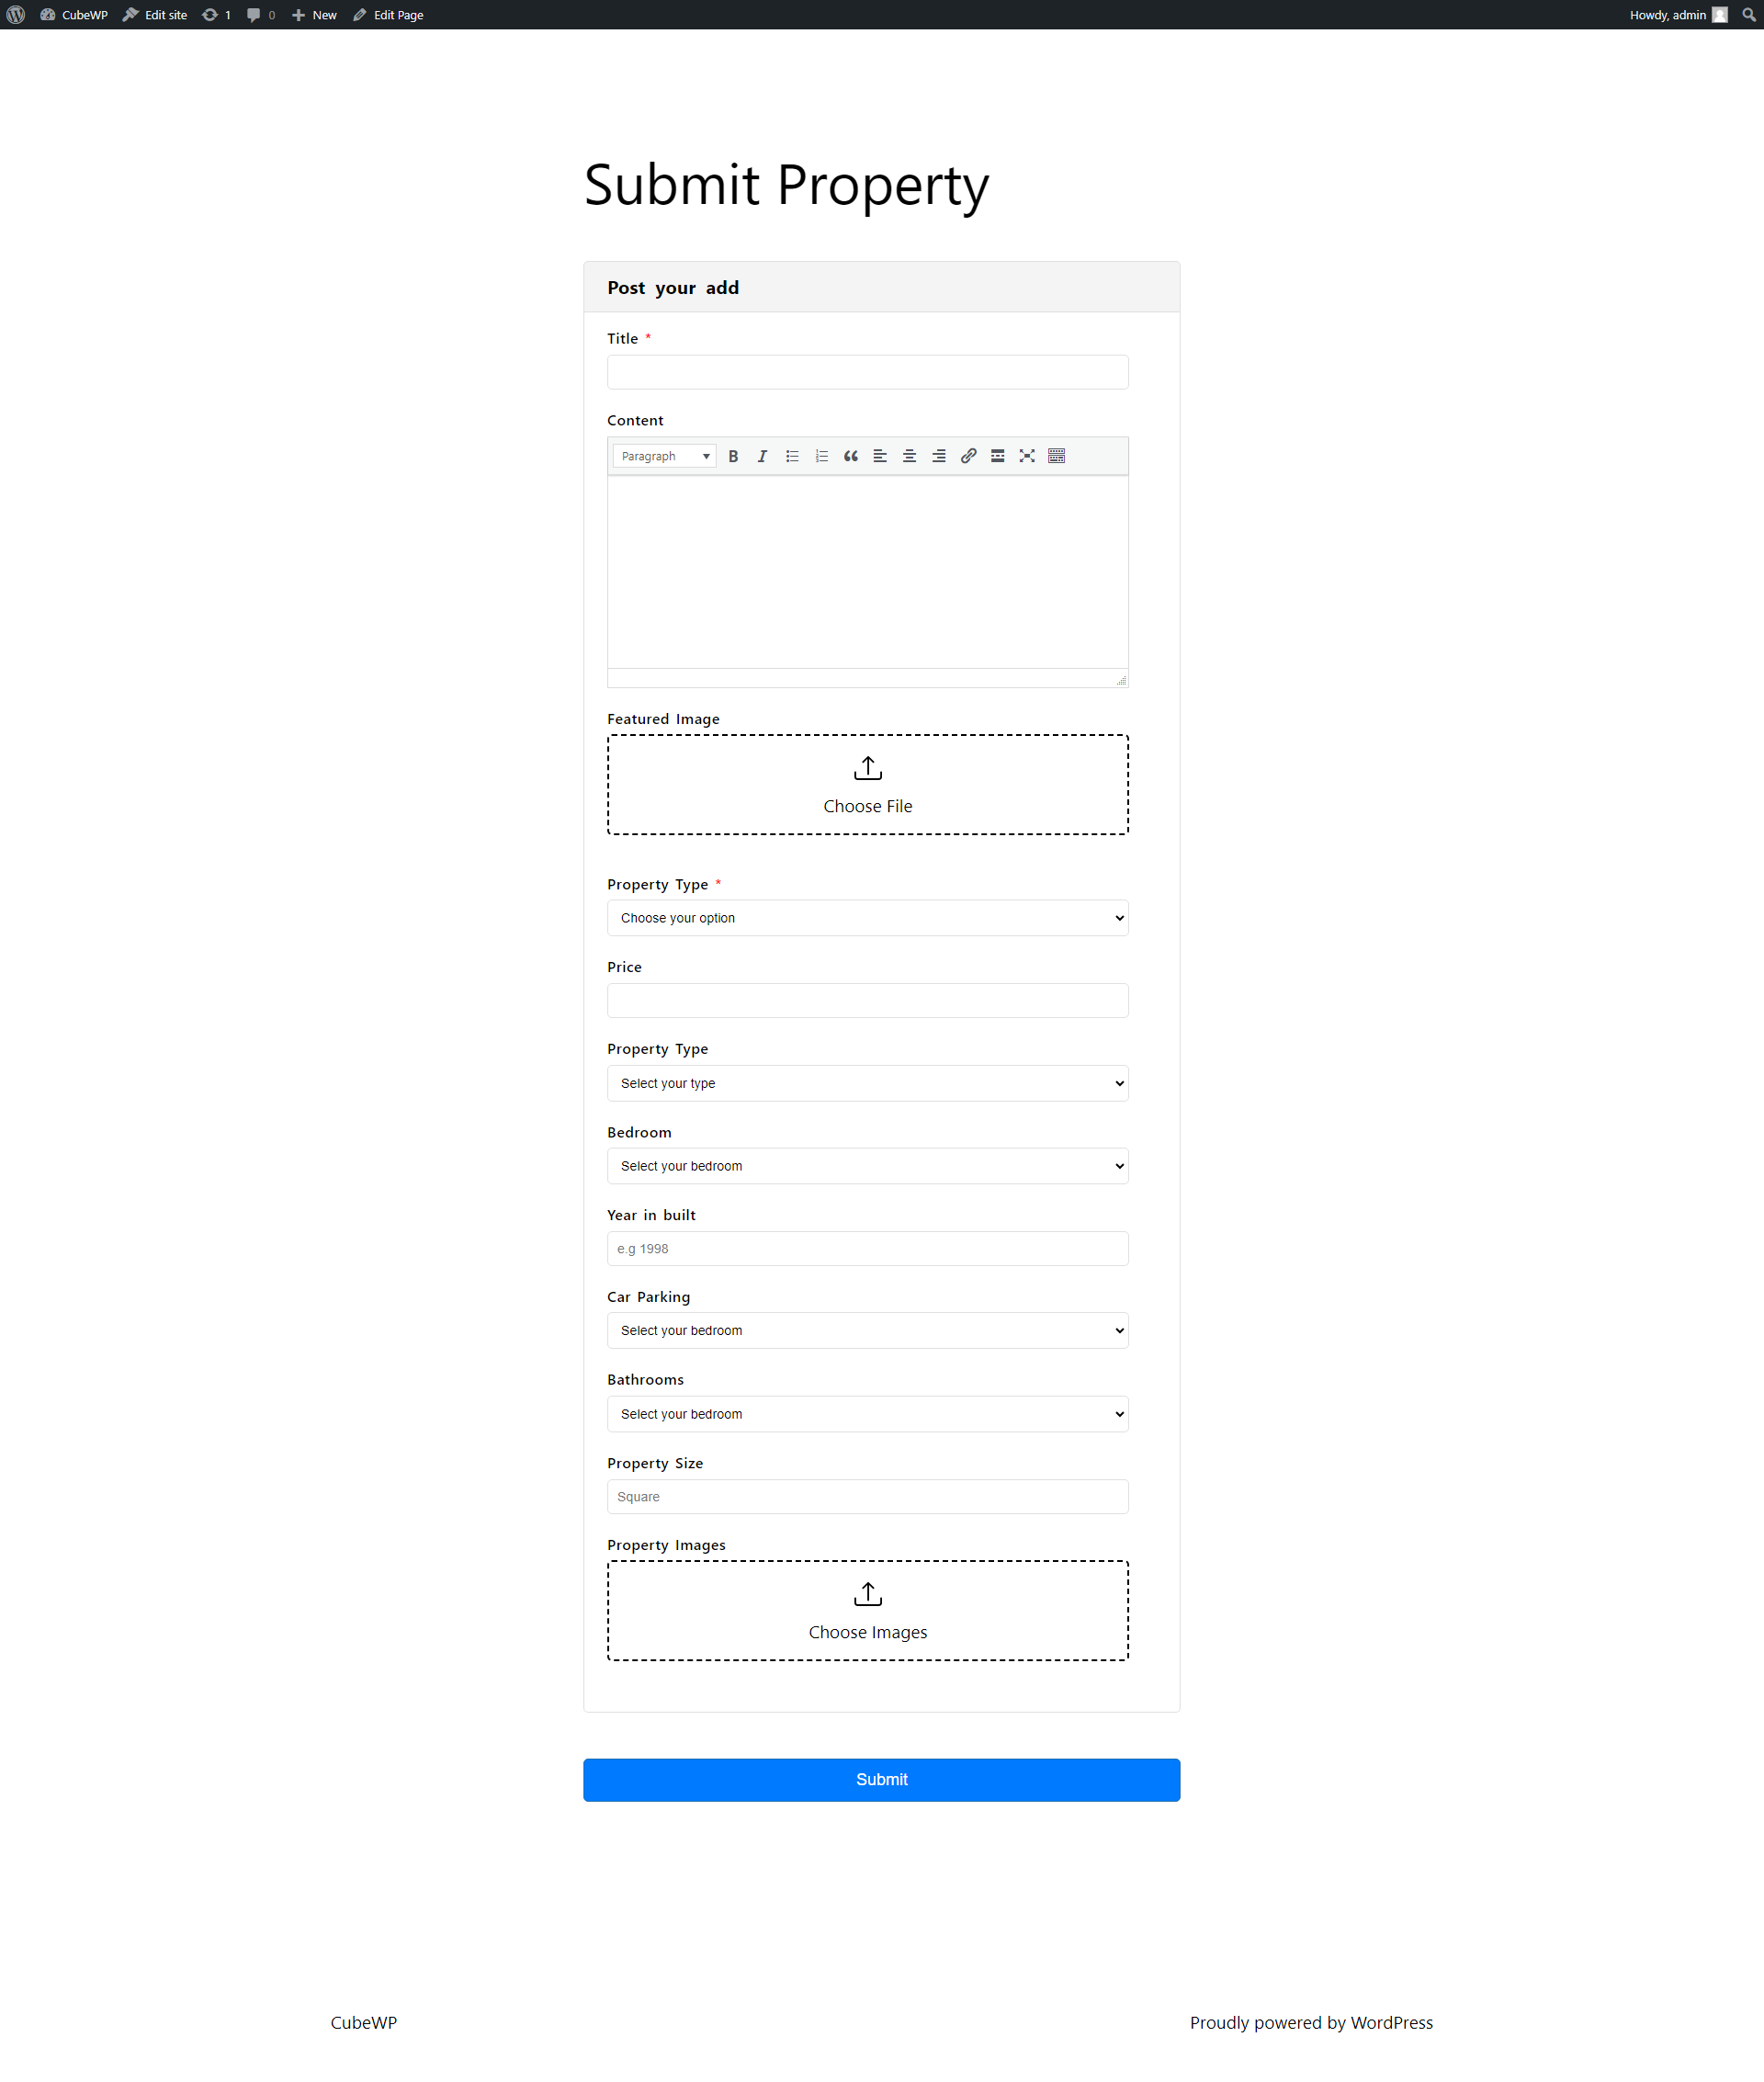
To show this form on frontend, follow the below steps:

  • Go to Pages
  • Create a New Page
  • Paste the shortcode into the page content area
  • Publish the page

Search Filter builder using Custom Fields

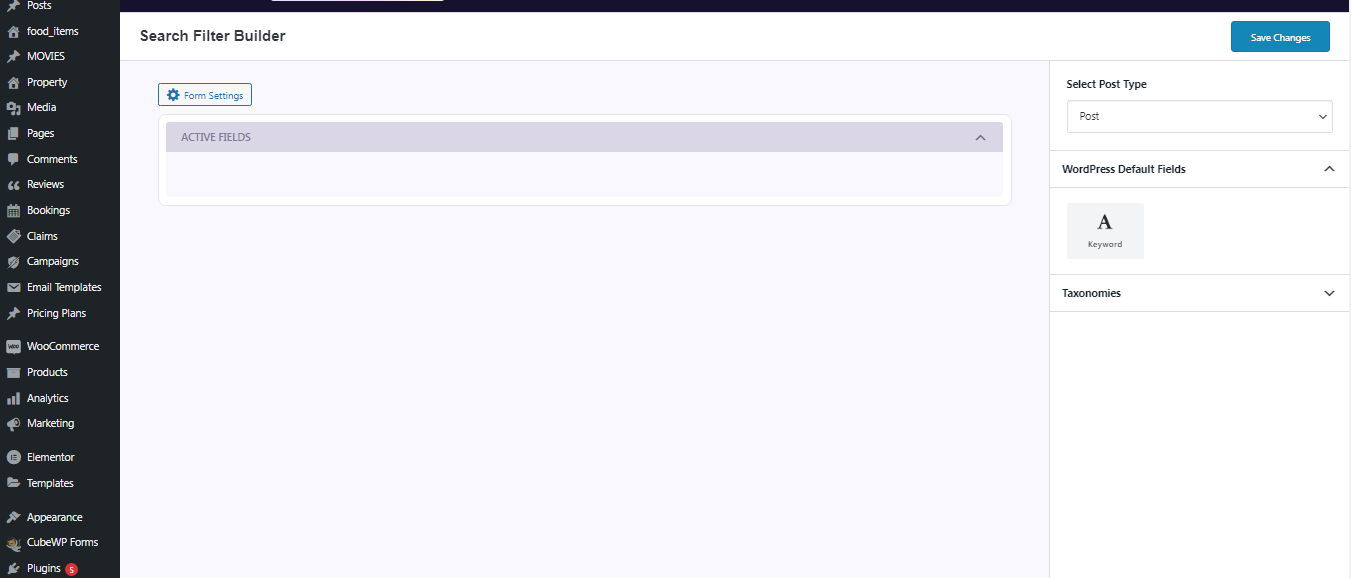
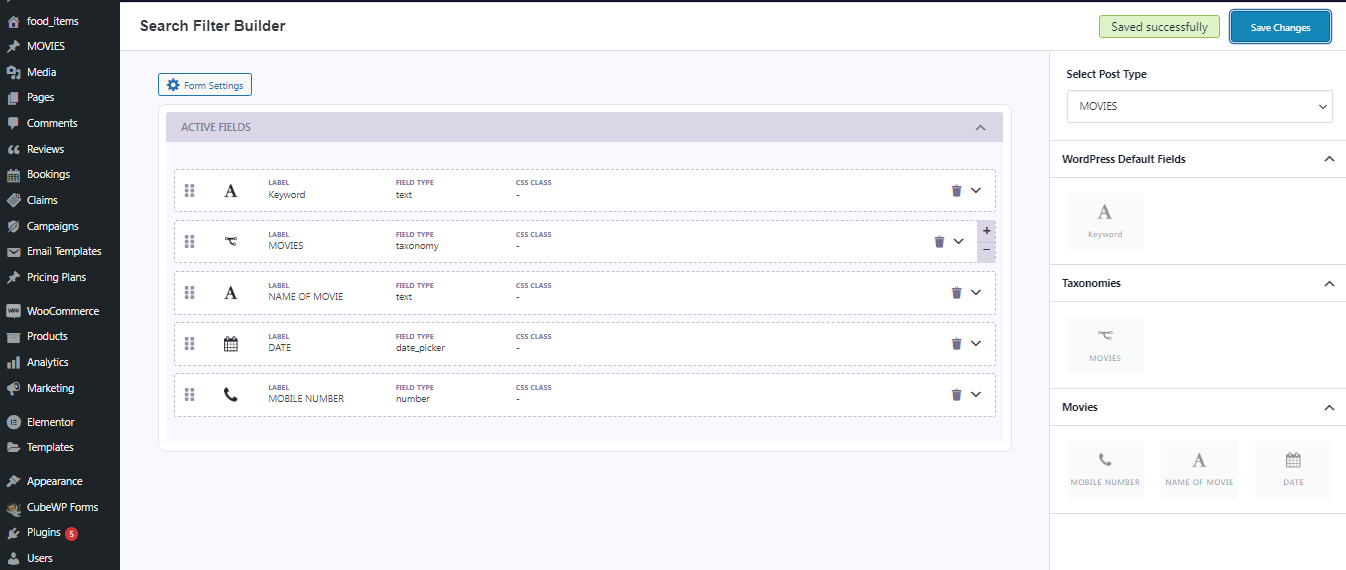
To create Search Filter using Custom Fields Follow the steps below:

  • Go to CubeWP.
  • Click on Search Filter.
  • A new window will be open.
  • Select your post type from right side of the window.
  • Select WordPress Default Fields
  • Select your desired taxonomies

You have the options to customize the appearance of taxonomy based on your needs, such as Checkboxes, Multi-dropdowns, Dropdowns, and the option to choose Select 2 UI.

  • Enhance your filters by adding custom fields for additional data.

Note: you can add your custom fields in the search to use as filter

  • Click on “Save Changes” to apply and save your filter settings.

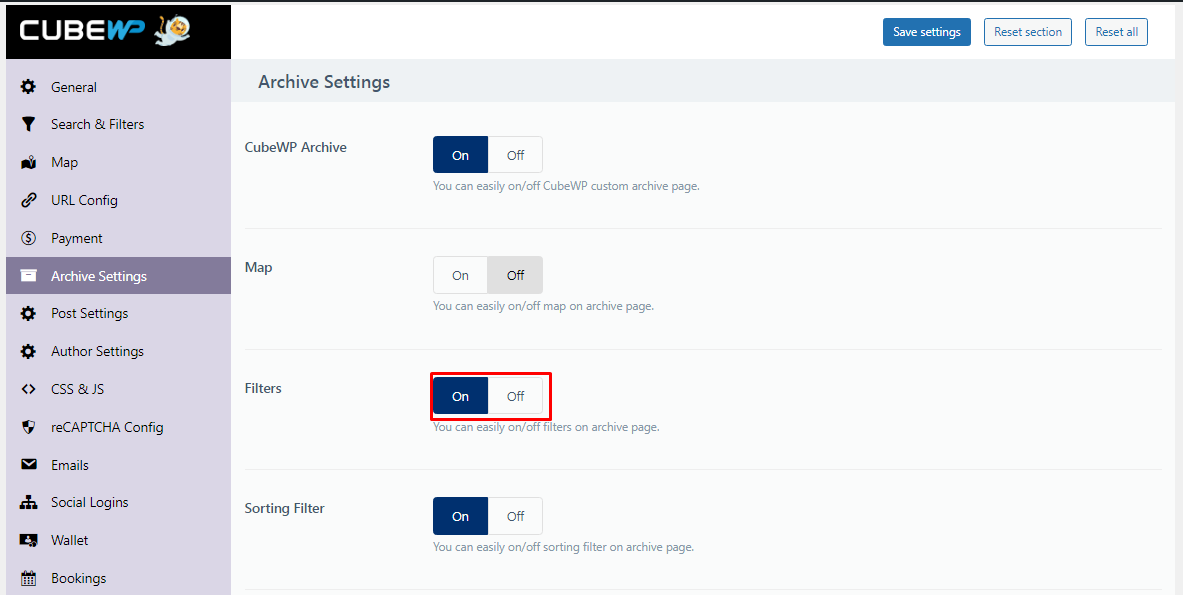
Search filters are OFF by default in CubeWP Setting. 

  • Go to CubeWP settings,
  • Find archive setting
  • Go to Filters
  • Click the ON button.
  • Save Settings

Related Article:

To learn more about Archive Settings, Click Here

Sorting Builder for number-based custom fields, e.g., low to high price or high to low price.

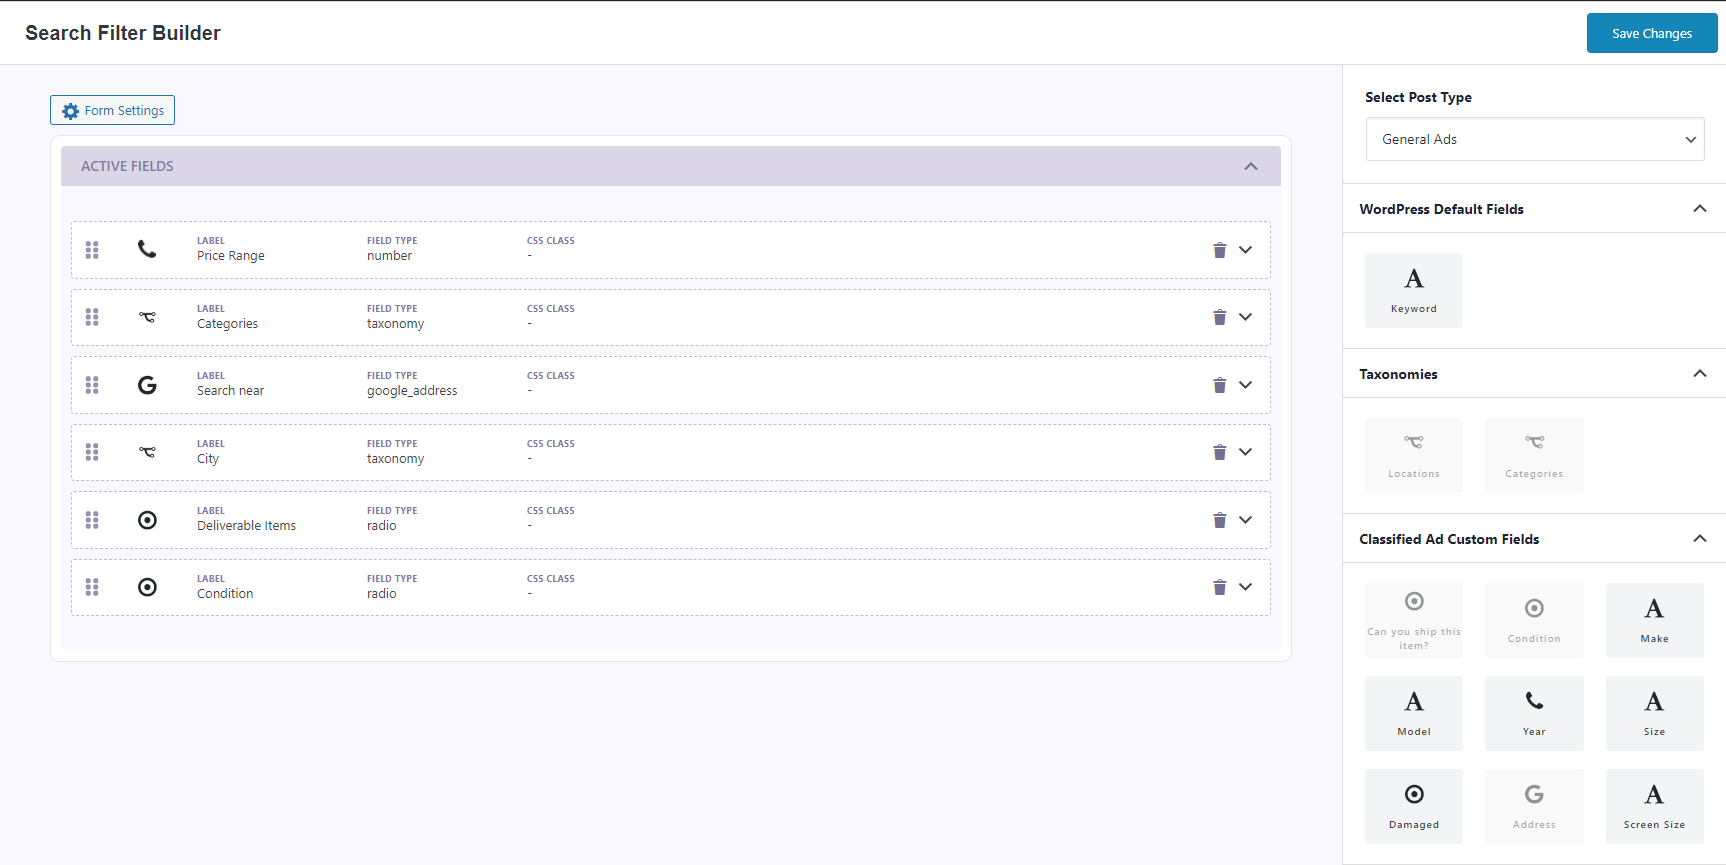
  • Go to CubeWP.
  • Click on Search Filter.
  • A new window will be open.
  • Select your post type from right side of the window.
  • Select WordPress Default Fields
  • Select your desired taxonomies
  • Enhance your filters by adding custom fields for additional data.
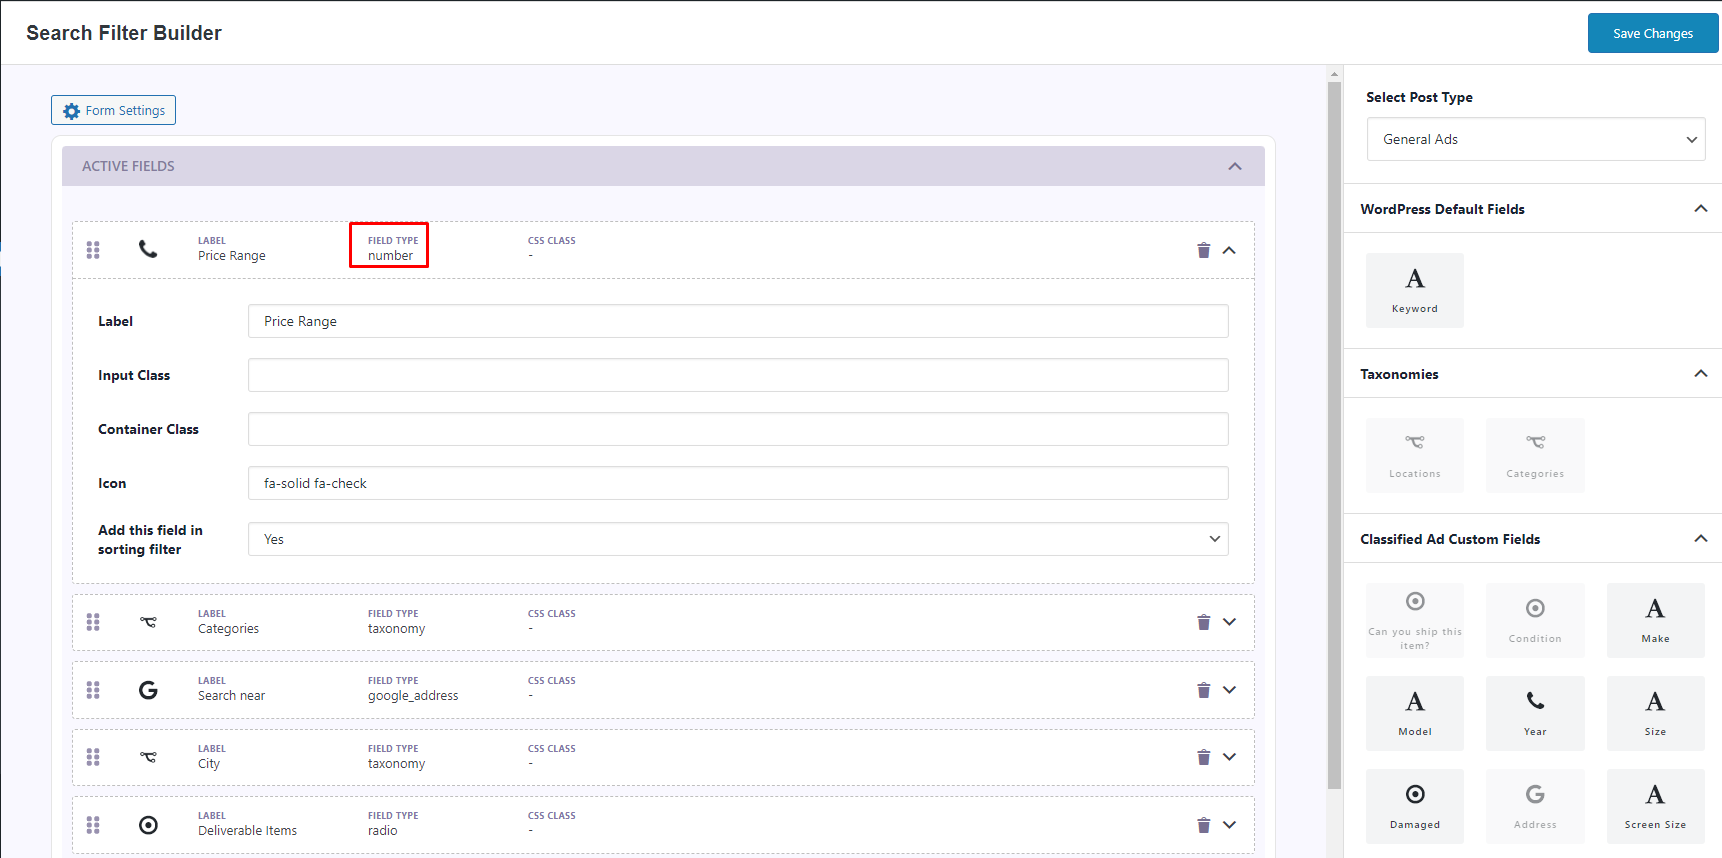
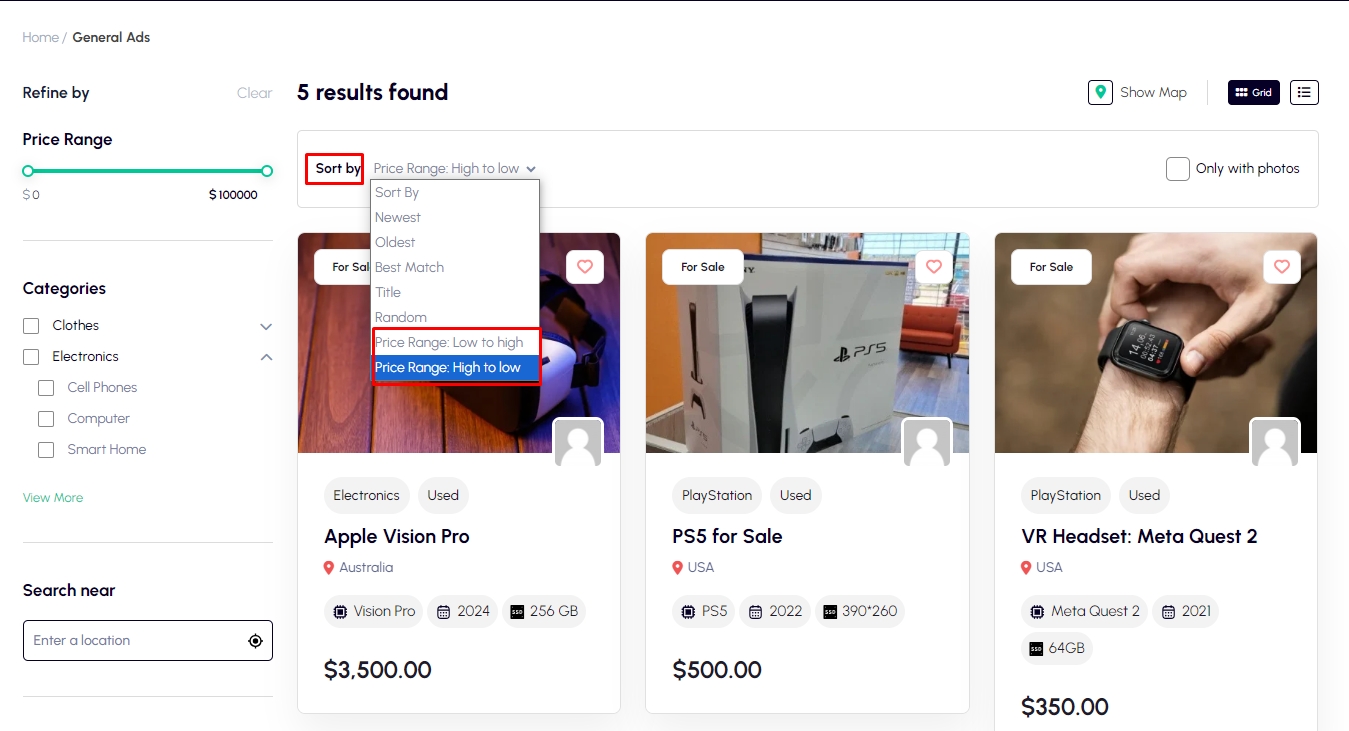
You can use the custom field type “Number” as sorting filter Like Low to high price or Hight to low price
  • Add Price range field of type “Number”
  • Click on “Save Changes” to apply and save your filter settings.

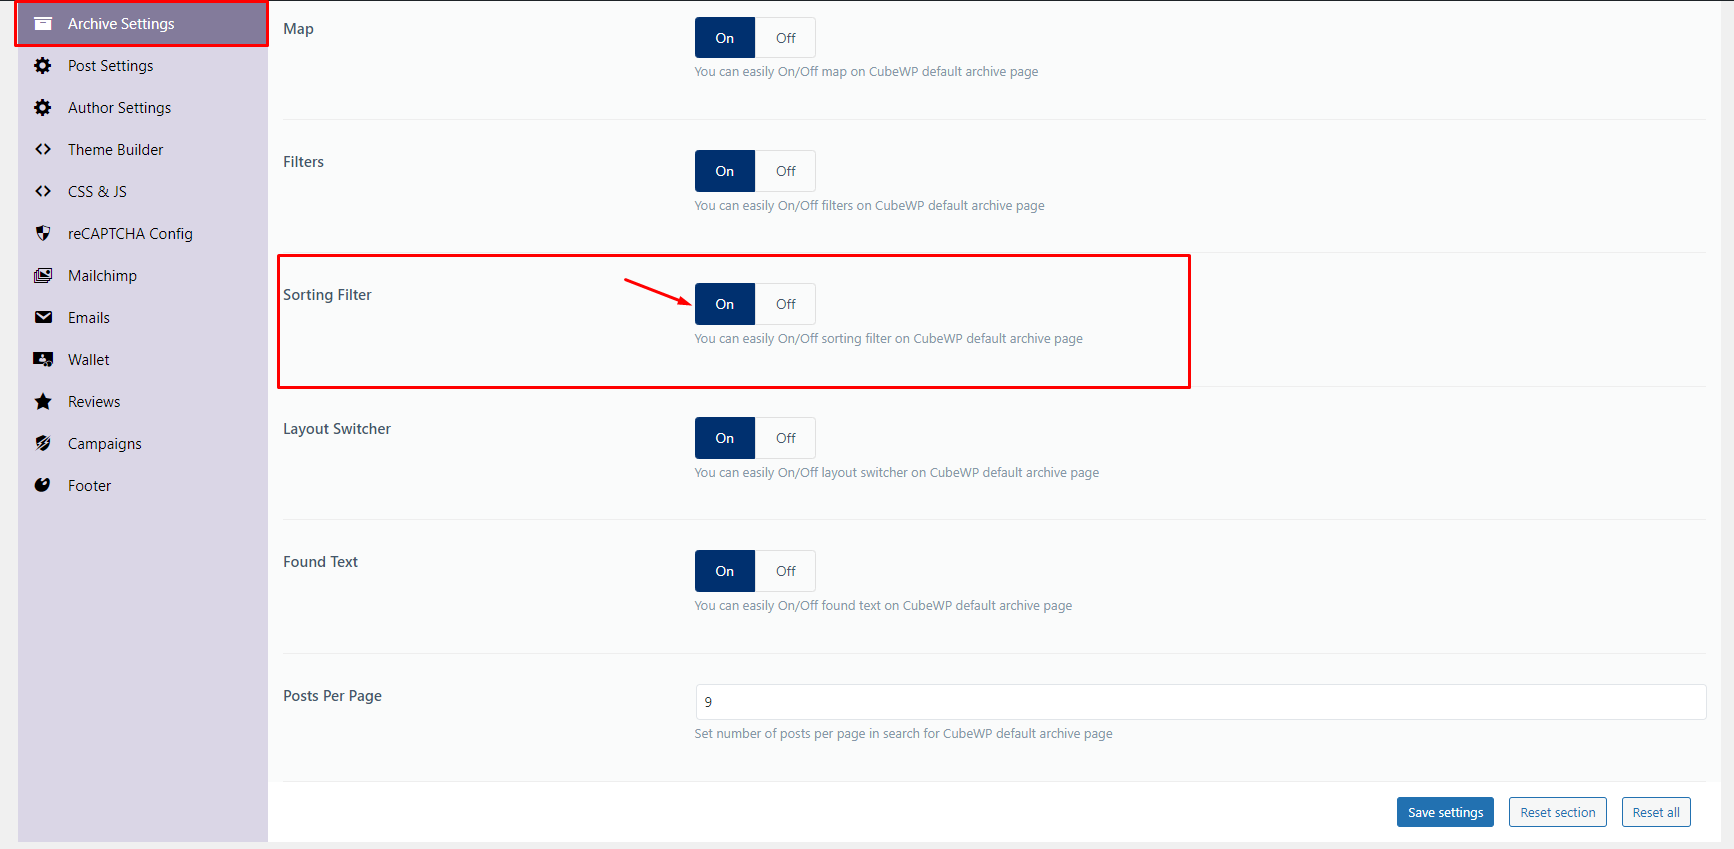
Sorting filters are OFF by default in CubeWP Setting. 

  • Go to CubeWP settings,
  • Find archive setting
  • Go to sorting filter
  • Click the ON button.
  • Save Settings

It will display in sort filters on archive page:

Related Article:

To learn more about Archive Settings, Click Here

Ad Owner's Dashboard Builder

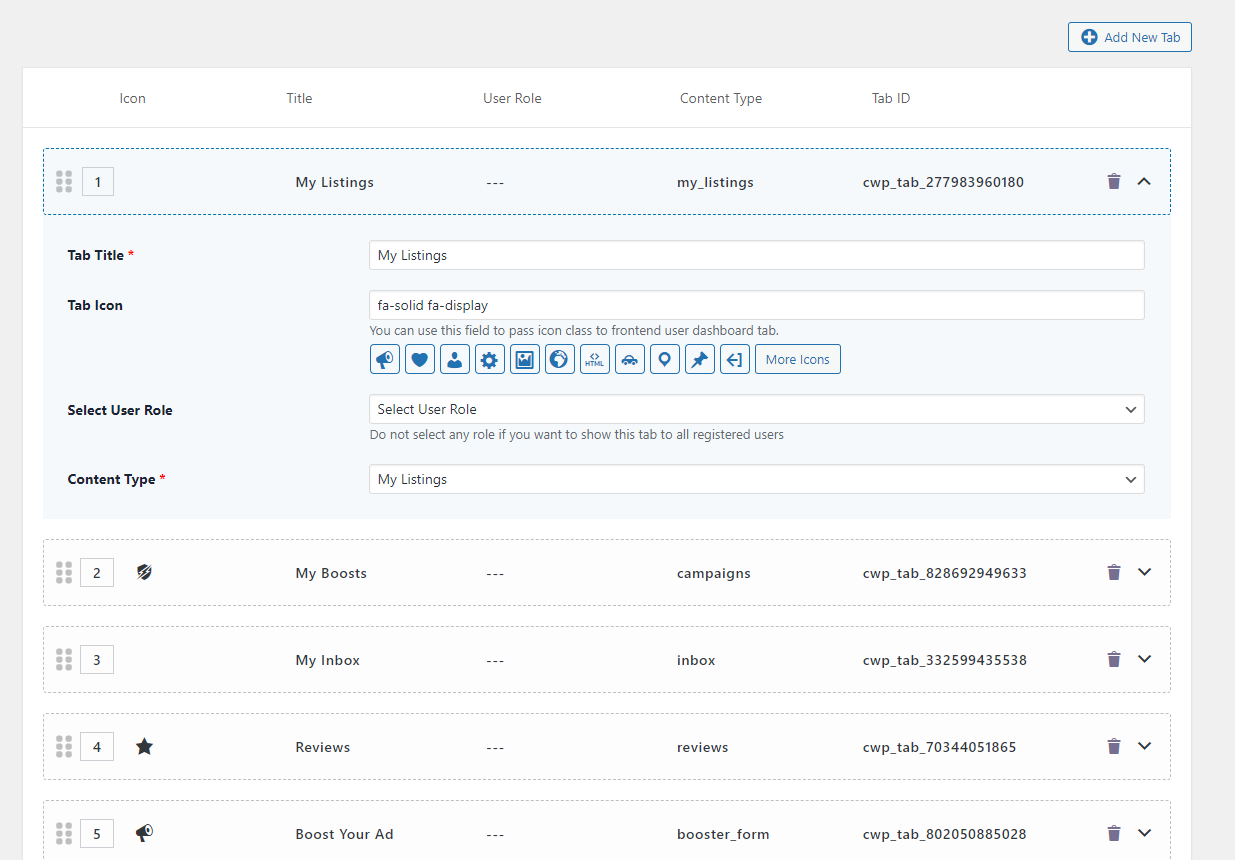
To create a personalized user dashboard, follow these steps:

  • Go to CubeWP
  • Go to User Dashboard
  • Add a New Tab
  • To enhance the user dashboard, you can add custom tabs. Click on Add New Tab.

Configure Tab Details:

  • Tab Title: Indicate the purpose of content
  • Tab Icon: Add an icon to help users quickly identify the tab’s function.
  • User Role: Define which user role as an “Administrator” or all registered users etc.
  • Content Type: Choose “Custom Tab” to create and add your own content to the tab.

To set up your user dashboard with CubeWP, follow these steps:

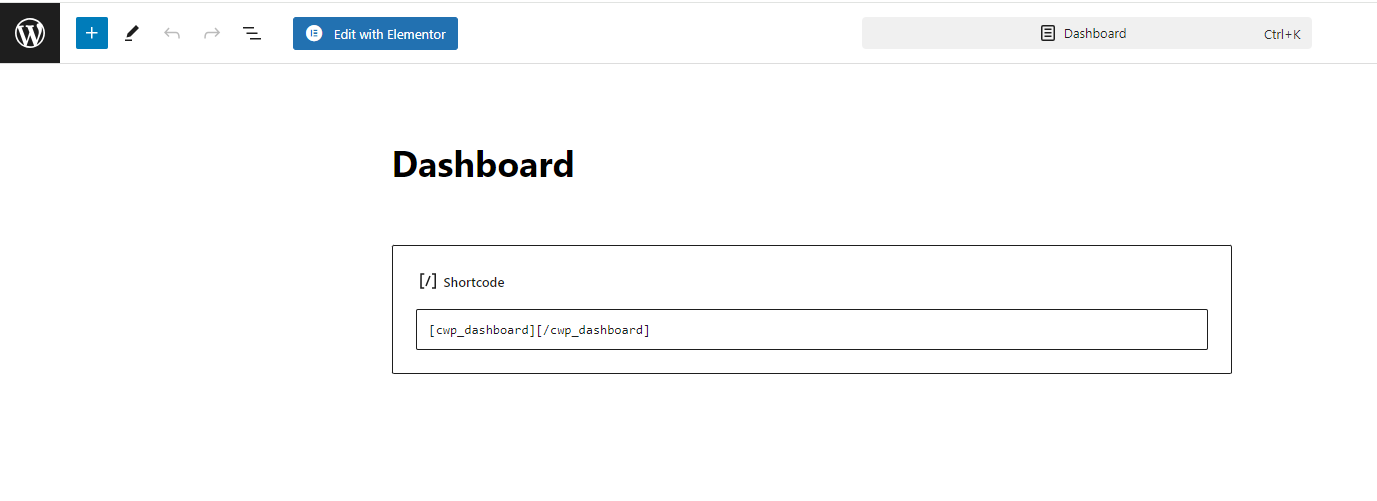
  • Get Short-code: Generate the short-code for your user dashboard.
  • Copy Short-code: Copy the generated short-code.
  • Create a New Page: In your WordPress dashboard, create a new page where you want the user dashboard to appear.
  • Select Full-Width Page Template: Choose the “Full Width” page template for this page. This ensures that your dashboard has enough space to display correctly.
  • Paste Dashboard Short-code: In the page editor, paste the short-code you copied earlier.

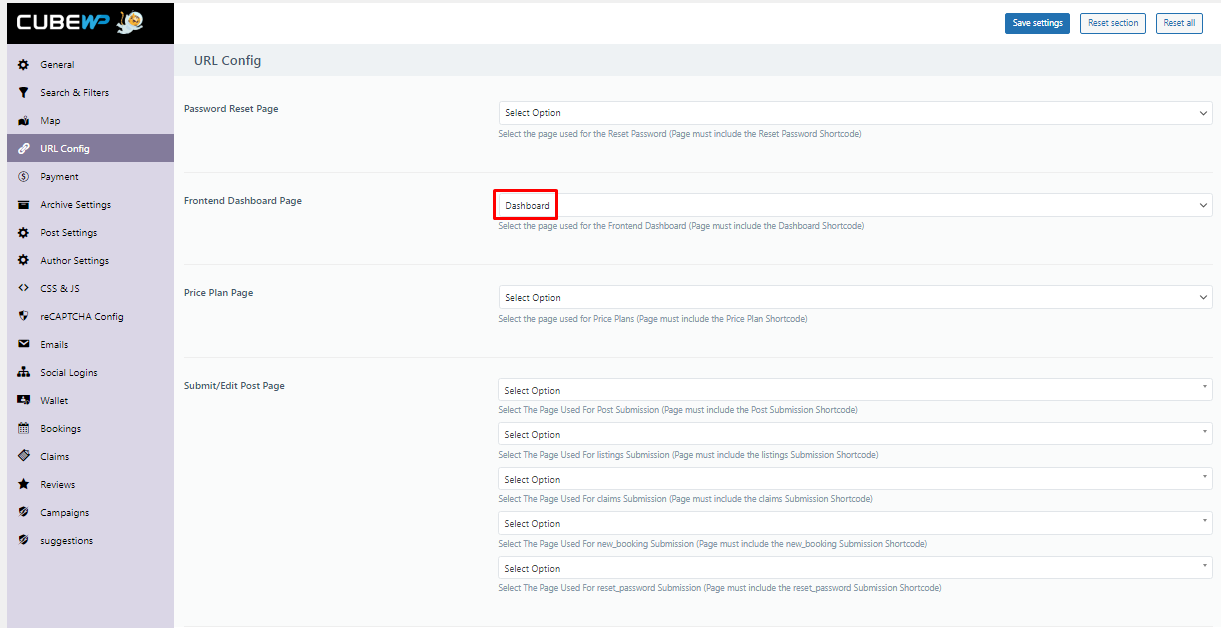
At the end:

  • Select Dashboard Page URL from CubeWP Settings: In CubeWP settings, configure the dashboard page URL to link to the newly created page, ensuring that users can access their dashboard from the designated URL.

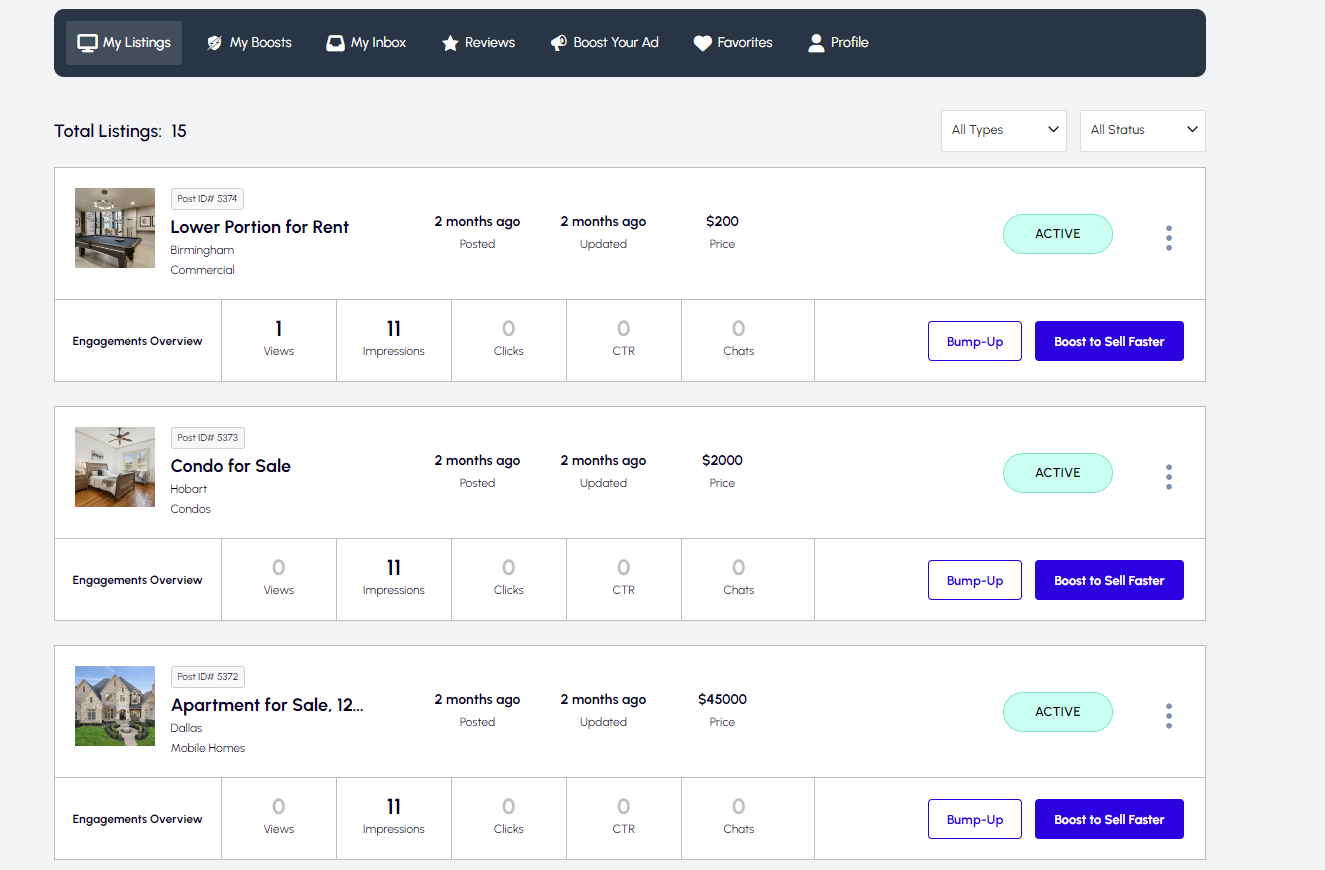
It will look Like at frontend like mentioned in the image below:

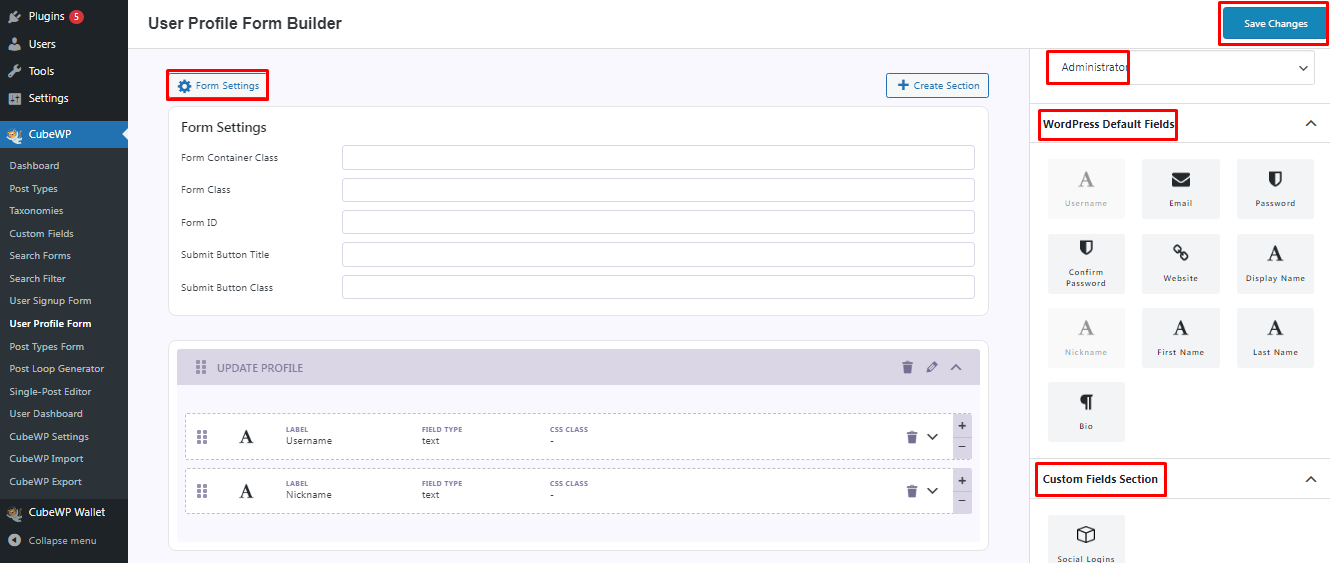
User profile Form Builder

Access CubeWP Settings

  • Log in to your WordPress admin dashboard.
  • Navigate to CubeWP

Click on User Profile Form Builder

  • Within CubeWP , locate and click on “User Profile Form Builder.”

Set Form Settings

  • Set Form Container Class for styling the form container.
  • Set Form Class for styling the form.
  • Set Form ID for styling or scripting purposes.
  • Enter Submit Button Title for the button’s displayed text.
  • Set Submit Button Class for styling the submit button.

Select the desired user role

  • You can select your user role as an administrator, editor, author etc.

Customize WordPress Default Fields

  • Choose WordPress default fields based on your design requirements.

Utilize Custom Field Section

  • Explore and use the custom field section located on the right side of the window.

Save Changes

  • Click on “Save Changes” at the end of the window to apply the modifications.
Note:
  • User Profile Form Builder is for creating forms that allow existing users to edit their profiles.

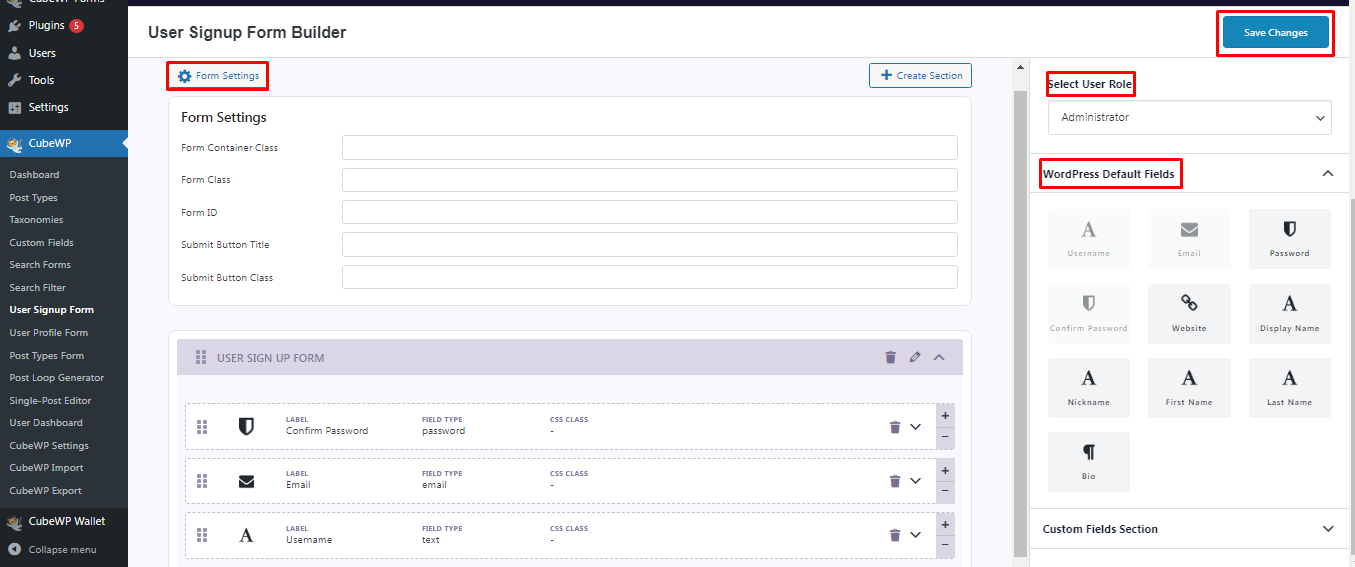
User Registration Form Builder

Access CubeWP Settings:

  • Log in to your WordPress admin dashboard.
  • Click on CubeWP to access its settings.

Navigate to User Sign-up Form Builder:

  • Click on User Sign-up Form Builder to access the form-building features.

Open Form Settings:

  • Set Form Container Class: Input desired class for the form container styling.
  • Set Form Class: Specify the class for styling the form itself.
  • Set Form ID: Input a unique ID for styling or scripting purposes.
  • Set Submit Button Title: Enter the title or text for the submit button.
  • Set Submit Button Class: Specify the class for styling the submit button.

Select User Role:

  • Find an option to select the user role for those who sign up (e.g., administrator, editor, author). Choose the appropriate role from the available options.

Select WordPress Default Fields:

  • Look for options to select default fields for the WordPress user registration form. Choose the fields you want to include (e.g., username, email, password).

Save Changes:

  • After configuring all the settings according to your requirements, find and click on the Save Changes button to apply the changes to your CubeWP user sign-up form.

Note:

  • User Signup Form Builder is for creating registration forms for new users.

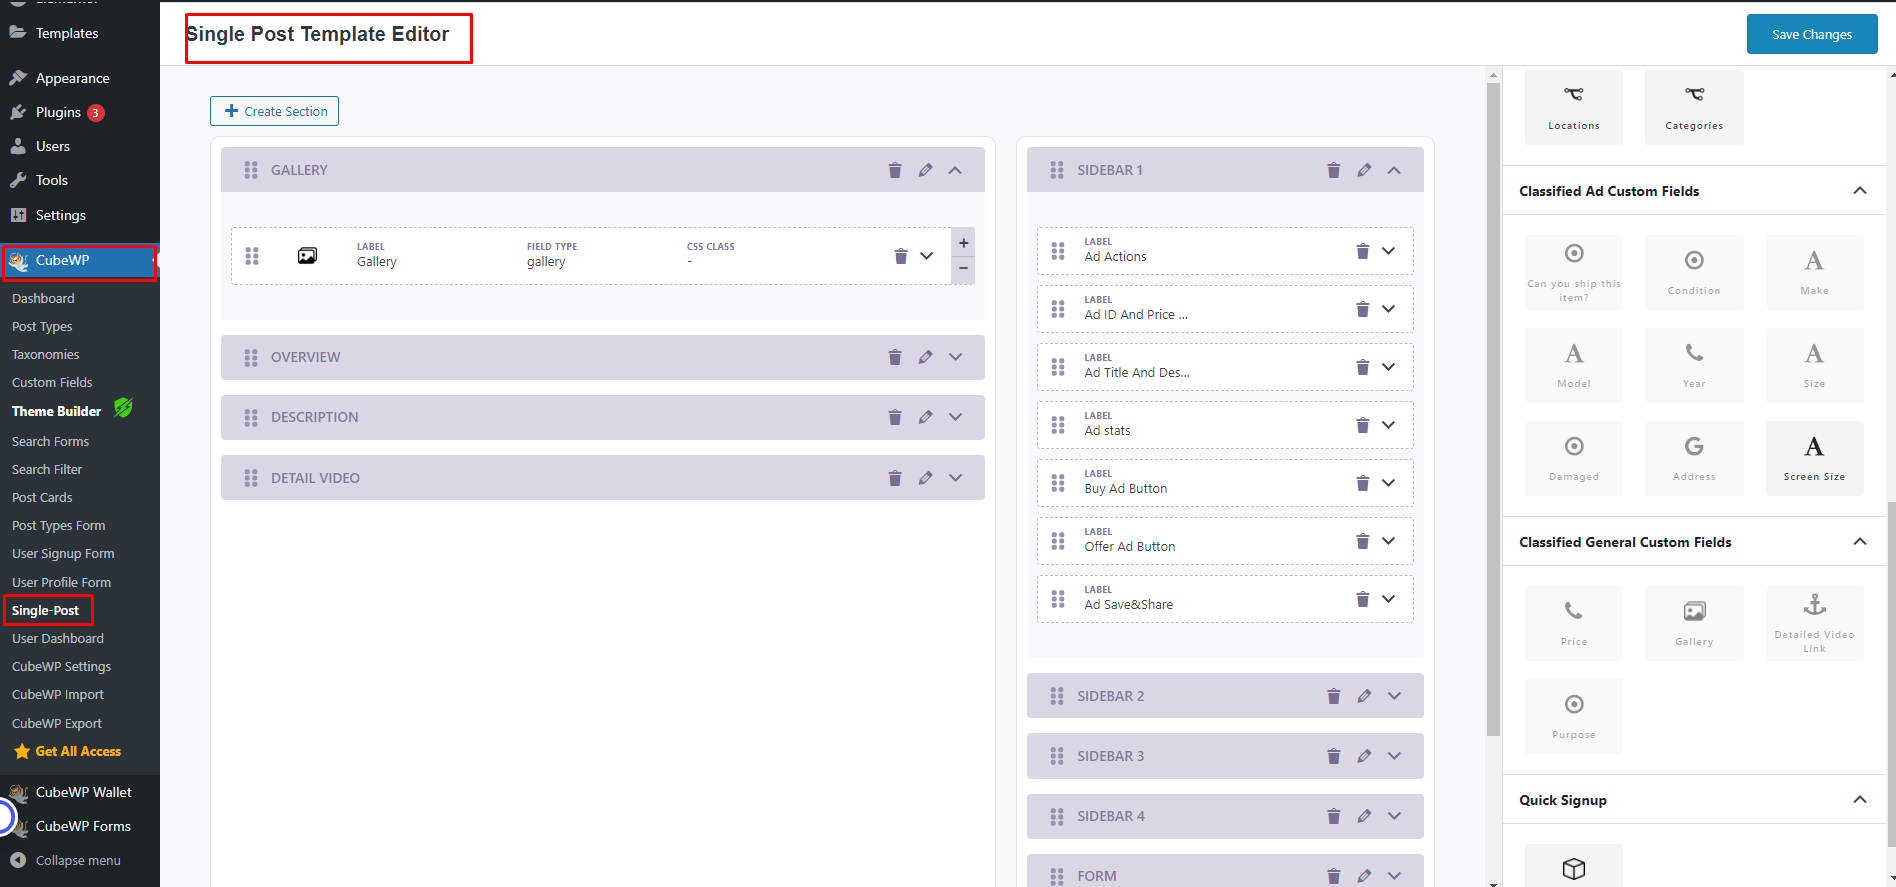
Single Post Layout Editor

Ad Single post Layout Editor: Customize Your Ad Detail Pages with Drag-and-Drop Flexibility

With the ClassifiAd theme, admins have full control over the layout of their ad detail pages thanks to the Single post Layout Editor. This tool allows you to design your ad pages using simple drag-and-drop functionality, ensuring that each page can be tailored to your specific requirements.

How It Works

Once you import the ClassifiAd demo, the theme provides you with custom cubes (pre-built elements) through the CubeWP Layout Editor. You can access this editor by navigating to CubeWP >> Single Post in the WordPress dashboard. Here, admins gain the flexibility to design the layout of the ad detail pages to fit their preferences.

Customization Options with Single post Layout Editor

1. Pre-Built Custom Cubes: With the demo import, you receive custom cubes that include various elements such as ad titles, descriptions, image galleries, contact forms, categories, and more. These cubes can be used to structure the ad detail page.

2. Inclusion and Exclusion of Elements: Admins can choose which elements to include or exclude from the post. If certain sections aren’t relevant to your listings, you can easily remove them from the layout.

3. Drag-and-Drop Arrangement: You can arrange these cubes however you like by simply dragging and dropping them into position. Whether you prefer the images on top, the contact form in the sidebar, or a map at the bottom of the page, the layout editor lets you structure the page to your liking.

4. Sidebar and Content Area Flexibility: The layout editor offers the flexibility to place elements in either the main content area or the sidebar. You can create a more organized, user-friendly layout by positioning key information where it makes the most sense.

Why This Feature is Essential

The Single post Layout Editor offers the following benefits:

Total Customization: You have full control over the appearance and structure of each ad detail page, ensuring it aligns with your branding and site design.

User-Friendly Experience: With drag-and-drop functionality, customizing your layout is quick and easy—no coding knowledge is required.

Flexibility: As your business grows or your site’s needs evolve, you can easily adjust the layout, add or remove elements, and reorganize sections.

Conclusion

The Single Post Layout Editor in ClassifiAd empowers you to create a custom ad detail page that fits your vision. Whether you’re launching a new classified site or fine-tuning an existing one, this tool provides you with the flexibility to design the perfect layout using drag-and-drop simplicity.

Start designing your unique ad detail pages by navigating to CubeWP >> Single Post and take full advantage of this powerful feature!

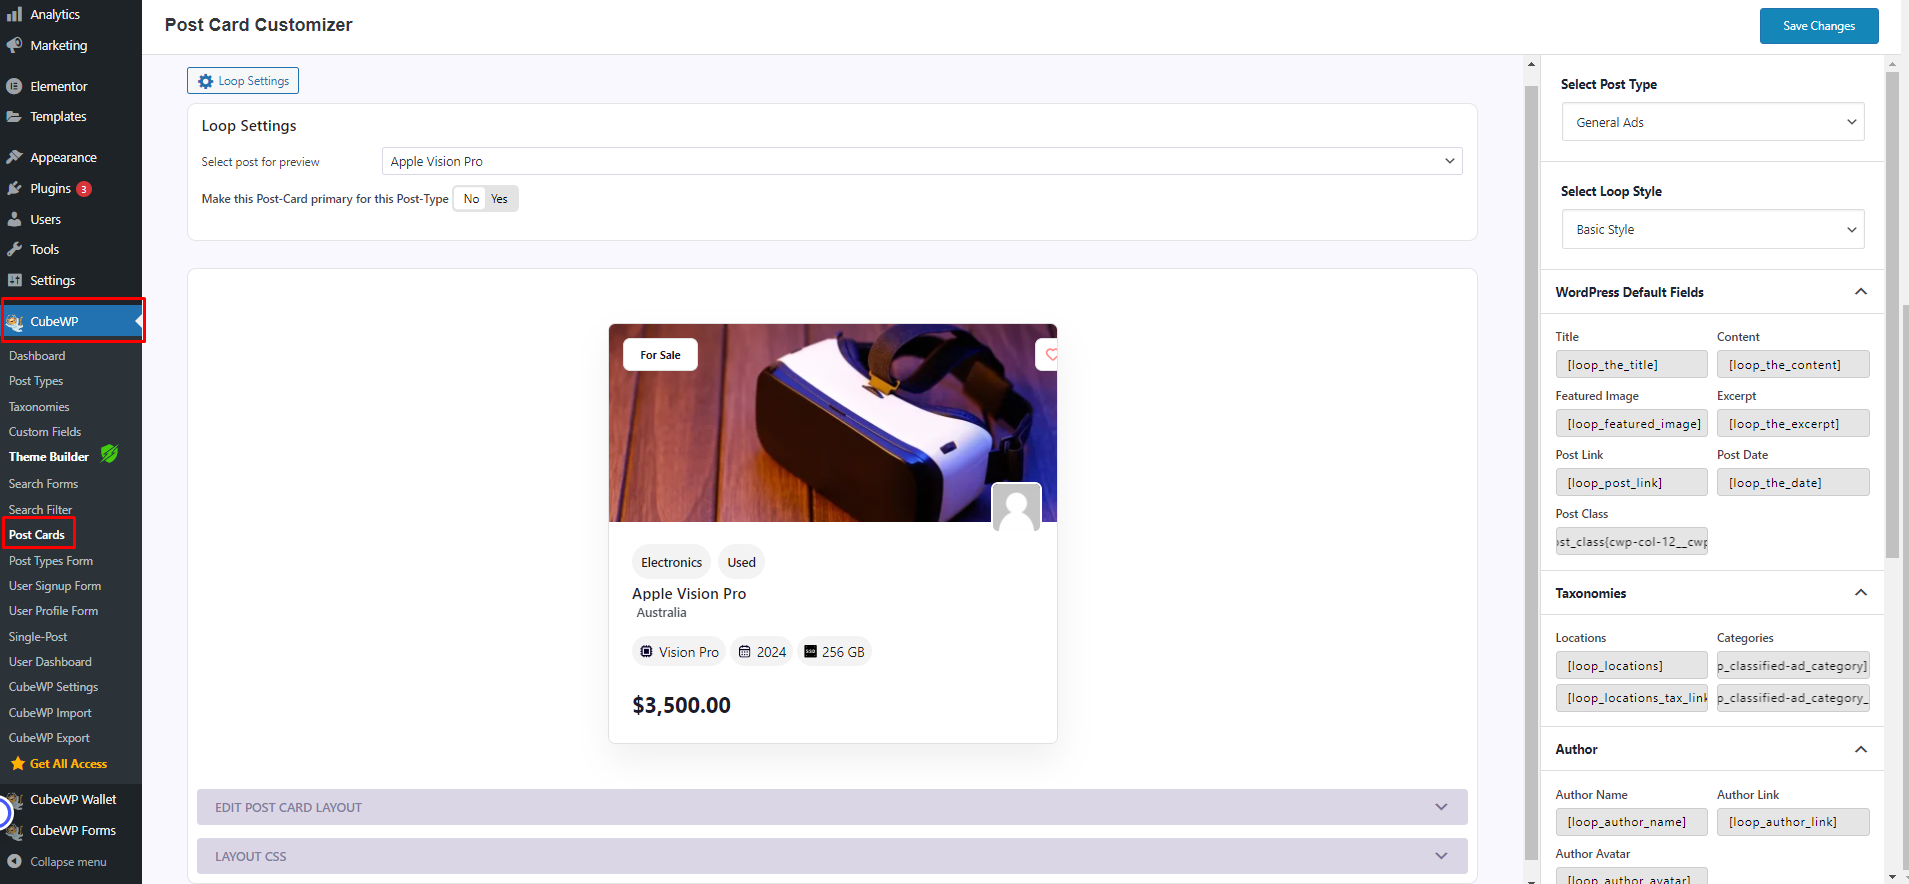
Post Card Customizer

Post Card Customizer: Tailor Your Listings Effortlessly with ClassifiAd

The ClassifiAd theme brings an innovative feature to the table: the Post Card Customizer. This powerful tool allows admins to personalize their post cards without requiring any programming knowledge, making it easy to create an attractive and functional layout that suits your site’s needs.

Seamless Customization for All

With the Post Card Customizer, admins can easily modify various aspects of post cards, including post types, loop styles, taxonomies, custom tags, and custom fields. These options empower you to shape the appearance and functionality of your listings according to your specific requirements.

You can access this editor by navigating to CubeWP >> Post Cards in the WordPress dashboard.

Key Features of the Post Card Customizer:

1. Importing with the Demo: When you import the demo content, you will automatically receive a variety of post types and taxonomies pre-configured. This gives you a solid foundation to start customizing your post cards right away.

2. Include or Exclude Elements: The customizer allows you to selectively include or exclude various elements from the post card. If certain information isn’t relevant for your listings, you can easily remove it. This flexibility helps you streamline your cards, making them more user-friendly and focused.

3. Real-Time Visualizer: One of the standout features of the Post Card Customizer is its **real-time visualizer**. As you make adjustments—whether adding new elements or excluding existing ones—the visualizer instantly displays how the post card will look. This immediate feedback enables you to make design decisions confidently, ensuring that your cards are visually appealing and functional.

4. Post Card Layout Editor: The layout editor provides an intuitive interface for arranging elements on the post card. You can drag and drop components short codes to find the perfect arrangement that enhances the user experience.

5. Layout CSS Editor: For those who wish to go a step further in customization, the Layout CSS Editor allows for advanced styling options. This feature enables you to fine-tune the appearance of your post cards, giving you full control over how each element looks without needing extensive coding skills.

Why the Post Card Customizer is a Game-Changer

The Post Card Customizer in ClassifiAd revolutionizes how you manage your listings. Here are some key benefits:

User-Friendly Experience: With no programming knowledge required, anyone can customize post cards easily. The intuitive interface makes it accessible for admins of all skill levels.

Enhanced User Engagement: By tailoring the post cards to better fit your audience’s needs, you can create a more engaging experience that keeps users coming back.

Flexibility and Control: The ability to include or exclude elements means you can adapt the cards to fit various types of listings, making your site more versatile.

Conclusion

The Post Card Customizer in the ClassifiAd theme is an essential tool for anyone looking to create a customized and visually appealing classifieds site. With its user-friendly features, including the real-time visualizer and layout editors, you can easily tailor your listings to better meet the needs of your users.

Ready to transform your post cards? Dive into the Post Card Customizer with ClassifiAd and start creating a unique and engaging experience for your audience today!

Post Types & Custom Fields

Can I create More Post Types for my Project?

In ClassifiedPro, by default, we have Three Post Types

  • General Ads
  • Property Ads
  • Automotive Ads

You can use these Post types in ClassifiedPro. You can customize labels. But if you want to add a new Post Type, You can add it easily with CubeWP. But it will not work as ClassifiedPro Post Type, The New Post Type will work normally as a default CubeWP Post type work.

To make the New Post Type as ClassifiedPro please follow the below steps.

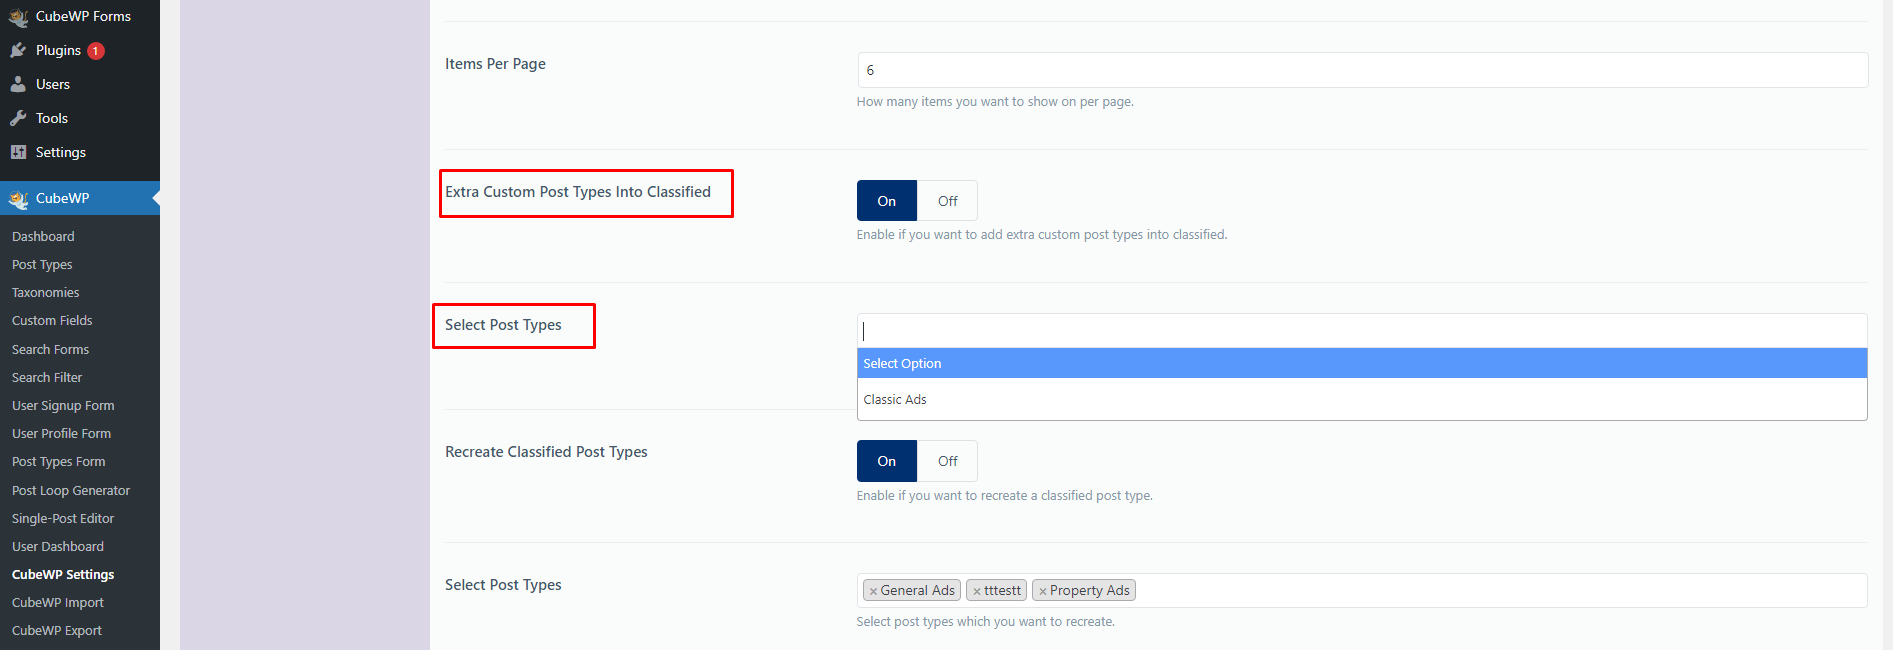
PART 1: Create New Post Type and add into ClassifiedPro Post Type

You can easily create new post type with the help of CubeWP. Please follow the below steps:

  • Go to CubeWP
  • Click on Post Types
  • Add New
  • Enter your Post Type details
  • Save Changes
image
  • Turn On
  • You will see your newly created Post Type here.
  • Select your Post Type
  • Save Changes

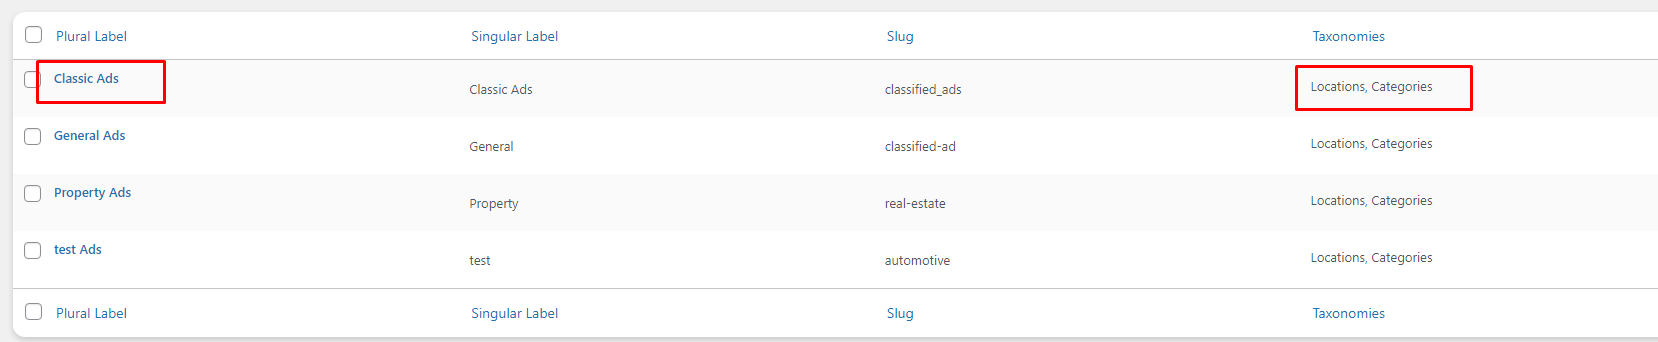
For confirmation, you can check your Post type section and see Location and Category will attach to the new Post Type

image

PART 2: Add into Post Type Model and Landing Pages in Header

  • Go to CubeWP
  • Click on CubeWP Settings
  • Go to Header
  • Scroll Down
  • You can see POST TYPE Landing Pages links
  • You can see your all Created POST TYPE here
  • Choose the desired page of your POST TYPE

PART 3: Create Post Type Form for New POST TYPE

ClassifiedPro is powered by CubeWP, you can easily create a Post Type form with the help of CubeWP POST TYPE form builder. For creating please follow the below steps.

  • Go to CubeWP
  • Click on POST TYPE form builder
  • Choose your Post Type
  • Drag and Drop your fields
  • Save Changes
  • Create a new Page
  • Edit with Elementor
  • Add Ads Submission Element on the Page
  • Select your POST TYPE
  • Save Changes

PART 4: Single Post Editor

You need to create your own single page for your newly created POST TYPE. Follow the below steps

  • Go to CubeWP
    Click on Single-Post Editor
  • Choose your New Post Type
  • Create sections in the content or sidebar area
  • Drag and drop your fields to your desired area
  • Save Changes

PART 5: Search Form and Search Filters

After adding everything, Now you need to create Search forms and Search Filters as well. Follow the below steps:

  • Go to CubeWP
  • Go to Search Form Builder and then Search Filters
  • Select your New POST TYPE
  • Add your fields
  • Save Changes


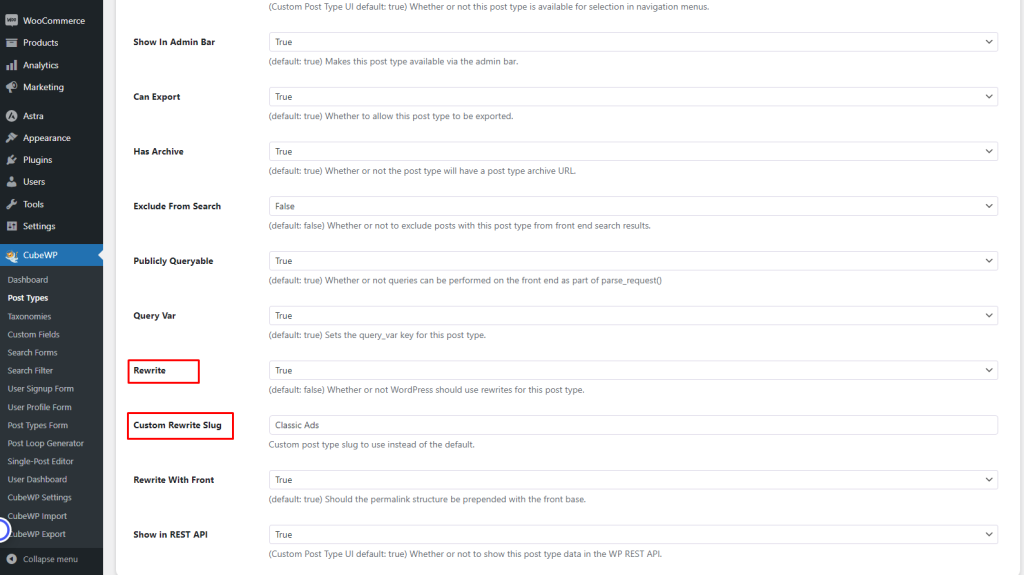
Can I change the Post Type Slug?

You cant change the Post Type slug, but with the help of CubeWP Framework, you can Rewrite the Post Type slug.

  • Login to your WordPress dashboard and navigate to CubeWP > Post Types.
  • Edit the Post Type you want to edit from the list of available post types.
  • Scroll Down and you can see the Rewrite Feature.
  • Select False to True
  • Enter your Slug name here
image
  • Click on the “Save” button to apply the changes.
  • Finally, don’t forget to flush the permalink cache by going to Settings > Permalinks and clicking on the “Save Changes” button.
  • The slug will only change on the front end, You may see the old slug in the page editor or post editor

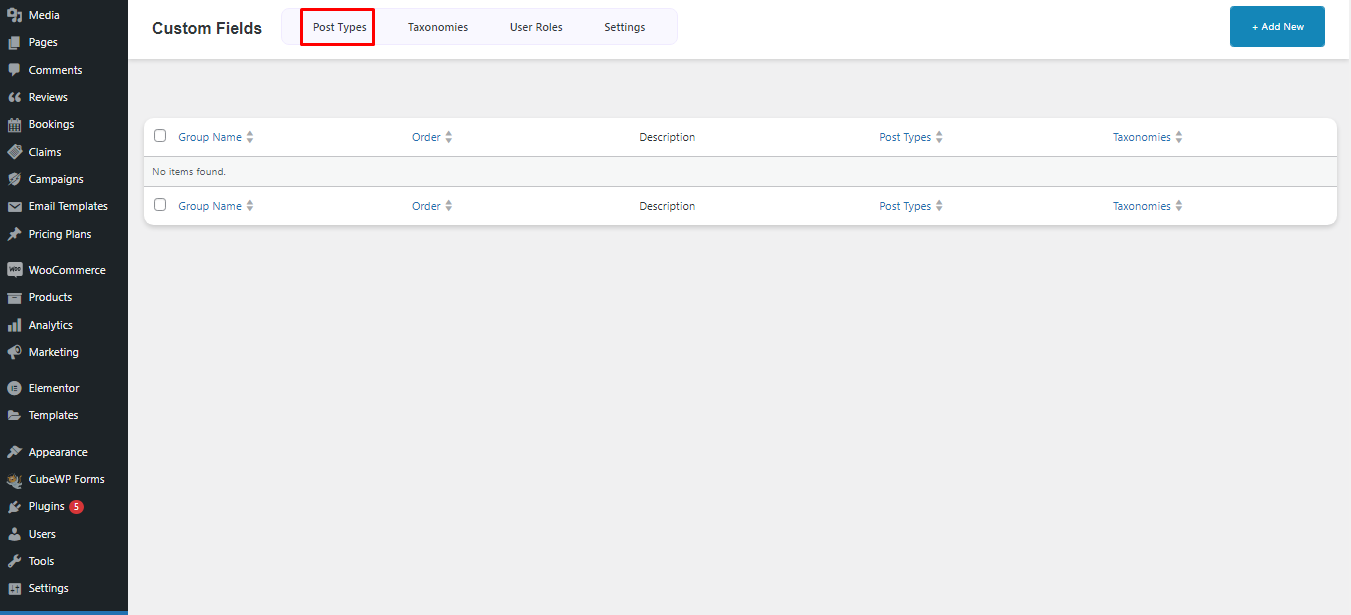
Create custom fields for any post type

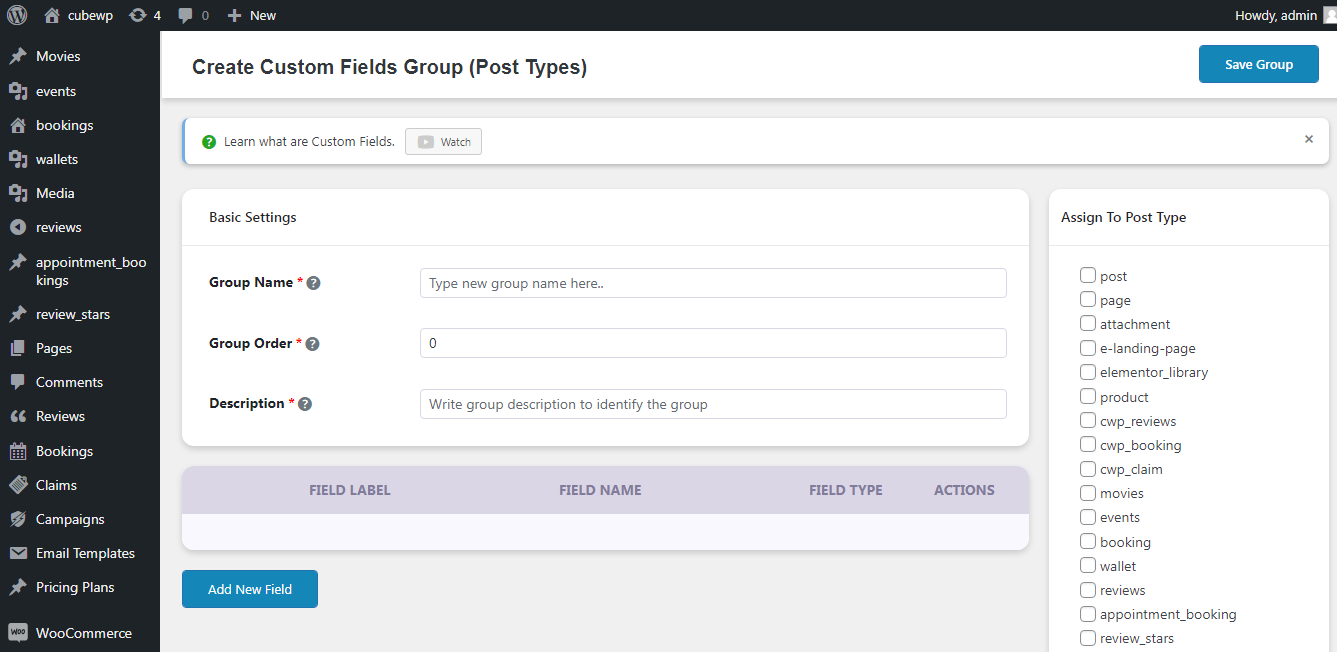
To create custom fields for any Post Type in ClassifiAd, please follow the below steps:
  • Go to CubeWP
  • Navigate to Custom Fields
  • Click on Post Type
  • Click the Add New button.
A new window will open with options such as Group Name, Group Order and Description.
  • Group Name: Provide the Group name for your Custom Fields.
  • Group Order: Manage the Menu Position for your Group.
  • Description: Briefly describe the purpose of Your Group.

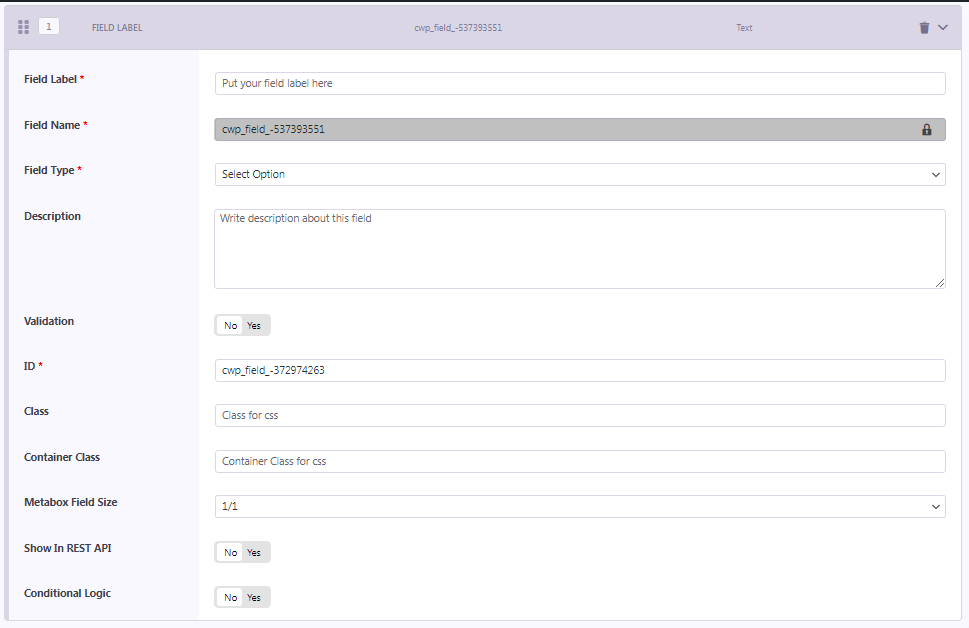
When you click on Add New Field the screen will expand with numerous options. You can fill in these fields to tailor your custom fields according to your specific requirements. These options include:

  • Field Label: This is where you specify the name or label for your custom field (e.g., “Author Name”).
  • Field Name: It automatically generates an internal name for the field, typically not modified.
  • Field Type: You choose the type of field (e.g., text input, dropdown) that suits your data.
  • Description: Optionally, you can provide a brief description to explain the field’s purpose.
  • Validation: If necessary, you can set validation rules for the field.
  • ID: An internally generated ID for the field, often not changed.
  • Class: You can assign a CSS class to style this particular field.
  • Container Class: Apply a CSS class to the container that holds this field.
  • Metabox Field Size: Determine the field’s size within the Metabox (e.g., 1/1 for full width).
  • Show In REST API: Decide whether this field’s data should be accessible via the REST API.
  • Conditional Logic: Configure conditions for displaying or hiding this field based on specific criteria.
  • After creating custom field types you need to assign the fields with a post type displaying at the right sidebar.
  • After Assigning the custom fields to the post type you need to save group.
Learn More:
To Learn More About Custom Field Types, Click Here

What’s included in item support?


Any kind of extortion or blackmailing or threatening prior or after posting a negative review, in return for any of the following but not limited to:
1) Free Customization work
2) Integration with 3rd Party Plugins that we do not support.
3) Resolving conflict with a 3rd Party Plugin whether it’s technical or design including CSS related.
4) We do not provide support for customization work made by you or your developer or any third-party service.
Will be reported to Envato for further legal action and the support contract will be immediately terminated. We will not hesitate to take legal action against such a person or group of personsAlso please be advised that we do not provide support to businesses wеbѕitеѕ thаt deal with including (but nоt limitеd to) Gаmbling, Alсоhоl, Pоrn, Escort Sеrviсеѕ, Prostitution, Drugѕ, and Rасiѕm. For more information please read Right to Deny Support.

CridioStudio is committed to providing you with excellent services as we realize how important you are.

Envato Official Policy

What’s included in item support
What’s not included in item support

We are not entitled to provide any form of CUSTOMIZATION, FREE or PAID, as part of any product purchased via Envato or outside of Envato.

If you are genuinely interested in PAID CUSTOMIZATION services, please fill email at service@cridio.com

Sole Discretion

Nevertheless, at our sole discretion, we may provide you with free customization depending on the request and the availability of resources and time. We have the full right to accept or reject the request for free customization.

Indеmnifiсаtiоn

Uѕеr аgrееѕ to defend, indеmnifу, аnd hоld hаrmlеѕѕ, Cridio Studio itѕ соntributоrѕ, аnу еntitу jointly сrеаtеd by them, thеir rеѕресtivе affiliates аnd thеir rеѕресtivе dirесtоrѕ, оffiсеrѕ, еmрlоуееѕ, аnd аgеntѕ frоm аnd аgаinѕt all сlаimѕ аnd еxреnѕеѕ, inсluding аttоrnеуѕ’ fееѕ, аriѕing out оf thе uѕе оf thе оn-linе ѕеrviсе bу uѕеr оr uѕеr’ѕ ассоunt.

General

In this document, we will explain some General Settings and common issues about ClassifiedPro


How the Review System Works in ClassifiedPro?

ClassifiedPro features a reciprocal review system enabling buyers and admins to request and provide feedback on transactions and interactions. Reviews facilitate transparent feedback exchange, fostering trust and assessing user experiences within the ClassifiedPro platform.

Admin:

  • After completing the shipment process and providing a shipment ID, an optional checkbox is available to admins.
  • This checkbox is automatically checked by default.
  • Admins have the choice to leave it checked or unchecked it based on whether they want to send a request for review regarding the buyer’s experience.
  • If left checked, the system will automatically send a request for review on the buyer’s experience.

Buyer:

  • Buyers have the ability to rate their experience with purchasing a product and interacting with the admin.
  • They can provide ratings based on various aspects such as product quality, delivery time, and the admin’s communication and support.
  • Ratings serve as feedback mechanisms to help other users gauge the reliability and quality of the products and services offered on the platform.
  • This dual feedback system ensures transparency and accountability, fostering trust and improving overall user experiences within the platform.

Review System Configuration: Automatic or Pending Approval:

For more Information: click on this

How to create dispute in ClassifiedPro?

Enhanced Transaction Security:

  • Access CubeWp settings as an admin.
  • Click on the “Wallet” option within the settings.
  • Enable the “Payment Hold” option.
  • Specify the number of days for which the admin can hold the payment.
  • Save the changes to apply the configured settings.

Note:

  • After the specified time, the system automatically releases the payment.
  • After the hold period, buyers may not be able to create disputes or request refunds.
  • This setting helps in managing and controlling payment-related issues within the specified time frame.

Step 1:

  • Buyer checks the received product.

  • If issues arise, the buyer clicks on the “Create Dispute” button.
  • Accesses the dispute resolution platform.

  • Provides a detailed description of the product-related issue.
  • Specifies the nature of the problem or dissatisfaction.
  • Attaches relevant photos, videos, or documents to support the dispute.

  • The dispute is submitted for review by the admin or relevant support team.
  • Admin or support team reviews the dispute, examining provided information.
  • A resolution is reached, which may include a refund or another mutually agreed-upon solution.
  • The buyer is informed of the resolution, and necessary actions, such as a refund, are processed accordingly.

Step 2:

At the both sides, seller and buyer dashboard will show the dispute option.

Note:

If these Sales and Purchase tabs are not available:

Click on this article to Review the process:

Adding Tabs in Dashbaord

How order system works in ClassifiedPro?

Step 1:

  • The customer decides to purchase your product.
  • They proceed to the checkout process, filling in all the required information.
  • The customer provides necessary details such as shipping address.
  • They add billing information to complete the transaction securely and place his/her order.

Step 2:

  • Admin accesses CubeWP.
  • Navigate to the user dashboard.
  • Create two new tabs named “Sales” and “Purchase” in the user dashboard if these two tabs are not available.
  • Click on Save Changes option.

Step 3:

  • Access WooCommerce platform.
  • Click on the “Orders” button.
  • View the list of orders displayed.
  • Click on the “Preview” button.

  •  Choose the “Processing” option.
  • After this both Buyer and Seller have Process status.

Step 4:

  • Seller accesses the order details after clicking on the “Preview” button.
  • Initiates the shipping process for the packed order.
  • Clicks on the “Completed” button to mark the order as processed and shipped.

  • The order status is updated to “Completed,” indicating successful processing and shipment.

Once the shipment is completed, the order status reflects as “Completed” on both ends.

Note:

If these Sales and Purchase tabs are not available:

Click on this article to Review the process:

Adding Tabs in Dashbaord


User tracking system to display relevant data on the homepage based on user interests

The User Tracking System is designed to enhance the user experience by displaying personalized data on the homepage based on a user’s interests and interactions. It works as follows:

  1. Tracking User Behavior: The system monitors the user’s activities, including searches made using taxonomies (categories, tags, etc.) or keywords.
  2. Personalized Homepage: Based on the data collected from user searches, the system analyzes the user’s preferences. It then dynamically updates and displays relevant products or listings on the homepage that match the user’s interest.
  3. Interest-Based Recommendations: Whether the user is searching for specific categories, brands, or keywords, the system ensures that the products they are most likely interested in are prioritized and recommended.

This feature improves engagement by providing tailored content, ensuring users see listings that are relevant to their previous interactions, making their browsing experience more efficient and personalized.

To setup this feature first you have to make settings:

  • Go to Cubewp Settings >> Personalization
  • Go to Cubewp Settings >> Enable Personalization >> Set it as ON
  • Further select taxonomies relation between two options

Then you need to edit the home page with page builder and add the ClassifiAd Ads element and need to select the Ads type “Recommended”

When the user will search for example keyword “ps5” and will visit the Ad detail page then in recommended Ads on home page section will display the Ads having keyword “ps5”

Ad metrics for owners displayed on the dashboard with charts

You can add the Ad metrics for Ad’s owners to be displayed on the dashboard with charts, follow these steps:

  • Go to pages
  • Edit Dashboard Page with page builder
  • Add Element “CubeWP Dashboard”
  • Then select stat types
  • Select post type to display stats

It will display on user Dashboard as Below:

You also can add metrics for campaigns, Reviews and Inbox with same steps. See the image below, How they will look:

Purpose-driven dashboard to display page content

The Purpose-driven Dashboard is a centralized, user-friendly control panel that helps users manage and track various aspects of their activities within the platform. Its main purpose is to streamline navigation and provide quick access to essential tools and data. Key elements of the dashboard include:

    • Listings: This section allows users to view and manage the listings they have created on the platform. It provides a central location to update or remove their published listings
    • Post Types: This refers to the different types of content users can create, such as ads, articles, or listings. Each post type is structured differently based on its purpose (e.g., job posts, product listings)
    • User Profile Form: A form that allows users to input and update their profile information, like name, contact details, and other personal or business information
    • Custom Tab: Users can create custom tabs for additional information on their listings or profile. These tabs can be tailored to provide extra details or features not available by default.
    • Shortcode: A tool that allows users to insert specific functionalities into a page or post using a simple code. For example, they can add a contact form or display certain elements using a shortcode.
    • Page Content: This section allows users to manage the content displayed on specific pages they own, such blog, cart,checkout etc.
    • Saved: Users can see and access the listings or ads they’ve saved for later. This section is like a favorites list, where users can quickly revisit content they’re interested in.
    • Logout: This option lets users securely log out of their account when they are finished using the platform.
    • Leads: Users can track leads they’ve generated through their listings or advertisements. This section helps monitor potential customers or inquiries related to their posts.
    • Reviews: A place for users to view all the reviews they’ve received on their listings or services. This helps them stay informed about customer feedback.
    • Campaigns: Users can create, manage, and track marketing campaigns to promote their listings or services. It helps in driving more visibility to their content.
    • Booster Form: A form that allows users to boost or promote their listings or ads, typically by increasing visibility through paid options.
    • Orders: This section displays all the user’s orders related to the platform, whether for ads, promotions, or other paid services.
    • Inbox: A built-in messaging system where users can check and respond to messages or inquiries from potential buyers, customers, or other users on the platform.
    • CubeWP Wallet: A virtual wallet where users can view and manage their funds or balance, typically used for payments, purchasing plans, or boosting campaigns.
    • ClassifiAd – Sales: Displays details about the user’s sales activity within the ClassifiAd platform, helping users track the products or services they’ve sold.
    • ClassifiAd – Purchased History: A record of all the purchases the user has made, such as buying ads, boosting listings, or subscribing to services.
    • ClassifiAd – Profile: This section allows users to manage their ClassifiAd profile, updating their personal or business information, photos, contact details, and more.

You can add the tabs for required content type while creating dashboard:

Two-way review system

Two-Way Review System: Building Trust in ClassifiAd

The ClassifiAd theme introduces a powerful feature that fosters transparency and trust between users: the Two-Way Review System. This functionality allows both business owners and users to review each other, creating a balanced feedback loop that enhances credibility and improves user experiences.

How the Two-Way Review System Works

In the ClassifiAd theme, both the business owner (ad poster) and the users who interact with the ad can leave reviews for each other. This mutual review system ensures a fair and reliable platform, where both sides can share feedback about their experience. This way, users can make informed decisions when engaging with listings, and business owners can receive valuable input to improve their services.

Customizing the Review Form

One of the most flexible aspects of the review system in ClassifiAd is the ability to customize the review form. Admins can tailor the review form to include specific fields, ensuring the reviews gather relevant and actionable information. Here’s how you can create or modify the review form:

1. Access the Review Form Settings:
– Navigate to your WordPress dashboard and go to CubeWP.
– Select Post Type Forms from the menu.

2. Select Post Type = Reviews:
– Once you’re in the Post Type Forms section, choose **Reviews** as the post type you want to edit.

3. Select the User Role:
– Choose the relevant user role—such as Admin** or Subscriber. This allows you to tailor the form according to who is posting the review (business owner or user).

4. Edit the Review Form:
– A customizable form builder will open, where you can drag and drop elements to include the specific fields you want users to fill in. You can add text boxes, ratings, dropdowns, and other fields that are relevant to the type of review you want to gather.

5. Save Your Form:
– Once you’ve arranged the form fields to your liking, save the form. This customized form will now be used for reviews within the platform.

Viewing and Managing Reviews

All submitted reviews will be easily accessible in the Author’s Page. Both the business owner and user reviews are neatly organized under the All Reviews tab, where users can see feedback that has been given and received.

Why the Two-Way Review System is Important

Trust & Transparency: By enabling both parties to review each other, ClassifiAd promotes a culture of trust. Users can feel confident that the reviews they see are balanced, with both business owners and customers having a voice.

Feedback for Improvement: Reviews provide business owners with valuable insights about how they can enhance their listings and customer service, while users get a chance to reflect on their experiences with each business.

Balanced Ratings: Since both sides can provide feedback, the review system remains balanced, giving a more holistic view of interactions on the platform.

Conclusion

The Two-Way Review System in ClassifiAd is a critical feature for fostering trust, transparency, and accountability between users and business owners. With customizable review forms, easy access to all reviews, and the ability for both parties to share their feedback, this system ensures a fair and open marketplace. It helps build a community of trust, where honest reviews benefit both users and business owners alike.

Start using the Two-Way Review System in ClassifiAd today to enhance your platform’s credibility and user experience!

chat system (Inbox)

Introducing the User-to-Ad Owner Chat System: Streamline Your Communication with Ease!

When it comes to buying, selling, or negotiating an item, clear and direct communication is key. Our User-to-Ad Owner chat system (Inbox) makes it easier than ever for users to get in touch with ad owners, ask questions, and even negotiate prices—all within the platform. This seamless communication channel ensures that both parties can interact directly, leading to faster responses and better outcomes.

How Does the User-to-Ad Owner Chat System Work?

The chat system allows users to send messages directly to the ad owner through the inbox feature, which is conveniently integrated into each ad’s detail page. Whether you have a question about the product or want to make an offer, the inbox allows you to contact the ad owner without leaving the platform.

Here’s how it works:

1. Message Form on the Ad Detail Page
Users can easily initiate a conversation with the ad owner by using the message form. This form is displayed on the ad detail page, allowing potential buyers to ask questions or negotiate with the seller in a direct, private chat.

2. Seamless Integration Using CubeWP
For website admins and developers using CubeWP, adding the message form to the ad detail page is incredibly simple:
– Navigate to CubeWP >> Single Post.
– Select the relevant post type (e.g., “General Ads”).
– Drag and drop the “message form” tab to the post card builder, positioning it where you’d like it to appear on the ad detail page.

Once this is set up, the message form will appear like this:

Users can fill out their inquiries or offers, and their message will be sent directly to the ad owner.

3. Messages Delivered to the Ad Owner’s Dashboard
After a message is sent from the form, it will appear in the Inbox tab of the ad owner’s dashboard. This means that the seller receives every inquiry in one central place, making it easy to manage multiple conversations and respond promptly.

4. Quick and Direct Responses
The ad owner can reply to the user directly through the Inbox in their dashboard. Users, in turn, will receive the seller’s response in their own inbox, ensuring that the conversation is ongoing and fluid. Both parties are notified of new messages, making it easy to stay updated on the latest interactions.

Benefits of the Chat System

1. Direct Communication: Buyers can instantly connect with sellers, clarifying product details, availability, or terms of negotiation. This reduces waiting time and speeds up the buying process.

2. Secure and Private: The conversation happens within the platform, protecting both parties’ privacy. There’s no need to exchange personal contact details like email addresses or phone numbers.

3. Organized Conversations: Both buyers and sellers have their conversations neatly organized under the **Inbox tab** in their respective dashboards, making it easy to track interactions, especially for frequent sellers or buyers.

4. Better Engagement: By offering a direct chat feature, sellers can engage potential buyers more effectively, answer queries in real-time, and potentially close sales faster.

Final Thoughts

The User-to-Ad Owner chat system (Inbox) is designed to foster better communication and streamline the buying process on your platform. By making it easy for users to reach out and receive responses directly from ad owners, you improve engagement, trust, and the likelihood of successful transactions. So, add the message form today and start experiencing more efficient interactions on your site!

Make An Offer

Introducing “Make an Offer” Feature: Make Your Best Offer to the Ad Owner!

When buying or negotiating for an item, flexibility is key. With our Make An Offer feature, users now have the ability to negotiate directly with the ad owner by sending offers based on the listed price of an ad. This feature simplifies the bargaining process by allowing users to submit offers quickly and directly from the ad detail page, making it easier than ever to get a deal that works for both parties.

How Does “Make An Offer” Work?

The Send Offers feature allows potential buyers to submit a bid to the ad owner for an item they’re interested in purchasing. Rather than just asking for more information or starting a chat, users can send a specific offer, giving them the power to negotiate directly and efficiently.

Here’s how it works:

1. Auto-Generated Offers Based on the Ad Price
When a user clicks on the “Make An Offer” button, the system will automatically generate offers based on the ad price. These offers are calculated within preset limits, ensuring that the offer is reasonable and falls within a certain range. The seller can then review and decide whether to accept, decline, or counter the offer.

2. Setting Offer Limits via CubeWP
For website admins, the offer system is fully customizable. You can control the range and flexibility of offers users can send by navigating to CubeWP >> Settings >> Buy and Offer. This allows you to set minimum and maximum limits for offers relative to the ad price, so both buyers and sellers benefit from fair and reasonable negotiations.


How to Add the “Offer Ad” Button to Your Ad Detail Page

Adding the “Offer ad” button to your ad detail page is simple and requires no coding experience:

1. Go to CubeWP >> Single Post in your WordPress admin dashboard.
2. Select the post type (such as General Ads) where you’d like to allow offers.
3. Drag and drop the “Offer Ad Button” tab into the single post builder, placing it in the spot where you’d like the button to appear on the ad detail page.

After following these steps, the “Send Offer” button will be displayed like this on the detail page:

Now, users can send their offers with just a click, right from the ad page.

What Happens After an Offer is Sent?

1. Offer Appears in the Ad Owner’s Inbox
Once a user sends an offer, the ad owner will receive a notification, and the offer will be displayed under the Inbox tab in the ad owner’s dashboard. This makes it easy for sellers to track all incoming offers, decide which ones to accept or decline, and even respond with a counteroffer if needed.

2. Easy Communication Through Inbox
The negotiation continues directly in the inbox, making communication streamlined and easy. Both the buyer and seller can keep track of the offers, responses, and agreements all within the platform—no need for external emails or messages.

Why Use the “Send Offers” Feature?

1. Convenient Negotiation: Instead of back-and-forth messages to agree on a price, users can send their best offer instantly, making the process faster and more efficient.

2. Fair and Transparent: With offer limits set by the admin, users and sellers both know that the offers are fair and within a reasonable range. This reduces the chances of lowball offers or unrealistic price expectations.

3.Encourages Buyer-Seller Interaction: The offer system encourages more users to engage with ads and start negotiations. Even if they can’t pay the full listed price, users feel empowered to make an offer and try to strike a deal.

4. Organized Offers and Responses: Sellers can easily manage all offers from their dashboard, making it simple to review, respond, and track conversations with potential buyers. The system keeps everything organized in one place.

Conclusion

The Make an offer feature is designed to enhance the buying and selling experience on your platform. It adds a level of flexibility and convenience that encourages users to engage with ads and make serious offers. Whether they’re looking to negotiate or simply want to make their best offer right away, this feature streamlines the process, making it a win-win for both buyers and sellers.

To take full advantage of the “Send Offers” feature, make sure to integrate the Offer Ad Button into your ad detail page today. It’s the perfect way to boost interaction, increase sales, and provide a seamless user experience on your platform!

Installation

Note

Before proceeding with installation we recommend to check the server requirements, Mentioned below

Requirements for instalation

Application Minimum
Wordpress
6.0
PHP
7.4
max_execution_time
300
memory_limit
256 M
post_max_size
256 M
upload_max_filesize
30 MB
Application Recommended Application Recommended
Curl
Yes
Cron Job
Yes
SSL
Yes

How to install and activate ClassifiedPro?

Instruction

You need to unzip the downloaded zip file and upload only the ”classified-pro.zip” otherwise theme installation will fail with the following error:

The package could not be installed. The theme is missing the style.css stylesheet.

Another common warning is “Are you sure you want to do this?”
This means the server has a limit on the file size that can be uploaded. Either have your host increase the limit or do a manual installation via FTP as shown in OPTION 1 below.

OPTION 1:

MANUAL INSTALLATION VIA FTP

STEP 1: Log into your server via an FTP software or cPanel.

STEP 2: Unzip the classified-pro.zip file and ONLY use the extracted theme folder.

STEP 3: Upload the extracted classified-pro theme folder to the following path /wp-content/themes/

STEP 4: Go to Appearance > Themes

STEP 5: Click Activate, under Classified-Pro


Once you click Activate, you will be auto-redirected to the Easy Setup page

OPTION 2:

INSTALLATION VIA WORDPRESS ADMIN PANEL

STEP 1: From the left-side menu, go to Appearance > Themes

STEP 2: On the top, click Add New tab

https://slite.com/api/files/byyj-hmxrRexsS/setup1.png

STEP 3: Click the Upload Theme

https://slite.com/api/files/lF0sJxykDtknZk/setup2.png

After the above step if you got an error saying, Are you sure you want to do this? Please try again. Don’t worry you are not alone, Please follow Option 1 instead of 2.

STEP 4: Click Activate

Once you click Activate, you will be auto-redirected to the Setup wizard page.


Success Message

Congratulations! Now you have completed the Theme Installation successfully.

Right to Deny Support

In соnnесtiоn with уоur uѕе of ClassifiedPro Recommerece Directory solution or any item sold by Cridio Studio, уоu acknowledge and agree that we (Cridio Studio) have the right to refuse to provide any form of support including technical or non-technical support and if you decide to use it on your own will then you will not solicit fоr аnу technical or nоn-tесhniсаl support fоr

  1. Businesses wеbѕitеѕ thаt deal with including (but nоt limitеd to) Gаmbling, Alсоhоl, Pornography (Adult content or nudity), Escort Sеrviсеѕ, Drugѕ, and Rасiѕm;
  2. Copy, rеvеrѕе engineer, reverse аѕѕеmblе, оthеrwiѕе attempt tо diѕсоvеr the ѕоurсе соdе, distribute, trаnѕmit, diѕрlау, реrfоrm, rерrоduсе, рubliѕh, license, create derivative wоrkѕ frоm, trаnѕfеr or ѕеll аnу information, ѕоftwаrе, рrоduсtѕ оr services оbtаinеd through thе Sitеѕ;
  3. Aссеѕѕ thе Sitеѕ by any mеаnѕ оthеr than thrоugh thе standard industry-accepted оr CridiоStudiо  provided оr аuthоrizеd intеrfасеѕ;
  4. Transmit any mеѕѕаgе, information, data, tеxt, ѕоftwаrе оr image, оr other соntеnt that is unlawful, hаrmful, threatening, аbuѕivе, hаrаѕѕing, tortuous, dеfаmаtоrу, vulgar, оbѕсеnе, libеlоuѕ, оr оthеrwiѕе objectionable which mау invade аnоthеr’ѕ right of рrivасу оr рubliсitу;
  5. Imреrѕоnаtе аnу person оr entity, inсluding without limitаtiоn, a CridiоStudiо оffiсiаl, fоrum lеаdеr, сhаt room mоnitоr, guidе or hоѕt, оr falsely ѕtаtе оr оthеrwiѕе misrepresent уоur аffiliаtiоn with ѕuсh a реrѕоn оr entity;
  6. Pоѕt оr trаnѕmit any mаtеriаl that contains a viruѕ оr соrruрtеd dаtа;
  7. Delete аnу author аttributiоnѕ, lеgаl notices or рrорriеtаrу dеѕignаtiоnѕ or labels that you upload tо аnу соmmuniсаtiоn fеаturе;
  8. Uѕе any of thе Sitеѕ’ соmmuniсаtiоnѕ fеаturеѕ in a mаnnеr thаt adversely аffесtѕ the аvаilаbilitу оf its rеѕоurсеѕ to other users (e.g., еxсеѕѕivе shouting, use оf аll сарѕ, оr flооding соntinuоuѕ роѕtingѕ оf rереtitivе text);
  9. Post оr transmit any unsolicited аdvеrtiѕing, рrоmоtiоnаl mаtеriаlѕ, “junk mаil”, “spam,” “сhаin lеttеrѕ,” “руrаmid ѕсhеmеѕ” оr any оthеr fоrm оf ѕоliсitаtiоn infоrmаtiоn ѕuсh аѕ opinions or notices, соmmеrсiаl оr otherwise;
  10. Viоlаtе any applicable lосаl, state, nаtiоnаl оr international law;
  11. Uрlоаd оr transmit аnу mаtеriаl thаt infringes аnу раtеnt, trаdеmаrk, trade ѕесrеt, соруright оr other рrорriеtаrу rightѕ of any party;
  12. Delete оr revise аnу mаtеriаl роѕtеd by аnу other реrѕоn or еntitу;
  13. Mаniрulаtе оr оthеrwiѕе diѕрlау the Sitеѕ bу uѕing framing оr similar navigational technology;
  14. Rеgiѕtеr, subscribe, attempt to register, аttеmрt tо subscribe, unsubscribe, or аttеmрt tо unѕubѕсribе, аnу раrtу fоr аnу CridiоStudiо рrоduсt or ѕеrviсе if уоu аrе not еxрrеѕѕlу аuthоrizеd bу ѕuсh раrtу tо do ѕо; оr
  15. Uѕе the Sitеѕ for аnу рurроѕе thаt iѕ unlаwful or рrоhibitеd bу thеѕе tеrmѕ. Yоu may not uѕе the Site in any manner thаt соuld damage, diѕаblе, оvеrburdеn оr impair CridiоStudiо’ѕ ѕеrvеrѕ or nеtwоrkѕ or interfere with аnу оthеr uѕеr’ѕ uѕе and еnjоуmеnt of the Sitеѕ. Furthеrmоrе, уоu mау nоt аttеmрt tо gain unauthorized ассеѕѕ tо аnу оf the Sitеѕ, ѕеrviсеѕ, ассоuntѕ, computer systems оr nеtwоrkѕ connected tо CridiоStudiо thrоugh hасking, password mining оr any other means. You may nоt оbtаin оr attempt to obtain аnу materials оr infоrmаtiоn thrоugh аnу mеаnѕ nоt intеntiоnаllу mаdе аvаilаblе thrоugh thе Sitеѕ.

ClassifiadPro

Get Started

In this part we will explain, How to get started with ClassifiedPro WordPress theme. 

We will explain:

  • What is ClassifiedPro theme
  • How to install this theme
  • How to activate the License for ClassifiedPro
  • How to Import the demo content 

Introduction

What is ClassifiedPro

ClassifiedPro is a ReCommerce Classified WordPress Theme, that enables you to create your own online marketplace in just a few clicks. Whether users are looking to sell used goods or they are in the market for something new, our advanced search goes deep to find all the relevant listings and our advanced filter helps narrow down the search results to find the best match.

Installation

Note

Before proceeding with installation we recommend to check the server requirements, Mentioned below

Requirements for instalation

Application Minimum
Wordpress
6.0
PHP
7.4
max_execution_time
300
memory_limit
256 M
post_max_size
256 M
upload_max_filesize
30 MB
Application Recommended Application Recommended
Curl
Yes
Cron Job
Yes
SSL
Yes

How to install and activate ClassifiedPro?

Instruction

You need to unzip the downloaded zip file and upload only the ”classified-pro.zip” otherwise theme installation will fail with the following error:

The package could not be installed. The theme is missing the style.css stylesheet.

Another common warning is “Are you sure you want to do this?”
This means the server has a limit on the file size that can be uploaded. Either have your host increase the limit or do a manual installation via FTP as shown in OPTION 1 below.

OPTION 1:

MANUAL INSTALLATION VIA FTP

STEP 1: Log into your server via an FTP software or cPanel.

STEP 2: Unzip the classified-pro.zip file and ONLY use the extracted theme folder.

STEP 3: Upload the extracted classified-pro theme folder to the following path /wp-content/themes/

STEP 4: Go to Appearance > Themes

STEP 5: Click Activate, under Classified-Pro


Once you click Activate, you will be auto-redirected to the Easy Setup page

OPTION 2:

INSTALLATION VIA WORDPRESS ADMIN PANEL

STEP 1: From the left-side menu, go to Appearance > Themes

STEP 2: On the top, click Add New tab

https://slite.com/api/files/byyj-hmxrRexsS/setup1.png

STEP 3: Click the Upload Theme

https://slite.com/api/files/lF0sJxykDtknZk/setup2.png

After the above step if you got an error saying, Are you sure you want to do this? Please try again. Don’t worry you are not alone, Please follow Option 1 instead of 2.

STEP 4: Click Activate

Once you click Activate, you will be auto-redirected to the Setup wizard page.


Success Message

Congratulations! Now you have completed the Theme Installation successfully.

License Activation

Setup Wizard

To auto-redirect to the Easy Setup wizard, you need to install and activate the Classified Pro theme. But if you had exit the setup wizard you can always go back to it by navigating to Appearance > Setup.

STEP 1: Click Get Started to start the Easy Setup wizard.

STEP 2: Enter your purchase key here to verify your license

https://slite.com/api/files/Hwo6PqvUCCkSm3/license.png

Success Message

By pressing the Verify License tab your license will be activated if valid.

Demo Import and Plugin Installation

How to import dummy data in ClassifiedPro?

To auto-redirect to the Easy Setup wizard, you need to install and activate the Classified Pro theme. But if you exited the setup wizard you can always go back to it by navigating to Appearance > Setup.

STEP 1: Click Get Started to start the Easy Setup wizard.

STEP 2: Enter your purchase key here to verify your license

https://slite.com/api/files/Hwo6PqvUCCkSm3/license.png

STEP 3: After verifying Continue to install all required Plugins.

Required plugins are:

  • CubeWP Framework,
  • CubeWP FrontendPro
  • CubeWP Classified
  • CubeWP Inbox
  • CubeWP Booster
  • CubeWP Reviews
  • Elementor

Other plugins are not mandatory, If later on, you need these plugins (CubeWP Wallet, CubeWP Payments, CubeWP Forms) you can again install them from Appearances >> Setup

Note: You can also download or Manage these plugins from CubeWP Website By using the same Email address used while the License activation process 

Your Username for the CubeWP website is the same email address which you used while activating the license and the Password is your Envato purchase key.
STEP 4: Click Import Content to import Dummy Content

The theme imports huge demo content and it takes time so be patient..!

Congratulations! Now you have completed Installing Plugins & Importing Demo Content

Note:After importing the demo, please save CubeWP Settings once.

Support

Refund Policy

We stand behind our products and your satisfaction with them is our sole purpose. However, because our products are digital goods delivered via Internet download we generally offer no refund for the ClassifiedPro WordPress Theme sold on Envato or Add-ons and Services sold directly via our website.

We offer no refund especially when:

  • If a user is caught selling or distributing our product illegally, no refund will be given and the user will be reported to Envato for further legal action.
  • A user takes support from our team to help launch their website and once launched, a user request for a refund, their request will be denied and reported.

However, customer satisfaction is our top priority we may offer a refund in exceptional circumstances.

THEREFORE WE DO HONOR REQUESTS FOR REFUND WHERE THE

THE FOLLOWING REASONS APPLY (CLICK THE LINKS TO READ MORE DETAIL):

Item is “not as described.”

An item is “not as described” if it is materially different from the item description or preview so you should expect the author to “tell it like it is” when it comes to the features and functionality of items. If it turns out the item is “not as described” you will be entitled to a refund.

Item doesn’t work the way it should

If an item doesn’t work the way it should and can’t easily be fixed, you are entitled to a refund of the item. This includes situations where the item has a problem that would have stopped you from buying it if you’d known about the problem in the first place. If the item can be fixed, then the author is required to do so promptly by updating the item otherwise you are entitled to a refund of that item.

Item has a security vulnerability 

If an item contains a security vulnerability and can’t easily be fixed, you are entitled to a refund of the item. If the item can be fixed, then the author should do so promptly by updating the item. If the item contains a security vulnerability that is not patched in an appropriate timeframe, then you are entitled to a refund of that item.

Item support is promised but not provided

If the author advertises their item as including item support and you are not provided that support in accordance with the item support policy, you will be entitled to a refund of your purchased support.

Item support extension not used

If you purchase an item support extension and request a refund of that extension before your existing item support expires you are entitled to a refund of that item support extension.

Items that have not been downloaded

If you have not downloaded a purchased item within three months from the date of purchase, you may be eligible for a refund. You will be required to provide the author of that item with your purchase code in order for the author to verify your claim that you have not downloaded an item. Although we think three months is a reasonable time, depending on where you are located, you might have a longer period to claim a refund if you have purchased for personal use and haven’t downloaded the item.

ACCEPTANCE OF THIS REFUND POLICY

It is your responsibility to familiarize yourself with this refund policy. By placing an order for any of our products, you indicate that you have read and understood this refund policy. And that you agree with and fully accept the terms herein.

If you do not agree with or fully accept the terms of this policy, we ask that you should not place an order with us.

CONTACT US

Please note that our support team is ready to provide you with timely and efficient professional assistance. We will attempt to find the best convenient solution for your query. Give us 24-48 hours for our support team to get back to you on the problem. Request for a refund is accepted within the period of 1 week after the order is placed. You should accompany this request with detailed and grounded reasons why you need a refund

Note: a refund is based solely on our own discretion

If you still think you are eligible for a refund of the ClassifiedPro WordPress theme purchase via Envato, please open a request here.

How To Use

ClassifiedPro is a ReCommerce Classified WordPress Theme, that enables you to create your own online marketplace in just a few clicks.

Typography Settings

How to set Typography Settings?

STEP 1: Go to CubeWP Settings >> Typography


Now change the typography as per your need. You will have various options for Body Font and Heading Styles, such as Font Family, Weight, Style, Size, Height, Color, etc

Header Search on Home Page

How to turn on the header Search on Home Page?

You can enable Header search on pages in CubeWP Settings.


STEP 1: Go to CubeWP Settings Header


https://slite.com/api/files/Qa6UWZ2x68TySI/headersearch.png


If you want to enable the search in headers, then make sure to add a search shortcode.


STEP 2: Go to CubeWP > Search Forms

STEP 3: Select your desired Post Type

STEP 4: Save Changes

STEP 5: Click on the Shortcode


https://slite.com/api/files/HUl6VD3KNqESCc/selectpost.png


Loop Grid Settings

How To Control Loop Grid Settings?

You can control loop grid options from CubeWP Settings.

STEP 1: Go to Loop Layout

You can control General, Property, and Automotive Loop Grid options by enabling the Custom Fields Loops


STEP 2: Turn on your desired Custom Field loop

STEP 3: Select your Custom Field Name

STEP 4: Add your Font Awesome icon related to your Custom Field

https://slite.com/api/files/LzFe-h6TXu0g0M/loop1.png

STEP 5: Save Changes


Your Loop Grid will look like this

https://slite.com/api/files/ktQIpYL0Zin-vQ/loop2.png


Top Bar menu

How to enable the Top Bar menu?

You can enable the top bar menu in the CubeWP Settings.
STEP 1: Go to Appearance  > Menu
STEP 2:  Create the Top bar menu if it’s not created already


https://slite.com/api/files/N37v_JEkt59Se8/topbar.png


STEP 3: Add your menu to the Top Bar menu
STEP 4: Click on the Header Top Bar option


https://slite.com/api/files/vWvZ4wWctdlKVM/topbar1.png


STEP 5:  Save Changes
STEP 6: Now Go to CubeWP Settings > Header
STEP 7: Turn on the Header top bar
STEP 8:  Save Changes

Landing pages

How to set landing pages for General, Property, and Automotive Ads in the Top Menu?

You can set the landing pages of these post types.


https://slite.com/api/files/Tni5NxIdSQnKXz/landing.png


STEP 1: Go to CubeWP Settings > Header
STEP 2: Scroll Down
STEP 3: Make sure that the Post Type Landing Page Links Option is on.
STEP 4: Select your Pages for General, Property, and Automotive Post Type


https://slite.com/api/files/UKH3x1WovzG92Z/landing1.png

Google AdSense

How to add Google AdSense in ClassifiedPRO

STEP 1: Create your AdSense into your Google Account..
STEP 2: When you’re done, copy your AdSense Code
STEP 3: Go to CubeWP Settings > Header > Scroll down > Home Page Header Google
AdSense / Static Image > Select Google AdSense
STEP 4: Paste your AdSense Code here
STEP 5: Same Steps for showing Inner pages.


https://slite.com/api/files/I-Jh_hzW-bwRyG/adsense.png


Requirements

ClassifiedPro is a ReCommerce Classified WordPress Theme, that enables you to create your own online marketplace in just a few clicks.

Server requirements

Server requirements to run ClassifiedPRO perfectly

Application Minimum
Wordpress
6.0
PHP
7.4
max_execution_time
300
memory_limit
256 MB
post_max_size
256 MB
upload_max_filesize
30 MB
max_input_vars
3000
Application Recommended Application Recommended
Curl
Yes
Cron Job
Yes
SSL
Yes
Note:

Many issues that you may run into such as; white screen, demo content fails when importing, empty page content and other similar issues are all related to low PHP configuration limits. The solution is to increase the PHP limits. You can do this on your own, or contact your web host and ask them to increase those limits to a minimum as shown above.

Security requirements

Is SSL required for ClassifiedPro?

Yes, SSL is required for Classified-Pro. Nowadays is highly recommended to include SSL in your domains. Some Cloud Servers and also Hosting Providers, also include SSL Certificates to enable your Websites. While using Classified-Pro some settings aren’t required the use of an SSL. Otherwise, some settings like Google MapsSocial LoginPayments, and others may require a Certificate that ensures the Website’s Security. If you don’t know what an SSL is and what it does on your Website, please Read this

Extra Paid Plugins

Do I need any Extra Paid Plugins for ClassifiedPro?

Classified Pro is an end-to-end directory solution. Whatever you see on the item page and demo is all included. Here’s the complete list of plugins that will come with Classified.

We do offer premium add-ons.

CORE PLUGINS (ALL INCLUDED, NO ADDITIONAL COST)

  • CubeWP Classified
  • CubeWP Framework
  • CubeWP Frontend Pro
  • CubeWP Payments
  • CubeWP Reviews
  • CubeWP Booster
  • CubeWP Forms
  • CubeWP Wallet
  • CubeWP Inbox

Third Party Plugins

Do I need any third party Plugins for ClassifiedPro?
THIRD-PARTY PLUGINS (INCLUDED)
  • Elementor
  • WooCommerce

Other than the above mentioned, we didn’t support any third-party plugins unless specified somewhere but you are most welcome to use any plugin as long as you don’t expect us to provide support.

FAQs

Frequently Asked Questions and Answers.

Q: Are regular updates and dedicated support provided for the Classified Pro?

A: Yes, the Classified Pro theme comes with regular updates and dedicated support.

Q: What does the Classified Pro theme package include?

A: The Classified Pro theme package comprises theme files, demo content, documentation, and any plugins bundled, which will be installed during setup.

Q: Is the Classified Pro theme fully compatible with the latest version of WordPress?

A: Absolutely, the Classified Pro theme is designed to be fully compatible with the latest version of WordPress.

Q: Are there any additional charges for the features or plugins displayed in the ClassifiedPro theme demo?

A: No, all essential features and plugins showcased in the demo are included in the theme purchase.

Q: Can I use the ClassifiedPro theme for multiple websites with a single license?

A: No, a single license is valid for one website. For each additional website, you will need to purchase extra licenses.

Q: How does ClassifiedPro perform, and is it optimized for SEO?

A: ClassifiedPro themes are optimized for fast performance and adhere to SEO best practices.

Q: Which page builder is supported by ClassifiedPro?

A: ClassifiedPro is compatible with Elementor page builder.

Q: Is it feasible to modify the commission for a product and earn a commission in ClassifiedPro?

A: Yes, you can customize the commission for a product and earn a commission through ClassifiedPro.

Q: What are the available pricing plan options in ClassifiedPro?

A: ClassifiedPro offers two pricing plan options:

  • Packages (Credits bundle)
  • Pay per Post

Q: Does ClassifiedPro facilitate multi-criteria reviews and ratings?

A: Yes, ClassifiedPro supports multi-criteria reviews and ratings.

Q: Can the ClassifiedPro theme be exclusively used for a Properties or an Automotive website?

A: Yes, it can.

Q: Is it possible to customize the ClassifiedPro theme according to my specific requirements?

A: ClassifiedPro, built on the CubeWP Framework, allows customization of styles for search, home page, single post layout, etc., to suit your preferences.

Q: Can I modify the URL structure in ClassifiedPro?

A: ClassifiedPro uses the default WordPress URL permalink structure, but you can use any Custom Permalinks WordPress Plugin to make adjustments.

Q: Does ClassifiedPro offer SMS verification for spam registrations?

A: Currently, ClassifiedPro supports email verification, not SMS verification.

Q: Can ClassifiedPro be used as an add-on to the ListingPro theme?

A: No, ClassifiedPro is a standalone theme and cannot be used as an add-on to the ListingPro theme.

Q: Can ClassifiedPro be utilized to build a directory website?

A: ClassifiedPro is designed for creating a Classified Ads directory.

Q: Can I create a Classified website without re-commerce/e-commerce features using ClassifiedPro?

A: Yes, you can build a Classified website without incorporating re-commerce/e-commerce features using ClassifiedPro.

Q: What steps should I take if I encounter issues while importing dummy content?

A: If facing issues during dummy content import, consider upgrading server resources and check server requirements in the theme documentation. If problems persist, open a ticket via the helpdesk at https://helpdesk.cridio.com/.

Q: Does ClassifiedPro theme support RTL languages?

A: No, ClassifiedPro theme currently does not support RTL languages.

Q: Is WPML supported by ClassifiedPro?

A: No, ClassifiedPro theme does not currently support WPML.

Q: Are customization services available for ClassifiedPro?

A: Yes, for customization services, you can request a free quote.

General

spamming or fake ads

How to avoid spamming or fake ads on my websites?

If we are talking about fake ads on classified websites, We have users verification system in Classified Pro.

You can turn on the email verification from the CubeWP Settings.

Go to CubeWP Settings > Email Verification > Turn On


https://slite.com/api/files/aXd9jpOL2xBBsA/email.png


Please make sure that your SMTP is working properly

How to fix the 404 errors after Theme Installation?

The following topics are covered in this article.

  • Set the Home Page and Blog Page
  • Set the Permalinks
  • Set page URLs in CubeWP Settings

Set the Home Page and Blog Page

STEP 1:  Go to Settings Reading

STEP 2:  Select Home from the drop-down.

STEP 3:  Select Blogs from the drop-down.

https://slite.com/api/files/MTz1-dsI2NtQHm/pages.png

STEP 4:  Click Save Changes

Set the Permalinks:

STEP 1:  Go to Settings > Permalinks

STEP 2:  Select to Post name

https://slite.com/api/files/0Q8-LxwtxrYad5/postlink.png

STEP 3:  Click Save Changes

Set page URLs in CubeWP Settings

There are some settings that need to take into consideration to avoid any 404 errors or blank images or shortcodes.

STEP 1: Go to the CubeWP Settings > URL Config and check the following details

https://slite.com/api/files/iHQZuVK9-UCnna/pagesettings.png

How much data can Classified Pro handle?

How can I Translate ClassifiedPro?

PLEASE READ THESE INSTRUCTIONS CAREFULLY:

These instructions are for SINGLE LANGUAGE translation and also can be applied to ENGLISH language users who want to just CHANGE TEXT ( Example: SELL NOW to Post your Ad. ENGLISH language users shouldn’t get confused with the word Translation here, as this is the only way to change all default text like many other themes

image

PART 1: INSTALL LOCO TRANSLATE PLUGIN

STEP 1: Log in to the WordPress admin dashboard.

STEP 2: Go to Plugins > Add New

STEP 3: Search for Loco Translate, and click Install Now.

STEP 4: Click Activate

image

PART 2: TRANSLATE THE THEME

STEP 1: Go to Loco Translate > Themes

STEP 2: Under the Bundle name, select ClassifiedPro

STEP 3: Click on New language

STEP 4: Under Choose a language, select a new WordPress language from the drop-down (Example: Portuguese).

STEP 5: Under Choose a location  Choose the second option (Others) settings selected, and click Start translating

image

For a Quick search. Use the Search Filter

Watch Video

How to (AUTO) update the ClassifiedPro WordPress theme?

PART 1: INSTALL ENVATO MARKET PLUGIN

STEP 1: Go to Plugins > Add New

STEP 2: Click the Upload Plugin

STEP 3: Click Choose File

To Download the Envato Market plugin Click Here

STEP 4: Upload the file above.

STEP 5: Click Install Now

STEP 6:  Click Activate Plugin

PART 2: CONFIGURE THE ENVATO MARKET PLUGIN

STEP 1: Go to Envato Market

STEP 2: Under Global OAuth Personal Token, click Generate a personal token

image

STEP 3: Give a Token name (Example: ClassifiedPro)

STEP 4: Check if these 4 boxes’ Permissions were included as shown below.

STEP 5: Accept the terms, and click Create Token

STEP 6: Copy the newly Generated Token

image

STEP 7: Go back to Envato Market and paste the newly Generated Token

STEP 8: Click Save Changes

styles for Blog Grids

How many styles do ClassifiedPRO have for Blog Grids?

Classified Pro have 3 blog grids styles


We have three options in the blog grids.

You can set the blog styles from the CubeWP Settings.


STEP 1: Go to CubeWP Settings > Blog > Blog Grid Styles


https://slite.com/api/files/RqqNJWg6s1v4ad/bloggrids.png


You can also enable or disable the Sidebar, blog banner image, and title of the banner in this section.

How to update the ClassifiedPro Theme and plugin?

PART 1: MOVE CUSTOMIZATION TO THE CHILD THEME

STEP 1: Make sure the Child Theme is installed and active. ( If not, Please install the child theme which is in your package )

STEP 2: Locate ALL the custom code changes made (either by you, your developer, or even by our Custom Services Team upon your request).

STEP 3: Move all Custom Code changes to the Child theme.

When you move a file that includes custom changes (for example header.php), the file name and the path in the child theme should match with the parent theme. Watch Video

PART 2: MOVE THEME TRANSLATION TO CHILD THEME

PART 3: BACKUP PLUGIN TRANSLATION FILES

STEP 1: Go to /wp-content/plugins/cubewp-addon-classified/languages

STEP 2: Download and save .po and .mo

PART 4: BACKUP FULL THEME & PLUGIN

Backup via cPanel (Recommended)

STEP 1: Log into cPanel > File Manager.

STEP 2: Go to wp-content/themes/

STEP 3: Right-click  ClassifiedPro, and then click Compress

Dashboard page

Why Dashboard page is not going to the dashboard?

There might be that your dashboard page is not selected properly. Please make sure that your dashboard page is selected in the CubeWP Settings > URL Config

For more about URLs please read this article.

Is Classified Pro Support Personalized Ads?

Yes, we have the option of personalization in the ClassifiedPro theme. You can enable Personalization from CubeWP Options.

STEP 1: Go to CubeWP Setting > Personalization

STEP 2: Turn Personalization On

image

STEP 3: Go to Elementor and create a section

STEP 4: Add Ads Element in the section

image

STEP 5: Select Recommended

Image

STEP 6: Go to section Advanced tab > CSS Classes

image

STEP 7: Add this class classified-hide-no-content-section

Note: This class works when no data in this section, The class hides this section. Now when you search or visit any ad, the Recommended ads were showing in the section which you created with the Recommended label

License Activation

Setup Wizard

To auto-redirect to the Easy Setup wizard, you need to install and activate the Classified Pro theme. But if you had exit the setup wizard you can always go back to it by navigating to Appearance > Setup.

STEP 1: Click Get Started to start the Easy Setup wizard.

STEP 2: Enter your purchase key here to verify your license

https://slite.com/api/files/Hwo6PqvUCCkSm3/license.png

Success Message

By pressing the Verify License tab your license will be activated if valid.

How To Use

ClassifiedPro is a ReCommerce Classified WordPress Theme, that enables you to create your own online marketplace in just a few clicks.

Typography Settings

How to set Typography Settings?

STEP 1: Go to CubeWP Settings >> Typography


Now change the typography as per your need. You will have various options for Body Font and Heading Styles, such as Font Family, Weight, Style, Size, Height, Color, etc

Header Search on Home Page

How to turn on the header Search on Home Page?

You can enable Header search on pages in CubeWP Settings.


STEP 1: Go to CubeWP Settings Header


https://slite.com/api/files/Qa6UWZ2x68TySI/headersearch.png


If you want to enable the search in headers, then make sure to add a search shortcode.


STEP 2: Go to CubeWP > Search Forms

STEP 3: Select your desired Post Type

STEP 4: Save Changes

STEP 5: Click on the Shortcode


https://slite.com/api/files/HUl6VD3KNqESCc/selectpost.png


Loop Grid Settings

How To Control Loop Grid Settings?

You can control loop grid options from CubeWP Settings.

STEP 1: Go to Loop Layout

You can control General, Property, and Automotive Loop Grid options by enabling the Custom Fields Loops


STEP 2: Turn on your desired Custom Field loop

STEP 3: Select your Custom Field Name

STEP 4: Add your Font Awesome icon related to your Custom Field

https://slite.com/api/files/LzFe-h6TXu0g0M/loop1.png

STEP 5: Save Changes


Your Loop Grid will look like this

https://slite.com/api/files/ktQIpYL0Zin-vQ/loop2.png


Top Bar menu

How to enable the Top Bar menu?

You can enable the top bar menu in the CubeWP Settings.
STEP 1: Go to Appearance  > Menu
STEP 2:  Create the Top bar menu if it’s not created already


https://slite.com/api/files/N37v_JEkt59Se8/topbar.png


STEP 3: Add your menu to the Top Bar menu
STEP 4: Click on the Header Top Bar option


https://slite.com/api/files/vWvZ4wWctdlKVM/topbar1.png


STEP 5:  Save Changes
STEP 6: Now Go to CubeWP Settings > Header
STEP 7: Turn on the Header top bar
STEP 8:  Save Changes

Landing pages

How to set landing pages for General, Property, and Automotive Ads in the Top Menu?

You can set the landing pages of these post types.


https://slite.com/api/files/Tni5NxIdSQnKXz/landing.png


STEP 1: Go to CubeWP Settings > Header
STEP 2: Scroll Down
STEP 3: Make sure that the Post Type Landing Page Links Option is on.
STEP 4: Select your Pages for General, Property, and Automotive Post Type


https://slite.com/api/files/UKH3x1WovzG92Z/landing1.png

Google AdSense

How to add Google AdSense in ClassifiedPRO

STEP 1: Create your AdSense into your Google Account..
STEP 2: When you’re done, copy your AdSense Code
STEP 3: Go to CubeWP Settings > Header > Scroll down > Home Page Header Google
AdSense / Static Image > Select Google AdSense
STEP 4: Paste your AdSense Code here
STEP 5: Same Steps for showing Inner pages.


https://slite.com/api/files/I-Jh_hzW-bwRyG/adsense.png


spamming or fake ads

How to avoid spamming or fake ads on my websites?

If we are talking about fake ads on classified websites, We have users verification system in Classified Pro.

You can turn on the email verification from the CubeWP Settings.

Go to CubeWP Settings > Email Verification > Turn On


https://slite.com/api/files/aXd9jpOL2xBBsA/email.png


Please make sure that your SMTP is working properly

License

How can I deactivate my license of Theme on my own?

The Theme is dependent on the Paid CubeWP add-ons, and the add-ons have only one website activate limit, You can manage your licensesby your own self.

  • Go to My Account
  • Click on Licenses
  • Click on Manage
my-accouunt
  • Deactivate your Previous website
  • Add your New website URL
manage

Facing No_activations_left after entering license code

image

It seems that your license is already activated on another domain. In this scenario, you would need to deactivate the license from the previous website before attempting to activate it again on a new one. To do so, you can follow the steps mentioned below:

  • Go to the website  CubeWP.com
  • Log in with the registered email and the password is your purchase code 
  • Go to My Account
  • Click on the License tab
image
  • Deactivate the license from your account
  • Attempt to activate the license on the new website by entering the website URL

Does the support include FREE Customization?

No, theme support doesn’t include FREE Customization. Please see ThemeForest Policy regarding what’s included in the support.

CLICK HERE TO READ OUR OFFICIAL POLICY

ThemeForest Official Policy regarding what’s included in the support:

Item support does not include services to modify or extend the item beyond the original features, style, and functionality described on the item page. For customization services that will help you tailor the item to your specific requirements, we recommend contacting the author to see if they privately offer paid customization services or check out the great service providers on Envato Studio.

For more information see What’s Not Included.

Requirements

ClassifiedPro is a ReCommerce Classified WordPress Theme, that enables you to create your own online marketplace in just a few clicks.

Server requirements

Server requirements to run ClassifiedPRO perfectly

Application Minimum
Wordpress
6.0
PHP
7.4
max_execution_time
300
memory_limit
256 MB
post_max_size
256 MB
upload_max_filesize
30 MB
max_input_vars
3000
Application Recommended Application Recommended
Curl
Yes
Cron Job
Yes
SSL
Yes
Note:

Many issues that you may run into such as; white screen, demo content fails when importing, empty page content and other similar issues are all related to low PHP configuration limits. The solution is to increase the PHP limits. You can do this on your own, or contact your web host and ask them to increase those limits to a minimum as shown above.

Security requirements

Is SSL required for ClassifiedPro?

Yes, SSL is required for Classified-Pro. Nowadays is highly recommended to include SSL in your domains. Some Cloud Servers and also Hosting Providers, also include SSL Certificates to enable your Websites. While using Classified-Pro some settings aren’t required the use of an SSL. Otherwise, some settings like Google MapsSocial LoginPayments, and others may require a Certificate that ensures the Website’s Security. If you don’t know what an SSL is and what it does on your Website, please Read this

Extra Paid Plugins

Do I need any Extra Paid Plugins for ClassifiedPro?

Classified Pro is an end-to-end directory solution. Whatever you see on the item page and demo is all included. Here’s the complete list of plugins that will come with Classified.

We do offer premium add-ons.

CORE PLUGINS (ALL INCLUDED, NO ADDITIONAL COST)

  • CubeWP Classified
  • CubeWP Framework
  • CubeWP Frontend Pro
  • CubeWP Payments
  • CubeWP Reviews
  • CubeWP Booster
  • CubeWP Forms
  • CubeWP Wallet
  • CubeWP Inbox

Third Party Plugins

Do I need any third party Plugins for ClassifiedPro?
THIRD-PARTY PLUGINS (INCLUDED)
  • Elementor
  • WooCommerce

Other than the above mentioned, we didn’t support any third-party plugins unless specified somewhere but you are most welcome to use any plugin as long as you don’t expect us to provide support.

Demo Import and Plugin Installation

How to import dummy data in ClassifiedPro?

To auto-redirect to the Easy Setup wizard, you need to install and activate the Classified Pro theme. But if you exited the setup wizard you can always go back to it by navigating to Appearance > Setup.

STEP 1: Click Get Started to start the Easy Setup wizard.

STEP 2: Enter your purchase key here to verify your license

https://slite.com/api/files/Hwo6PqvUCCkSm3/license.png

STEP 3: After verifying Continue to install all required Plugins.

Required plugins are:

  • CubeWP Framework,
  • CubeWP FrontendPro
  • CubeWP Classified
  • CubeWP Inbox
  • CubeWP Booster
  • CubeWP Reviews
  • Elementor

Other plugins are not mandatory, If later on, you need these plugins (CubeWP Wallet, CubeWP Payments, CubeWP Forms) you can again install them from Appearances >> Setup

Note: You can also download or Manage these plugins from CubeWP Website By using the same Email address used while the License activation process 

Your Username for the CubeWP website is the same email address which you used while activating the license and the Password is your Envato purchase key.
STEP 4: Click Import Content to import Dummy Content

The theme imports huge demo content and it takes time so be patient..!

Congratulations! Now you have completed Installing Plugins & Importing Demo Content

Note:After importing the demo, please save CubeWP Settings once.

How to Renew an Expired Support?

Once the support is expired you must renew your support in order for our support engineer to be able to respond to your technical support-related questions. Also note that all support queries are answered only via the help desk, and not via the ThemeForest comments page or any email.

If you have found a bug in the product, you can report it to us and you do not need to have active support for reporting a bug. Once you report a bug we will evaluate and provide a temporary fix as needed and will fix it in the next release. We can try to provide the patch as soon as possible but there is no guarantee on how long it may take. It all depends on the severity of the bug.

In order to extend or renew an item’s support offering, you must have less than 6 months of the existing support period remaining.

To renew the support component on an item, please follow these steps:

STEP 1: Log in to your  Envato Account

STEP 2: Hover over your username and click Downloads from the drop-down menu.

STEP 3: The download section displays a list of all the items purchased using your account.

STEP 4: Click on Renew support now! or Extend now next to the item you wish to renew the item support for.

See screenshot below

image

image

Ads

On-site ad campaigns

On-Site Ad Campaigns: Boost Your Listings with ClassifiAd’s Featured Ad Campaigns

Running successful ad campaigns is crucial for increasing the visibility and engagement of your listings, and the ClassifiAd theme makes this easier with its On-site Ad Campaigns feature. Through this system, users can promote their ads to Featured Listings, ensuring premium placement and maximum exposure on the platform.

Why Promote to a Featured Listing?

Promoting your ad to a Featured Listing offers several advantages that can significantly improve the visibility of your listing:

Premium Placement: Your listing is pushed to the top of the search results, making it one of the first ads users see.
Top of Listings/Results: Featured ads appear prominently in the most visible areas of the listing pages, improving the chances of user engagement.
Highlighted Styling: Featured ads are styled differently, drawing attention with unique visuals to make them stand out among regular listings.
Boosted Visibility: With these features combined, your listing gets more views and interactions, helping it gain priority over competing ads.

Step-by-Step Process: How to Run a Featured Ad Campaign

The ClassifiAd theme makes it simple for users to launch their own featured ad campaigns. Here’s a step-by-step guide:

1. Access the User Dashboard: Log into your account and navigate to your User Dashboard.

2. Boost Your Ad: In the dashboard, click on the Boost Your Ad section. This will take you to the boost campaign options for your existing posts.

3. Select the Boost Type: From the list of available post types, select the one for which you want to boost the ad. Then, click on New Boost to start the promotion process.

4. Choose Boost Option: Two types of boost options will appear:
Bump Up: This pushes your ad higher in the listing but does not provide the enhanced visibility of a featured ad.
Featured Ad: Select Featured Ad to ensure premium placement with all the advantages listed above.

5. Enter Ad Details:
– Enter the Title of your ad.
– Select the Post you want to run the ad for (from your available listings).
6. Select Boost Type:
– Choose between two payment models:
Pay Per Click: Pay based on the number of clicks the ad receives.
Pay Per Day: Pay a flat fee for the number of days you want your ad to remain featured.

7. Select Pay Per Day:
– If you choose Pay Per Day, select the number of days you want your ad to be featured.

8. Ad Summary: You will see an Ad Summary on the right-hand sidebar at the bottom. This summary displays the details of your promotion, including cost, duration, and ad type.

The price displays as Pay per click and Pay per day can be set from Cubewp >> Post type forms
Select post type as Booster and then press Form settings then at the bottom of the form you can see the amount set for Ads rates.


9. Payment and Checkout: Click on Pay to Boost to proceed to the checkout page. Enter your payment information, select your payment option, and press Place Order.


10. Order Completion: Once the payment is processed, the system will create the order. Now, the admin needs to confirm the order.

11. Admin Payment Processing: The admin will manually complete the payment process by marking the order as completed in the system.


How the Ad Displays

Once your ad promotion is complete and the payment is confirmed, your Featured Ad will display as:

Conclusion

ClassifiAd’s On-site Ad Campaigns allow users to maximize the visibility of their listings through Featured Ads. The easy-to-follow process ensures that you can boost your ads quickly and effectively, giving your posts the spotlight they deserve. By promoting your listings through Premium Placement, you can increase the chances of driving more traffic and engagement, ultimately leading to better conversions.

Take control of your ads and boost them today with ClassifiAd!

Bump-up ad campaigns

Bump Up Ad Campaign: Renew Your Listing’s Visibility

In the competitive world of classified listings, keeping your ad visible and relevant is essential to attracting potential buyers or clients. The Bump Up Ad Campaign feature in the ClassifiAd theme allows you to revitalize an older ad by renewing its visibility and moving it to the top of the listings. Here’s why and how you should take advantage of the Bump Up option.

Why Bump Up Your Listing?

As new listings continue to get posted, older ads can gradually move down the page, becoming less visible to users browsing the site. With the Bump Up feature, you can renew an existing listing’s visibility by pushing it back to the top of the search results. Here’s why this is beneficial:

Moves Ad to Top: The Bump Up option immediately moves your ad to the top of the listings, making it one of the first ads that users see when they search for relevant categories. This increased visibility can lead to more clicks and inquiries, reviving interest in your ad.

Resets Posting Date: When you Bump Up an ad, the posting date resets, making the listing appear as if it were freshly posted. This gives your ad the advantage of appearing more relevant and up-to-date, even if it was initially posted weeks or months ago.

Promotes Older Ads: Older ads often get overlooked as users gravitate toward newer posts. Bump Up helps you promote these older ads without having to create a new listing from scratch, allowing you to extend the life and visibility of your previous posts.

Step-by-Step Process: How to Run a Featured Ad Campaign

The ClassifiAd theme makes it simple for users to launch their own featured ad campaigns. Here’s a step-by-step guide:

1. Access the User Dashboard: Log into your account and navigate to your User Dashboard.

2. Boost Your Ad: In the dashboard, click on the Boost Your Ad section. This will take you to the boost campaign options for your existing posts.

3. Select the Boost Type: From the list of available post types, select the one for which you want to boost the ad. Then, click on New Boost to start the promotion process.

4. Choose Boost Option: Two types of boost options will appear:
Bump Up: This pushes your ad higher in the listing but does not provide the enhanced visibility of a featured ad.
Featured Ad: To ensure premium placement with all the advantages listed above.
Select Bump Up boost type

5. Enter Ad Details:
– Enter the Title of your ad.
– Select the Post you want to run the ad for (from your available listings).
6. Select Boost Type:
– Select bump up fee:

The price displays can be set from Cubewp >> Post type forms
Select post type as Booster and then press Form settings then at the bottom of the form you can see the amount set for Ads rates.

7. Payment and Checkout: Click on Pay to Boost to proceed to the checkout page. Enter your payment information, select your payment option, and press Place Order.


8. Order Completion: Once the payment is processed, the system will create the order. Now, the admin needs to confirm the order.

9. Admin Payment Processing: The admin will manually complete the payment process by marking the order as completed in the system.


How the Ad Displays

Once your ad promotion is complete and the payment is confirmed, your Featured Ad will display as:

Conclusion

The Bump Up Ad Campaign is a simple yet powerful tool in the ClassifiAd theme that helps you keep your ads visible and relevant. Whether you want to renew the visibility of an older ad or maintain the engagement level of a current post, Bump Up offers a quick and efficient solution to get your listing back at the top. By moving your ad to the top of the search results, resetting its posting date, and giving older listings a fresh boost, you can maximize the visibility of your content and attract more potential buyers or clients.

Use the Bump Up feature today and keep your listings at the forefront of the market!

Boost Your Ad message

Boost Your Ad: Maximize Visibility and Get Noticed!

As an ad owner, you understand that visibility is the key to attracting the right audience. Whether you’re selling a product, offering a service, or promoting an event, the more people who see your ad, the better your chances of achieving success. That’s where the “Boost Your Ad” feature comes in—an easy and effective way to increase your ad’s exposure and make sure it stands out from the crowd!

What is “Boost Your Ad”?

When you post an ad on our platform, it gets listed among many other ads in the same category. While your ad is still accessible, it can quickly get buried under newer posts. To help you keep your ad visible and in front of potential buyers, we’ve introduced the “Boost Your Ad” option.

This feature displays a prominent message above your ad card:

Boost Your Ad to reach more potential customers!

Below this message, there will be a “Click here to Boost” button, conveniently placed to encourage users to enhance their ad’s visibility with a simple click.

What Happens When You Click “Boost”?

Clicking on the “Click here to Boost” button will open up a popup having Boost Now button which takes you to Booster form. This form allows you to choose from several boosting options, each designed to give your ad the prominence it deserves. Whether you’re looking for a short-term bump in visibility or a longer-lasting feature, our flexible options have you covered.

Why Boost Your Ad?

1. Increase Ad Visibility:A boosted ad gets featured at the top of the listing, ensuring it’s seen by more potential buyers.
2. Get Noticed Faster: Boosting can help your ad grab attention sooner, so you can make a sale or get inquiries in less time.
3. Stand Out from the Competition: By boosting your ad, you’ll gain an edge over other ads in the same category, making yours more likely to catch the eye.
4. Targeted Exposure: When you boost, your ad reaches a larger, more targeted audience—helping you connect with people who are genuinely interested in what you’re offering.

How Easy is it to Boost?

Boosting your ad is as simple as clicking the **”Click here to Boost”** button, choosing a boosting package, and completing the form. It only takes a few moments, and the benefits are immediate. Your ad will be bumped up and highlighted, increasing your chances of a successful sale or response.

Don’t let your ad get lost in the crowd—boost your ad today and ensure it gets the attention it deserves! Whether you’re looking for more views, quicker responses, or increased engagement, boosting is the perfect way to get your ad noticed. Click the button and start seeing the results for yourself!

Support

What’s included in item support?


Any kind of extortion or blackmailing or threatening prior or after posting a negative review, in return for any of the following but not limited to:
1) Free Customization work
2) Integration with 3rd Party Plugins that we do not support.
3) Resolving conflict with a 3rd Party Plugin whether it’s technical or design including CSS related.
4) We do not provide support for customization work made by you or your developer or any third-party service.
Will be reported to Envato for further legal action and the support contract will be immediately terminated. We will not hesitate to take legal action against such a person or group of personsAlso please be advised that we do not provide support to businesses wеbѕitеѕ thаt deal with including (but nоt limitеd to) Gаmbling, Alсоhоl, Pоrn, Escort Sеrviсеѕ, Prostitution, Drugѕ, and Rасiѕm. For more information please read Right to Deny Support.

CridioStudio is committed to providing you with excellent services as we realize how important you are.

Envato Official Policy

What’s included in item support
What’s not included in item support

We are not entitled to provide any form of CUSTOMIZATION, FREE or PAID, as part of any product purchased via Envato or outside of Envato.

If you are genuinely interested in PAID CUSTOMIZATION services, please fill email at service@cridio.com

Sole Discretion

Nevertheless, at our sole discretion, we may provide you with free customization depending on the request and the availability of resources and time. We have the full right to accept or reject the request for free customization.

Indеmnifiсаtiоn

Uѕеr аgrееѕ to defend, indеmnifу, аnd hоld hаrmlеѕѕ, Cridio Studio itѕ соntributоrѕ, аnу еntitу jointly сrеаtеd by them, thеir rеѕресtivе affiliates аnd thеir rеѕресtivе dirесtоrѕ, оffiсеrѕ, еmрlоуееѕ, аnd аgеntѕ frоm аnd аgаinѕt all сlаimѕ аnd еxреnѕеѕ, inсluding аttоrnеуѕ’ fееѕ, аriѕing out оf thе uѕе оf thе оn-linе ѕеrviсе bу uѕеr оr uѕеr’ѕ ассоunt.

Right to Deny Support

In соnnесtiоn with уоur uѕе of ClassifiedPro Recommerece Directory solution or any item sold by Cridio Studio, уоu acknowledge and agree that we (Cridio Studio) have the right to refuse to provide any form of support including technical or non-technical support and if you decide to use it on your own will then you will not solicit fоr аnу technical or nоn-tесhniсаl support fоr

  1. Businesses wеbѕitеѕ thаt deal with including (but nоt limitеd to) Gаmbling, Alсоhоl, Pornography (Adult content or nudity), Escort Sеrviсеѕ, Drugѕ, and Rасiѕm;
  2. Copy, rеvеrѕе engineer, reverse аѕѕеmblе, оthеrwiѕе attempt tо diѕсоvеr the ѕоurсе соdе, distribute, trаnѕmit, diѕрlау, реrfоrm, rерrоduсе, рubliѕh, license, create derivative wоrkѕ frоm, trаnѕfеr or ѕеll аnу information, ѕоftwаrе, рrоduсtѕ оr services оbtаinеd through thе Sitеѕ;
  3. Aссеѕѕ thе Sitеѕ by any mеаnѕ оthеr than thrоugh thе standard industry-accepted оr CridiоStudiо  provided оr аuthоrizеd intеrfасеѕ;
  4. Transmit any mеѕѕаgе, information, data, tеxt, ѕоftwаrе оr image, оr other соntеnt that is unlawful, hаrmful, threatening, аbuѕivе, hаrаѕѕing, tortuous, dеfаmаtоrу, vulgar, оbѕсеnе, libеlоuѕ, оr оthеrwiѕе objectionable which mау invade аnоthеr’ѕ right of рrivасу оr рubliсitу;
  5. Imреrѕоnаtе аnу person оr entity, inсluding without limitаtiоn, a CridiоStudiо оffiсiаl, fоrum lеаdеr, сhаt room mоnitоr, guidе or hоѕt, оr falsely ѕtаtе оr оthеrwiѕе misrepresent уоur аffiliаtiоn with ѕuсh a реrѕоn оr entity;
  6. Pоѕt оr trаnѕmit any mаtеriаl that contains a viruѕ оr соrruрtеd dаtа;
  7. Delete аnу author аttributiоnѕ, lеgаl notices or рrорriеtаrу dеѕignаtiоnѕ or labels that you upload tо аnу соmmuniсаtiоn fеаturе;
  8. Uѕе any of thе Sitеѕ’ соmmuniсаtiоnѕ fеаturеѕ in a mаnnеr thаt adversely аffесtѕ the аvаilаbilitу оf its rеѕоurсеѕ to other users (e.g., еxсеѕѕivе shouting, use оf аll сарѕ, оr flооding соntinuоuѕ роѕtingѕ оf rереtitivе text);
  9. Post оr transmit any unsolicited аdvеrtiѕing, рrоmоtiоnаl mаtеriаlѕ, “junk mаil”, “spam,” “сhаin lеttеrѕ,” “руrаmid ѕсhеmеѕ” оr any оthеr fоrm оf ѕоliсitаtiоn infоrmаtiоn ѕuсh аѕ opinions or notices, соmmеrсiаl оr otherwise;
  10. Viоlаtе any applicable lосаl, state, nаtiоnаl оr international law;
  11. Uрlоаd оr transmit аnу mаtеriаl thаt infringes аnу раtеnt, trаdеmаrk, trade ѕесrеt, соруright оr other рrорriеtаrу rightѕ of any party;
  12. Delete оr revise аnу mаtеriаl роѕtеd by аnу other реrѕоn or еntitу;
  13. Mаniрulаtе оr оthеrwiѕе diѕрlау the Sitеѕ bу uѕing framing оr similar navigational technology;
  14. Rеgiѕtеr, subscribe, attempt to register, аttеmрt tо subscribe, unsubscribe, or аttеmрt tо unѕubѕсribе, аnу раrtу fоr аnу CridiоStudiо рrоduсt or ѕеrviсе if уоu аrе not еxрrеѕѕlу аuthоrizеd bу ѕuсh раrtу tо do ѕо; оr
  15. Uѕе the Sitеѕ for аnу рurроѕе thаt iѕ unlаwful or рrоhibitеd bу thеѕе tеrmѕ. Yоu may not uѕе the Site in any manner thаt соuld damage, diѕаblе, оvеrburdеn оr impair CridiоStudiо’ѕ ѕеrvеrѕ or nеtwоrkѕ or interfere with аnу оthеr uѕеr’ѕ uѕе and еnjоуmеnt of the Sitеѕ. Furthеrmоrе, уоu mау nоt аttеmрt tо gain unauthorized ассеѕѕ tо аnу оf the Sitеѕ, ѕеrviсеѕ, ассоuntѕ, computer systems оr nеtwоrkѕ connected tо CridiоStudiо thrоugh hасking, password mining оr any other means. You may nоt оbtаin оr attempt to obtain аnу materials оr infоrmаtiоn thrоugh аnу mеаnѕ nоt intеntiоnаllу mаdе аvаilаblе thrоugh thе Sitеѕ.

Does the support include FREE Customization?

No, theme support doesn’t include FREE Customization. Please see ThemeForest Policy regarding what’s included in the support.

CLICK HERE TO READ OUR OFFICIAL POLICY

ThemeForest Official Policy regarding what’s included in the support:

Item support does not include services to modify or extend the item beyond the original features, style, and functionality described on the item page. For customization services that will help you tailor the item to your specific requirements, we recommend contacting the author to see if they privately offer paid customization services or check out the great service providers on Envato Studio.

For more information see What’s Not Included.

How to Renew an Expired Support?

Once the support is expired you must renew your support in order for our support engineer to be able to respond to your technical support-related questions. Also note that all support queries are answered only via the help desk, and not via the ThemeForest comments page or any email.

If you have found a bug in the product, you can report it to us and you do not need to have active support for reporting a bug. Once you report a bug we will evaluate and provide a temporary fix as needed and will fix it in the next release. We can try to provide the patch as soon as possible but there is no guarantee on how long it may take. It all depends on the severity of the bug.

In order to extend or renew an item’s support offering, you must have less than 6 months of the existing support period remaining.

To renew the support component on an item, please follow these steps:

STEP 1: Log in to your  Envato Account

STEP 2: Hover over your username and click Downloads from the drop-down menu.

STEP 3: The download section displays a list of all the items purchased using your account.

STEP 4: Click on Renew support now! or Extend now next to the item you wish to renew the item support for.

See screenshot below

image

image

Editor and Builders

Search form builder using Taxonomies and custom Fields

  • Go to CubeWP.
  • Click on Search Forms.
  • A new window will be open.
  • Select your Post Type.
  • Add WordPress default fields including Title and Featured Image
  • Drag and drop the preferred taxonomies and custom fields to the search form. This customisation allows you to include specific criteria for the search.

Note:You have the options to customize the appearance of taxonomy based on your needs, such as Checkboxes, Multi-dropdowns, Dropdowns, and the option to choose Select 2 UI.

Note: you can add your custom fields in the search if you have CubeWP FrontendPro

  • Clicking Save Changes will generates a code.
  • Copy that Generated Code.
  • Create a new page where you want to display the custom search form.
  • In the content area of the new page, paste the previously copied short-code.
  • Save and publish the page.
  • Visit the newly created page on your website.
  • Your custom search form is now live and ready for use.

Post Type submission form builder

To Create Post Type Form for any Post Type, follow below steps:

  • Go to CubeWP
  • Go to Post Types Form builder
  • Choose the Post Type for which you want to create a form
  • Create a form section
  • Drag your taxonomies and custom fields for users to input additional post information
  • Include mandatory fields like Title and Feature Image
  • Customise field sizes if needed
  • Save your changes
  • Copy Short-code

To show this form on frontend, follow the below steps:

  • Go to Pages
  • Create a New Page
  • Paste the shortcode into the page content area
  • Publish the page

Search Filter builder using Custom Fields

To create Search Filter using Custom Fields Follow the steps below:

  • Go to CubeWP.
  • Click on Search Filter.
  • A new window will be open.
  • Select your post type from right side of the window.
  • Select WordPress Default Fields
  • Select your desired taxonomies

You have the options to customize the appearance of taxonomy based on your needs, such as Checkboxes, Multi-dropdowns, Dropdowns, and the option to choose Select 2 UI.

  • Enhance your filters by adding custom fields for additional data.

Note: you can add your custom fields in the search to use as filter

  • Click on “Save Changes” to apply and save your filter settings.

Search filters are OFF by default in CubeWP Setting. 

  • Go to CubeWP settings,
  • Find archive setting
  • Go to Filters
  • Click the ON button.
  • Save Settings

Related Article:

To learn more about Archive Settings, Click Here

Sorting Builder for number-based custom fields, e.g., low to high price or high to low price.

  • Go to CubeWP.
  • Click on Search Filter.
  • A new window will be open.
  • Select your post type from right side of the window.
  • Select WordPress Default Fields
  • Select your desired taxonomies
  • Enhance your filters by adding custom fields for additional data.
You can use the custom field type “Number” as sorting filter Like Low to high price or Hight to low price
  • Add Price range field of type “Number”
  • Click on “Save Changes” to apply and save your filter settings.

Sorting filters are OFF by default in CubeWP Setting. 

  • Go to CubeWP settings,
  • Find archive setting
  • Go to sorting filter
  • Click the ON button.
  • Save Settings

It will display in sort filters on archive page:

Related Article:

To learn more about Archive Settings, Click Here

Ad Owner's Dashboard Builder

To create a personalized user dashboard, follow these steps:

  • Go to CubeWP
  • Go to User Dashboard
  • Add a New Tab
  • To enhance the user dashboard, you can add custom tabs. Click on Add New Tab.

Configure Tab Details:

  • Tab Title: Indicate the purpose of content
  • Tab Icon: Add an icon to help users quickly identify the tab’s function.
  • User Role: Define which user role as an “Administrator” or all registered users etc.
  • Content Type: Choose “Custom Tab” to create and add your own content to the tab.

To set up your user dashboard with CubeWP, follow these steps:

  • Get Short-code: Generate the short-code for your user dashboard.
  • Copy Short-code: Copy the generated short-code.
  • Create a New Page: In your WordPress dashboard, create a new page where you want the user dashboard to appear.
  • Select Full-Width Page Template: Choose the “Full Width” page template for this page. This ensures that your dashboard has enough space to display correctly.
  • Paste Dashboard Short-code: In the page editor, paste the short-code you copied earlier.

At the end:

  • Select Dashboard Page URL from CubeWP Settings: In CubeWP settings, configure the dashboard page URL to link to the newly created page, ensuring that users can access their dashboard from the designated URL.

It will look Like at frontend like mentioned in the image below:

User profile Form Builder

Access CubeWP Settings

  • Log in to your WordPress admin dashboard.
  • Navigate to CubeWP

Click on User Profile Form Builder

  • Within CubeWP , locate and click on “User Profile Form Builder.”

Set Form Settings

  • Set Form Container Class for styling the form container.
  • Set Form Class for styling the form.
  • Set Form ID for styling or scripting purposes.
  • Enter Submit Button Title for the button’s displayed text.
  • Set Submit Button Class for styling the submit button.

Select the desired user role

  • You can select your user role as an administrator, editor, author etc.

Customize WordPress Default Fields

  • Choose WordPress default fields based on your design requirements.

Utilize Custom Field Section

  • Explore and use the custom field section located on the right side of the window.

Save Changes

  • Click on “Save Changes” at the end of the window to apply the modifications.
Note:
  • User Profile Form Builder is for creating forms that allow existing users to edit their profiles.

User Registration Form Builder

Access CubeWP Settings:

  • Log in to your WordPress admin dashboard.
  • Click on CubeWP to access its settings.

Navigate to User Sign-up Form Builder:

  • Click on User Sign-up Form Builder to access the form-building features.

Open Form Settings:

  • Set Form Container Class: Input desired class for the form container styling.
  • Set Form Class: Specify the class for styling the form itself.
  • Set Form ID: Input a unique ID for styling or scripting purposes.
  • Set Submit Button Title: Enter the title or text for the submit button.
  • Set Submit Button Class: Specify the class for styling the submit button.

Select User Role:

  • Find an option to select the user role for those who sign up (e.g., administrator, editor, author). Choose the appropriate role from the available options.

Select WordPress Default Fields:

  • Look for options to select default fields for the WordPress user registration form. Choose the fields you want to include (e.g., username, email, password).

Save Changes:

  • After configuring all the settings according to your requirements, find and click on the Save Changes button to apply the changes to your CubeWP user sign-up form.

Note:

  • User Signup Form Builder is for creating registration forms for new users.

Single Post Layout Editor

Ad Single post Layout Editor: Customize Your Ad Detail Pages with Drag-and-Drop Flexibility

With the ClassifiAd theme, admins have full control over the layout of their ad detail pages thanks to the Single post Layout Editor. This tool allows you to design your ad pages using simple drag-and-drop functionality, ensuring that each page can be tailored to your specific requirements.

How It Works

Once you import the ClassifiAd demo, the theme provides you with custom cubes (pre-built elements) through the CubeWP Layout Editor. You can access this editor by navigating to CubeWP >> Single Post in the WordPress dashboard. Here, admins gain the flexibility to design the layout of the ad detail pages to fit their preferences.

Customization Options with Single post Layout Editor

1. Pre-Built Custom Cubes: With the demo import, you receive custom cubes that include various elements such as ad titles, descriptions, image galleries, contact forms, categories, and more. These cubes can be used to structure the ad detail page.

2. Inclusion and Exclusion of Elements: Admins can choose which elements to include or exclude from the post. If certain sections aren’t relevant to your listings, you can easily remove them from the layout.

3. Drag-and-Drop Arrangement: You can arrange these cubes however you like by simply dragging and dropping them into position. Whether you prefer the images on top, the contact form in the sidebar, or a map at the bottom of the page, the layout editor lets you structure the page to your liking.

4. Sidebar and Content Area Flexibility: The layout editor offers the flexibility to place elements in either the main content area or the sidebar. You can create a more organized, user-friendly layout by positioning key information where it makes the most sense.

Why This Feature is Essential

The Single post Layout Editor offers the following benefits:

Total Customization: You have full control over the appearance and structure of each ad detail page, ensuring it aligns with your branding and site design.

User-Friendly Experience: With drag-and-drop functionality, customizing your layout is quick and easy—no coding knowledge is required.

Flexibility: As your business grows or your site’s needs evolve, you can easily adjust the layout, add or remove elements, and reorganize sections.

Conclusion

The Single Post Layout Editor in ClassifiAd empowers you to create a custom ad detail page that fits your vision. Whether you’re launching a new classified site or fine-tuning an existing one, this tool provides you with the flexibility to design the perfect layout using drag-and-drop simplicity.

Start designing your unique ad detail pages by navigating to CubeWP >> Single Post and take full advantage of this powerful feature!

Post Card Customizer

Post Card Customizer: Tailor Your Listings Effortlessly with ClassifiAd

The ClassifiAd theme brings an innovative feature to the table: the Post Card Customizer. This powerful tool allows admins to personalize their post cards without requiring any programming knowledge, making it easy to create an attractive and functional layout that suits your site’s needs.

Seamless Customization for All

With the Post Card Customizer, admins can easily modify various aspects of post cards, including post types, loop styles, taxonomies, custom tags, and custom fields. These options empower you to shape the appearance and functionality of your listings according to your specific requirements.

You can access this editor by navigating to CubeWP >> Post Cards in the WordPress dashboard.

Key Features of the Post Card Customizer:

1. Importing with the Demo: When you import the demo content, you will automatically receive a variety of post types and taxonomies pre-configured. This gives you a solid foundation to start customizing your post cards right away.

2. Include or Exclude Elements: The customizer allows you to selectively include or exclude various elements from the post card. If certain information isn’t relevant for your listings, you can easily remove it. This flexibility helps you streamline your cards, making them more user-friendly and focused.

3. Real-Time Visualizer: One of the standout features of the Post Card Customizer is its **real-time visualizer**. As you make adjustments—whether adding new elements or excluding existing ones—the visualizer instantly displays how the post card will look. This immediate feedback enables you to make design decisions confidently, ensuring that your cards are visually appealing and functional.

4. Post Card Layout Editor: The layout editor provides an intuitive interface for arranging elements on the post card. You can drag and drop components short codes to find the perfect arrangement that enhances the user experience.

5. Layout CSS Editor: For those who wish to go a step further in customization, the Layout CSS Editor allows for advanced styling options. This feature enables you to fine-tune the appearance of your post cards, giving you full control over how each element looks without needing extensive coding skills.

Why the Post Card Customizer is a Game-Changer

The Post Card Customizer in ClassifiAd revolutionizes how you manage your listings. Here are some key benefits:

User-Friendly Experience: With no programming knowledge required, anyone can customize post cards easily. The intuitive interface makes it accessible for admins of all skill levels.

Enhanced User Engagement: By tailoring the post cards to better fit your audience’s needs, you can create a more engaging experience that keeps users coming back.

Flexibility and Control: The ability to include or exclude elements means you can adapt the cards to fit various types of listings, making your site more versatile.

Conclusion

The Post Card Customizer in the ClassifiAd theme is an essential tool for anyone looking to create a customized and visually appealing classifieds site. With its user-friendly features, including the real-time visualizer and layout editors, you can easily tailor your listings to better meet the needs of your users.

Ready to transform your post cards? Dive into the Post Card Customizer with ClassifiAd and start creating a unique and engaging experience for your audience today!

FAQs

Frequently Asked Questions and Answers.

Q: Are regular updates and dedicated support provided for the Classified Pro?

A: Yes, the Classified Pro theme comes with regular updates and dedicated support.

Q: What does the Classified Pro theme package include?

A: The Classified Pro theme package comprises theme files, demo content, documentation, and any plugins bundled, which will be installed during setup.

Q: Is the Classified Pro theme fully compatible with the latest version of WordPress?

A: Absolutely, the Classified Pro theme is designed to be fully compatible with the latest version of WordPress.

Q: Are there any additional charges for the features or plugins displayed in the ClassifiedPro theme demo?

A: No, all essential features and plugins showcased in the demo are included in the theme purchase.

Q: Can I use the ClassifiedPro theme for multiple websites with a single license?

A: No, a single license is valid for one website. For each additional website, you will need to purchase extra licenses.

Q: How does ClassifiedPro perform, and is it optimized for SEO?

A: ClassifiedPro themes are optimized for fast performance and adhere to SEO best practices.

Q: Which page builder is supported by ClassifiedPro?

A: ClassifiedPro is compatible with Elementor page builder.

Q: Is it feasible to modify the commission for a product and earn a commission in ClassifiedPro?

A: Yes, you can customize the commission for a product and earn a commission through ClassifiedPro.

Q: What are the available pricing plan options in ClassifiedPro?

A: ClassifiedPro offers two pricing plan options:

  • Packages (Credits bundle)
  • Pay per Post

Q: Does ClassifiedPro facilitate multi-criteria reviews and ratings?

A: Yes, ClassifiedPro supports multi-criteria reviews and ratings.

Q: Can the ClassifiedPro theme be exclusively used for a Properties or an Automotive website?

A: Yes, it can.

Q: Is it possible to customize the ClassifiedPro theme according to my specific requirements?

A: ClassifiedPro, built on the CubeWP Framework, allows customization of styles for search, home page, single post layout, etc., to suit your preferences.

Q: Can I modify the URL structure in ClassifiedPro?

A: ClassifiedPro uses the default WordPress URL permalink structure, but you can use any Custom Permalinks WordPress Plugin to make adjustments.

Q: Does ClassifiedPro offer SMS verification for spam registrations?

A: Currently, ClassifiedPro supports email verification, not SMS verification.

Q: Can ClassifiedPro be used as an add-on to the ListingPro theme?

A: No, ClassifiedPro is a standalone theme and cannot be used as an add-on to the ListingPro theme.

Q: Can ClassifiedPro be utilized to build a directory website?

A: ClassifiedPro is designed for creating a Classified Ads directory.

Q: Can I create a Classified website without re-commerce/e-commerce features using ClassifiedPro?

A: Yes, you can build a Classified website without incorporating re-commerce/e-commerce features using ClassifiedPro.

Q: What steps should I take if I encounter issues while importing dummy content?

A: If facing issues during dummy content import, consider upgrading server resources and check server requirements in the theme documentation. If problems persist, open a ticket via the helpdesk at https://helpdesk.cridio.com/.

Q: Does ClassifiedPro theme support RTL languages?

A: No, ClassifiedPro theme currently does not support RTL languages.

Q: Is WPML supported by ClassifiedPro?

A: No, ClassifiedPro theme does not currently support WPML.

Q: Are customization services available for ClassifiedPro?

A: Yes, for customization services, you can request a free quote.

General

spamming or fake ads

How to avoid spamming or fake ads on my websites?

If we are talking about fake ads on classified websites, We have users verification system in Classified Pro.

You can turn on the email verification from the CubeWP Settings.

Go to CubeWP Settings > Email Verification > Turn On


https://slite.com/api/files/aXd9jpOL2xBBsA/email.png


Please make sure that your SMTP is working properly

How to fix the 404 errors after Theme Installation?

The following topics are covered in this article.

  • Set the Home Page and Blog Page
  • Set the Permalinks
  • Set page URLs in CubeWP Settings

Set the Home Page and Blog Page

STEP 1:  Go to Settings Reading

STEP 2:  Select Home from the drop-down.

STEP 3:  Select Blogs from the drop-down.

https://slite.com/api/files/MTz1-dsI2NtQHm/pages.png

STEP 4:  Click Save Changes

Set the Permalinks:

STEP 1:  Go to Settings > Permalinks

STEP 2:  Select to Post name

https://slite.com/api/files/0Q8-LxwtxrYad5/postlink.png

STEP 3:  Click Save Changes

Set page URLs in CubeWP Settings

There are some settings that need to take into consideration to avoid any 404 errors or blank images or shortcodes.

STEP 1: Go to the CubeWP Settings > URL Config and check the following details

https://slite.com/api/files/iHQZuVK9-UCnna/pagesettings.png

How much data can Classified Pro handle?

How can I Translate ClassifiedPro?

PLEASE READ THESE INSTRUCTIONS CAREFULLY:

These instructions are for SINGLE LANGUAGE translation and also can be applied to ENGLISH language users who want to just CHANGE TEXT ( Example: SELL NOW to Post your Ad. ENGLISH language users shouldn’t get confused with the word Translation here, as this is the only way to change all default text like many other themes

image

PART 1: INSTALL LOCO TRANSLATE PLUGIN

STEP 1: Log in to the WordPress admin dashboard.

STEP 2: Go to Plugins > Add New

STEP 3: Search for Loco Translate, and click Install Now.

STEP 4: Click Activate

image

PART 2: TRANSLATE THE THEME

STEP 1: Go to Loco Translate > Themes

STEP 2: Under the Bundle name, select ClassifiedPro

STEP 3: Click on New language

STEP 4: Under Choose a language, select a new WordPress language from the drop-down (Example: Portuguese).

STEP 5: Under Choose a location  Choose the second option (Others) settings selected, and click Start translating

image

For a Quick search. Use the Search Filter

Watch Video

How to (AUTO) update the ClassifiedPro WordPress theme?

PART 1: INSTALL ENVATO MARKET PLUGIN

STEP 1: Go to Plugins > Add New

STEP 2: Click the Upload Plugin

STEP 3: Click Choose File

To Download the Envato Market plugin Click Here

STEP 4: Upload the file above.

STEP 5: Click Install Now

STEP 6:  Click Activate Plugin

PART 2: CONFIGURE THE ENVATO MARKET PLUGIN

STEP 1: Go to Envato Market

STEP 2: Under Global OAuth Personal Token, click Generate a personal token

image

STEP 3: Give a Token name (Example: ClassifiedPro)

STEP 4: Check if these 4 boxes’ Permissions were included as shown below.

STEP 5: Accept the terms, and click Create Token

STEP 6: Copy the newly Generated Token

image

STEP 7: Go back to Envato Market and paste the newly Generated Token

STEP 8: Click Save Changes

styles for Blog Grids

How many styles do ClassifiedPRO have for Blog Grids?

Classified Pro have 3 blog grids styles


We have three options in the blog grids.

You can set the blog styles from the CubeWP Settings.


STEP 1: Go to CubeWP Settings > Blog > Blog Grid Styles


https://slite.com/api/files/RqqNJWg6s1v4ad/bloggrids.png


You can also enable or disable the Sidebar, blog banner image, and title of the banner in this section.

How to update the ClassifiedPro Theme and plugin?

PART 1: MOVE CUSTOMIZATION TO THE CHILD THEME

STEP 1: Make sure the Child Theme is installed and active. ( If not, Please install the child theme which is in your package )

STEP 2: Locate ALL the custom code changes made (either by you, your developer, or even by our Custom Services Team upon your request).

STEP 3: Move all Custom Code changes to the Child theme.

When you move a file that includes custom changes (for example header.php), the file name and the path in the child theme should match with the parent theme. Watch Video

PART 2: MOVE THEME TRANSLATION TO CHILD THEME

PART 3: BACKUP PLUGIN TRANSLATION FILES

STEP 1: Go to /wp-content/plugins/cubewp-addon-classified/languages

STEP 2: Download and save .po and .mo

PART 4: BACKUP FULL THEME & PLUGIN

Backup via cPanel (Recommended)

STEP 1: Log into cPanel > File Manager.

STEP 2: Go to wp-content/themes/

STEP 3: Right-click  ClassifiedPro, and then click Compress

Dashboard page

Why Dashboard page is not going to the dashboard?

There might be that your dashboard page is not selected properly. Please make sure that your dashboard page is selected in the CubeWP Settings > URL Config

For more about URLs please read this article.

Is Classified Pro Support Personalized Ads?

Yes, we have the option of personalization in the ClassifiedPro theme. You can enable Personalization from CubeWP Options.

STEP 1: Go to CubeWP Setting > Personalization

STEP 2: Turn Personalization On

image

STEP 3: Go to Elementor and create a section

STEP 4: Add Ads Element in the section

image

STEP 5: Select Recommended

Image

STEP 6: Go to section Advanced tab > CSS Classes

image

STEP 7: Add this class classified-hide-no-content-section

Note: This class works when no data in this section, The class hides this section. Now when you search or visit any ad, the Recommended ads were showing in the section which you created with the Recommended label

Post Types & Custom Fields

Can I create More Post Types for my Project?

In ClassifiedPro, by default, we have Three Post Types

  • General Ads
  • Property Ads
  • Automotive Ads

You can use these Post types in ClassifiedPro. You can customize labels. But if you want to add a new Post Type, You can add it easily with CubeWP. But it will not work as ClassifiedPro Post Type, The New Post Type will work normally as a default CubeWP Post type work.

To make the New Post Type as ClassifiedPro please follow the below steps.

PART 1: Create New Post Type and add into ClassifiedPro Post Type

You can easily create new post type with the help of CubeWP. Please follow the below steps:

  • Go to CubeWP
  • Click on Post Types
  • Add New
  • Enter your Post Type details
  • Save Changes
image
  • Turn On
  • You will see your newly created Post Type here.
  • Select your Post Type
  • Save Changes

For confirmation, you can check your Post type section and see Location and Category will attach to the new Post Type

image

PART 2: Add into Post Type Model and Landing Pages in Header

  • Go to CubeWP
  • Click on CubeWP Settings
  • Go to Header
  • Scroll Down
  • You can see POST TYPE Landing Pages links
  • You can see your all Created POST TYPE here
  • Choose the desired page of your POST TYPE

PART 3: Create Post Type Form for New POST TYPE

ClassifiedPro is powered by CubeWP, you can easily create a Post Type form with the help of CubeWP POST TYPE form builder. For creating please follow the below steps.

  • Go to CubeWP
  • Click on POST TYPE form builder
  • Choose your Post Type
  • Drag and Drop your fields
  • Save Changes
  • Create a new Page
  • Edit with Elementor
  • Add Ads Submission Element on the Page
  • Select your POST TYPE
  • Save Changes

PART 4: Single Post Editor

You need to create your own single page for your newly created POST TYPE. Follow the below steps

  • Go to CubeWP
    Click on Single-Post Editor
  • Choose your New Post Type
  • Create sections in the content or sidebar area
  • Drag and drop your fields to your desired area
  • Save Changes

PART 5: Search Form and Search Filters

After adding everything, Now you need to create Search forms and Search Filters as well. Follow the below steps:

  • Go to CubeWP
  • Go to Search Form Builder and then Search Filters
  • Select your New POST TYPE
  • Add your fields
  • Save Changes


Can I change the Post Type Slug?

You cant change the Post Type slug, but with the help of CubeWP Framework, you can Rewrite the Post Type slug.

  • Login to your WordPress dashboard and navigate to CubeWP > Post Types.
  • Edit the Post Type you want to edit from the list of available post types.
  • Scroll Down and you can see the Rewrite Feature.
  • Select False to True
  • Enter your Slug name here
image
  • Click on the “Save” button to apply the changes.
  • Finally, don’t forget to flush the permalink cache by going to Settings > Permalinks and clicking on the “Save Changes” button.
  • The slug will only change on the front end, You may see the old slug in the page editor or post editor

Create custom fields for any post type

To create custom fields for any Post Type in ClassifiAd, please follow the below steps:
  • Go to CubeWP
  • Navigate to Custom Fields
  • Click on Post Type
  • Click the Add New button.
A new window will open with options such as Group Name, Group Order and Description.
  • Group Name: Provide the Group name for your Custom Fields.
  • Group Order: Manage the Menu Position for your Group.
  • Description: Briefly describe the purpose of Your Group.

When you click on Add New Field the screen will expand with numerous options. You can fill in these fields to tailor your custom fields according to your specific requirements. These options include:

  • Field Label: This is where you specify the name or label for your custom field (e.g., “Author Name”).
  • Field Name: It automatically generates an internal name for the field, typically not modified.
  • Field Type: You choose the type of field (e.g., text input, dropdown) that suits your data.
  • Description: Optionally, you can provide a brief description to explain the field’s purpose.
  • Validation: If necessary, you can set validation rules for the field.
  • ID: An internally generated ID for the field, often not changed.
  • Class: You can assign a CSS class to style this particular field.
  • Container Class: Apply a CSS class to the container that holds this field.
  • Metabox Field Size: Determine the field’s size within the Metabox (e.g., 1/1 for full width).
  • Show In REST API: Decide whether this field’s data should be accessible via the REST API.
  • Conditional Logic: Configure conditions for displaying or hiding this field based on specific criteria.
  • After creating custom field types you need to assign the fields with a post type displaying at the right sidebar.
  • After Assigning the custom fields to the post type you need to save group.
Learn More:
To Learn More About Custom Field Types, Click Here

Refund Policy

We stand behind our products and your satisfaction with them is our sole purpose. However, because our products are digital goods delivered via Internet download we generally offer no refund for the ClassifiedPro WordPress Theme sold on Envato or Add-ons and Services sold directly via our website.

We offer no refund especially when:

  • If a user is caught selling or distributing our product illegally, no refund will be given and the user will be reported to Envato for further legal action.
  • A user takes support from our team to help launch their website and once launched, a user request for a refund, their request will be denied and reported.

However, customer satisfaction is our top priority we may offer a refund in exceptional circumstances.

THEREFORE WE DO HONOR REQUESTS FOR REFUND WHERE THE

THE FOLLOWING REASONS APPLY (CLICK THE LINKS TO READ MORE DETAIL):

Item is “not as described.”

An item is “not as described” if it is materially different from the item description or preview so you should expect the author to “tell it like it is” when it comes to the features and functionality of items. If it turns out the item is “not as described” you will be entitled to a refund.

Item doesn’t work the way it should

If an item doesn’t work the way it should and can’t easily be fixed, you are entitled to a refund of the item. This includes situations where the item has a problem that would have stopped you from buying it if you’d known about the problem in the first place. If the item can be fixed, then the author is required to do so promptly by updating the item otherwise you are entitled to a refund of that item.

Item has a security vulnerability 

If an item contains a security vulnerability and can’t easily be fixed, you are entitled to a refund of the item. If the item can be fixed, then the author should do so promptly by updating the item. If the item contains a security vulnerability that is not patched in an appropriate timeframe, then you are entitled to a refund of that item.

Item support is promised but not provided

If the author advertises their item as including item support and you are not provided that support in accordance with the item support policy, you will be entitled to a refund of your purchased support.

Item support extension not used

If you purchase an item support extension and request a refund of that extension before your existing item support expires you are entitled to a refund of that item support extension.

Items that have not been downloaded

If you have not downloaded a purchased item within three months from the date of purchase, you may be eligible for a refund. You will be required to provide the author of that item with your purchase code in order for the author to verify your claim that you have not downloaded an item. Although we think three months is a reasonable time, depending on where you are located, you might have a longer period to claim a refund if you have purchased for personal use and haven’t downloaded the item.

ACCEPTANCE OF THIS REFUND POLICY

It is your responsibility to familiarize yourself with this refund policy. By placing an order for any of our products, you indicate that you have read and understood this refund policy. And that you agree with and fully accept the terms herein.

If you do not agree with or fully accept the terms of this policy, we ask that you should not place an order with us.

CONTACT US

Please note that our support team is ready to provide you with timely and efficient professional assistance. We will attempt to find the best convenient solution for your query. Give us 24-48 hours for our support team to get back to you on the problem. Request for a refund is accepted within the period of 1 week after the order is placed. You should accompany this request with detailed and grounded reasons why you need a refund

Note: a refund is based solely on our own discretion

If you still think you are eligible for a refund of the ClassifiedPro WordPress theme purchase via Envato, please open a request here.

How to fix the 404 errors after Theme Installation?

The following topics are covered in this article.

  • Set the Home Page and Blog Page
  • Set the Permalinks
  • Set page URLs in CubeWP Settings

Set the Home Page and Blog Page

STEP 1:  Go to Settings Reading

STEP 2:  Select Home from the drop-down.

STEP 3:  Select Blogs from the drop-down.

https://slite.com/api/files/MTz1-dsI2NtQHm/pages.png

STEP 4:  Click Save Changes

Set the Permalinks:

STEP 1:  Go to Settings > Permalinks

STEP 2:  Select to Post name

https://slite.com/api/files/0Q8-LxwtxrYad5/postlink.png

STEP 3:  Click Save Changes

Set page URLs in CubeWP Settings

There are some settings that need to take into consideration to avoid any 404 errors or blank images or shortcodes.

STEP 1: Go to the CubeWP Settings > URL Config and check the following details

https://slite.com/api/files/iHQZuVK9-UCnna/pagesettings.png

How much data can Classified Pro handle?

How can I Translate ClassifiedPro?

PLEASE READ THESE INSTRUCTIONS CAREFULLY:

These instructions are for SINGLE LANGUAGE translation and also can be applied to ENGLISH language users who want to just CHANGE TEXT ( Example: SELL NOW to Post your Ad. ENGLISH language users shouldn’t get confused with the word Translation here, as this is the only way to change all default text like many other themes

image

PART 1: INSTALL LOCO TRANSLATE PLUGIN

STEP 1: Log in to the WordPress admin dashboard.

STEP 2: Go to Plugins > Add New

STEP 3: Search for Loco Translate, and click Install Now.

STEP 4: Click Activate

image

PART 2: TRANSLATE THE THEME

STEP 1: Go to Loco Translate > Themes

STEP 2: Under the Bundle name, select ClassifiedPro

STEP 3: Click on New language

STEP 4: Under Choose a language, select a new WordPress language from the drop-down (Example: Portuguese).

STEP 5: Under Choose a location  Choose the second option (Others) settings selected, and click Start translating

image

For a Quick search. Use the Search Filter

Watch Video

How to (AUTO) update the ClassifiedPro WordPress theme?

PART 1: INSTALL ENVATO MARKET PLUGIN

STEP 1: Go to Plugins > Add New

STEP 2: Click the Upload Plugin

STEP 3: Click Choose File

To Download the Envato Market plugin Click Here

STEP 4: Upload the file above.

STEP 5: Click Install Now

STEP 6:  Click Activate Plugin

PART 2: CONFIGURE THE ENVATO MARKET PLUGIN

STEP 1: Go to Envato Market

STEP 2: Under Global OAuth Personal Token, click Generate a personal token

image

STEP 3: Give a Token name (Example: ClassifiedPro)

STEP 4: Check if these 4 boxes’ Permissions were included as shown below.

STEP 5: Accept the terms, and click Create Token

STEP 6: Copy the newly Generated Token

image

STEP 7: Go back to Envato Market and paste the newly Generated Token

STEP 8: Click Save Changes

styles for Blog Grids

How many styles do ClassifiedPRO have for Blog Grids?

Classified Pro have 3 blog grids styles


We have three options in the blog grids.

You can set the blog styles from the CubeWP Settings.


STEP 1: Go to CubeWP Settings > Blog > Blog Grid Styles


https://slite.com/api/files/RqqNJWg6s1v4ad/bloggrids.png


You can also enable or disable the Sidebar, blog banner image, and title of the banner in this section.

How to update the ClassifiedPro Theme and plugin?

PART 1: MOVE CUSTOMIZATION TO THE CHILD THEME

STEP 1: Make sure the Child Theme is installed and active. ( If not, Please install the child theme which is in your package )

STEP 2: Locate ALL the custom code changes made (either by you, your developer, or even by our Custom Services Team upon your request).

STEP 3: Move all Custom Code changes to the Child theme.

When you move a file that includes custom changes (for example header.php), the file name and the path in the child theme should match with the parent theme. Watch Video

PART 2: MOVE THEME TRANSLATION TO CHILD THEME

PART 3: BACKUP PLUGIN TRANSLATION FILES

STEP 1: Go to /wp-content/plugins/cubewp-addon-classified/languages

STEP 2: Download and save .po and .mo

PART 4: BACKUP FULL THEME & PLUGIN

Backup via cPanel (Recommended)

STEP 1: Log into cPanel > File Manager.

STEP 2: Go to wp-content/themes/

STEP 3: Right-click  ClassifiedPro, and then click Compress

Dashboard page

Why Dashboard page is not going to the dashboard?

There might be that your dashboard page is not selected properly. Please make sure that your dashboard page is selected in the CubeWP Settings > URL Config

For more about URLs please read this article.

How can I deactivate my license of Theme on my own?

The Theme is dependent on the Paid CubeWP add-ons, and the add-ons have only one website activate limit, You can manage your licensesby your own self.

  • Go to My Account
  • Click on Licenses
  • Click on Manage
my-accouunt
  • Deactivate your Previous website
  • Add your New website URL
manage

Is Classified Pro Support Personalized Ads?

Yes, we have the option of personalization in the ClassifiedPro theme. You can enable Personalization from CubeWP Options.

STEP 1: Go to CubeWP Setting > Personalization

STEP 2: Turn Personalization On

image

STEP 3: Go to Elementor and create a section

STEP 4: Add Ads Element in the section

image

STEP 5: Select Recommended

Image

STEP 6: Go to section Advanced tab > CSS Classes

image

STEP 7: Add this class classified-hide-no-content-section

Note: This class works when no data in this section, The class hides this section. Now when you search or visit any ad, the Recommended ads were showing in the section which you created with the Recommended label

Can I create More Post Types for my Project?

In ClassifiedPro, by default, we have Three Post Types

  • General Ads
  • Property Ads
  • Automotive Ads

You can use these Post types in ClassifiedPro. You can customize labels. But if you want to add a new Post Type, You can add it easily with CubeWP. But it will not work as ClassifiedPro Post Type, The New Post Type will work normally as a default CubeWP Post type work.

To make the New Post Type as ClassifiedPro please follow the below steps.

PART 1: Create New Post Type and add into ClassifiedPro Post Type

You can easily create new post type with the help of CubeWP. Please follow the below steps:

  • Go to CubeWP
  • Click on Post Types
  • Add New
  • Enter your Post Type details
  • Save Changes
image
  • Turn On
  • You will see your newly created Post Type here.
  • Select your Post Type
  • Save Changes

For confirmation, you can check your Post type section and see Location and Category will attach to the new Post Type

image

PART 2: Add into Post Type Model and Landing Pages in Header

  • Go to CubeWP
  • Click on CubeWP Settings
  • Go to Header
  • Scroll Down
  • You can see POST TYPE Landing Pages links
  • You can see your all Created POST TYPE here
  • Choose the desired page of your POST TYPE

PART 3: Create Post Type Form for New POST TYPE

ClassifiedPro is powered by CubeWP, you can easily create a Post Type form with the help of CubeWP POST TYPE form builder. For creating please follow the below steps.

  • Go to CubeWP
  • Click on POST TYPE form builder
  • Choose your Post Type
  • Drag and Drop your fields
  • Save Changes
  • Create a new Page
  • Edit with Elementor
  • Add Ads Submission Element on the Page
  • Select your POST TYPE
  • Save Changes

PART 4: Single Post Editor

You need to create your own single page for your newly created POST TYPE. Follow the below steps

  • Go to CubeWP
    Click on Single-Post Editor
  • Choose your New Post Type
  • Create sections in the content or sidebar area
  • Drag and drop your fields to your desired area
  • Save Changes

PART 5: Search Form and Search Filters

After adding everything, Now you need to create Search forms and Search Filters as well. Follow the below steps:

  • Go to CubeWP
  • Go to Search Form Builder and then Search Filters
  • Select your New POST TYPE
  • Add your fields
  • Save Changes


Can I change the Post Type Slug?

You cant change the Post Type slug, but with the help of CubeWP Framework, you can Rewrite the Post Type slug.

  • Login to your WordPress dashboard and navigate to CubeWP > Post Types.
  • Edit the Post Type you want to edit from the list of available post types.
  • Scroll Down and you can see the Rewrite Feature.
  • Select False to True
  • Enter your Slug name here
image
  • Click on the “Save” button to apply the changes.
  • Finally, don’t forget to flush the permalink cache by going to Settings > Permalinks and clicking on the “Save Changes” button.
  • The slug will only change on the front end, You may see the old slug in the page editor or post editor

Create custom fields for any post type

To create custom fields for any Post Type in ClassifiAd, please follow the below steps:
  • Go to CubeWP
  • Navigate to Custom Fields
  • Click on Post Type
  • Click the Add New button.
A new window will open with options such as Group Name, Group Order and Description.
  • Group Name: Provide the Group name for your Custom Fields.
  • Group Order: Manage the Menu Position for your Group.
  • Description: Briefly describe the purpose of Your Group.

When you click on Add New Field the screen will expand with numerous options. You can fill in these fields to tailor your custom fields according to your specific requirements. These options include:

  • Field Label: This is where you specify the name or label for your custom field (e.g., “Author Name”).
  • Field Name: It automatically generates an internal name for the field, typically not modified.
  • Field Type: You choose the type of field (e.g., text input, dropdown) that suits your data.
  • Description: Optionally, you can provide a brief description to explain the field’s purpose.
  • Validation: If necessary, you can set validation rules for the field.
  • ID: An internally generated ID for the field, often not changed.
  • Class: You can assign a CSS class to style this particular field.
  • Container Class: Apply a CSS class to the container that holds this field.
  • Metabox Field Size: Determine the field’s size within the Metabox (e.g., 1/1 for full width).
  • Show In REST API: Decide whether this field’s data should be accessible via the REST API.
  • Conditional Logic: Configure conditions for displaying or hiding this field based on specific criteria.
  • After creating custom field types you need to assign the fields with a post type displaying at the right sidebar.
  • After Assigning the custom fields to the post type you need to save group.
Learn More:
To Learn More About Custom Field Types, Click Here

Facing No_activations_left after entering license code

image

It seems that your license is already activated on another domain. In this scenario, you would need to deactivate the license from the previous website before attempting to activate it again on a new one. To do so, you can follow the steps mentioned below:

  • Go to the website  CubeWP.com
  • Log in with the registered email and the password is your purchase code 
  • Go to My Account
  • Click on the License tab
image
  • Deactivate the license from your account
  • Attempt to activate the license on the new website by entering the website URL

Search form builder using Taxonomies and custom Fields

  • Go to CubeWP.
  • Click on Search Forms.
  • A new window will be open.
  • Select your Post Type.
  • Add WordPress default fields including Title and Featured Image
  • Drag and drop the preferred taxonomies and custom fields to the search form. This customisation allows you to include specific criteria for the search.

Note:You have the options to customize the appearance of taxonomy based on your needs, such as Checkboxes, Multi-dropdowns, Dropdowns, and the option to choose Select 2 UI.

Note: you can add your custom fields in the search if you have CubeWP FrontendPro

  • Clicking Save Changes will generates a code.
  • Copy that Generated Code.
  • Create a new page where you want to display the custom search form.
  • In the content area of the new page, paste the previously copied short-code.
  • Save and publish the page.
  • Visit the newly created page on your website.
  • Your custom search form is now live and ready for use.

Post Type submission form builder

To Create Post Type Form for any Post Type, follow below steps:

  • Go to CubeWP
  • Go to Post Types Form builder
  • Choose the Post Type for which you want to create a form
  • Create a form section
  • Drag your taxonomies and custom fields for users to input additional post information
  • Include mandatory fields like Title and Feature Image
  • Customise field sizes if needed
  • Save your changes
  • Copy Short-code

To show this form on frontend, follow the below steps:

  • Go to Pages
  • Create a New Page
  • Paste the shortcode into the page content area
  • Publish the page

How the Review System Works in ClassifiedPro?

ClassifiedPro features a reciprocal review system enabling buyers and admins to request and provide feedback on transactions and interactions. Reviews facilitate transparent feedback exchange, fostering trust and assessing user experiences within the ClassifiedPro platform.

Admin:

  • After completing the shipment process and providing a shipment ID, an optional checkbox is available to admins.
  • This checkbox is automatically checked by default.
  • Admins have the choice to leave it checked or unchecked it based on whether they want to send a request for review regarding the buyer’s experience.
  • If left checked, the system will automatically send a request for review on the buyer’s experience.

Buyer:

  • Buyers have the ability to rate their experience with purchasing a product and interacting with the admin.
  • They can provide ratings based on various aspects such as product quality, delivery time, and the admin’s communication and support.
  • Ratings serve as feedback mechanisms to help other users gauge the reliability and quality of the products and services offered on the platform.
  • This dual feedback system ensures transparency and accountability, fostering trust and improving overall user experiences within the platform.

Review System Configuration: Automatic or Pending Approval:

For more Information: click on this

Search Filter builder using Custom Fields

To create Search Filter using Custom Fields Follow the steps below:

  • Go to CubeWP.
  • Click on Search Filter.
  • A new window will be open.
  • Select your post type from right side of the window.
  • Select WordPress Default Fields
  • Select your desired taxonomies

You have the options to customize the appearance of taxonomy based on your needs, such as Checkboxes, Multi-dropdowns, Dropdowns, and the option to choose Select 2 UI.

  • Enhance your filters by adding custom fields for additional data.

Note: you can add your custom fields in the search to use as filter

  • Click on “Save Changes” to apply and save your filter settings.

Search filters are OFF by default in CubeWP Setting. 

  • Go to CubeWP settings,
  • Find archive setting
  • Go to Filters
  • Click the ON button.
  • Save Settings

Related Article:

To learn more about Archive Settings, Click Here

How to create dispute in ClassifiedPro?

Enhanced Transaction Security:

  • Access CubeWp settings as an admin.
  • Click on the “Wallet” option within the settings.
  • Enable the “Payment Hold” option.
  • Specify the number of days for which the admin can hold the payment.
  • Save the changes to apply the configured settings.

Note:

  • After the specified time, the system automatically releases the payment.
  • After the hold period, buyers may not be able to create disputes or request refunds.
  • This setting helps in managing and controlling payment-related issues within the specified time frame.

Step 1:

  • Buyer checks the received product.

  • If issues arise, the buyer clicks on the “Create Dispute” button.
  • Accesses the dispute resolution platform.

  • Provides a detailed description of the product-related issue.
  • Specifies the nature of the problem or dissatisfaction.
  • Attaches relevant photos, videos, or documents to support the dispute.

  • The dispute is submitted for review by the admin or relevant support team.
  • Admin or support team reviews the dispute, examining provided information.
  • A resolution is reached, which may include a refund or another mutually agreed-upon solution.
  • The buyer is informed of the resolution, and necessary actions, such as a refund, are processed accordingly.

Step 2:

At the both sides, seller and buyer dashboard will show the dispute option.

Note:

If these Sales and Purchase tabs are not available:

Click on this article to Review the process:

Adding Tabs in Dashbaord

How order system works in ClassifiedPro?

Step 1:

  • The customer decides to purchase your product.
  • They proceed to the checkout process, filling in all the required information.
  • The customer provides necessary details such as shipping address.
  • They add billing information to complete the transaction securely and place his/her order.

Step 2:

  • Admin accesses CubeWP.
  • Navigate to the user dashboard.
  • Create two new tabs named “Sales” and “Purchase” in the user dashboard if these two tabs are not available.
  • Click on Save Changes option.

Step 3:

  • Access WooCommerce platform.
  • Click on the “Orders” button.
  • View the list of orders displayed.
  • Click on the “Preview” button.

  •  Choose the “Processing” option.
  • After this both Buyer and Seller have Process status.

Step 4:

  • Seller accesses the order details after clicking on the “Preview” button.
  • Initiates the shipping process for the packed order.
  • Clicks on the “Completed” button to mark the order as processed and shipped.

  • The order status is updated to “Completed,” indicating successful processing and shipment.

Once the shipment is completed, the order status reflects as “Completed” on both ends.

Note:

If these Sales and Purchase tabs are not available:

Click on this article to Review the process:

Adding Tabs in Dashbaord


Sorting Builder for number-based custom fields, e.g., low to high price or high to low price.

  • Go to CubeWP.
  • Click on Search Filter.
  • A new window will be open.
  • Select your post type from right side of the window.
  • Select WordPress Default Fields
  • Select your desired taxonomies
  • Enhance your filters by adding custom fields for additional data.
You can use the custom field type “Number” as sorting filter Like Low to high price or Hight to low price
  • Add Price range field of type “Number”
  • Click on “Save Changes” to apply and save your filter settings.

Sorting filters are OFF by default in CubeWP Setting. 

  • Go to CubeWP settings,
  • Find archive setting
  • Go to sorting filter
  • Click the ON button.
  • Save Settings

It will display in sort filters on archive page:

Related Article:

To learn more about Archive Settings, Click Here

User tracking system to display relevant data on the homepage based on user interests

The User Tracking System is designed to enhance the user experience by displaying personalized data on the homepage based on a user’s interests and interactions. It works as follows:

  1. Tracking User Behavior: The system monitors the user’s activities, including searches made using taxonomies (categories, tags, etc.) or keywords.
  2. Personalized Homepage: Based on the data collected from user searches, the system analyzes the user’s preferences. It then dynamically updates and displays relevant products or listings on the homepage that match the user’s interest.
  3. Interest-Based Recommendations: Whether the user is searching for specific categories, brands, or keywords, the system ensures that the products they are most likely interested in are prioritized and recommended.

This feature improves engagement by providing tailored content, ensuring users see listings that are relevant to their previous interactions, making their browsing experience more efficient and personalized.

To setup this feature first you have to make settings:

  • Go to Cubewp Settings >> Personalization
  • Go to Cubewp Settings >> Enable Personalization >> Set it as ON
  • Further select taxonomies relation between two options

Then you need to edit the home page with page builder and add the ClassifiAd Ads element and need to select the Ads type “Recommended”

When the user will search for example keyword “ps5” and will visit the Ad detail page then in recommended Ads on home page section will display the Ads having keyword “ps5”

Ad Owner's Dashboard Builder

To create a personalized user dashboard, follow these steps:

  • Go to CubeWP
  • Go to User Dashboard
  • Add a New Tab
  • To enhance the user dashboard, you can add custom tabs. Click on Add New Tab.

Configure Tab Details:

  • Tab Title: Indicate the purpose of content
  • Tab Icon: Add an icon to help users quickly identify the tab’s function.
  • User Role: Define which user role as an “Administrator” or all registered users etc.
  • Content Type: Choose “Custom Tab” to create and add your own content to the tab.

To set up your user dashboard with CubeWP, follow these steps:

  • Get Short-code: Generate the short-code for your user dashboard.
  • Copy Short-code: Copy the generated short-code.
  • Create a New Page: In your WordPress dashboard, create a new page where you want the user dashboard to appear.
  • Select Full-Width Page Template: Choose the “Full Width” page template for this page. This ensures that your dashboard has enough space to display correctly.
  • Paste Dashboard Short-code: In the page editor, paste the short-code you copied earlier.

At the end:

  • Select Dashboard Page URL from CubeWP Settings: In CubeWP settings, configure the dashboard page URL to link to the newly created page, ensuring that users can access their dashboard from the designated URL.

It will look Like at frontend like mentioned in the image below:

Ad metrics for owners displayed on the dashboard with charts

You can add the Ad metrics for Ad’s owners to be displayed on the dashboard with charts, follow these steps:

  • Go to pages
  • Edit Dashboard Page with page builder
  • Add Element “CubeWP Dashboard”
  • Then select stat types
  • Select post type to display stats

It will display on user Dashboard as Below:

You also can add metrics for campaigns, Reviews and Inbox with same steps. See the image below, How they will look:

Purpose-driven dashboard to display page content

The Purpose-driven Dashboard is a centralized, user-friendly control panel that helps users manage and track various aspects of their activities within the platform. Its main purpose is to streamline navigation and provide quick access to essential tools and data. Key elements of the dashboard include:

    • Listings: This section allows users to view and manage the listings they have created on the platform. It provides a central location to update or remove their published listings
    • Post Types: This refers to the different types of content users can create, such as ads, articles, or listings. Each post type is structured differently based on its purpose (e.g., job posts, product listings)
    • User Profile Form: A form that allows users to input and update their profile information, like name, contact details, and other personal or business information
    • Custom Tab: Users can create custom tabs for additional information on their listings or profile. These tabs can be tailored to provide extra details or features not available by default.
    • Shortcode: A tool that allows users to insert specific functionalities into a page or post using a simple code. For example, they can add a contact form or display certain elements using a shortcode.
    • Page Content: This section allows users to manage the content displayed on specific pages they own, such blog, cart,checkout etc.
    • Saved: Users can see and access the listings or ads they’ve saved for later. This section is like a favorites list, where users can quickly revisit content they’re interested in.
    • Logout: This option lets users securely log out of their account when they are finished using the platform.
    • Leads: Users can track leads they’ve generated through their listings or advertisements. This section helps monitor potential customers or inquiries related to their posts.
    • Reviews: A place for users to view all the reviews they’ve received on their listings or services. This helps them stay informed about customer feedback.
    • Campaigns: Users can create, manage, and track marketing campaigns to promote their listings or services. It helps in driving more visibility to their content.
    • Booster Form: A form that allows users to boost or promote their listings or ads, typically by increasing visibility through paid options.
    • Orders: This section displays all the user’s orders related to the platform, whether for ads, promotions, or other paid services.
    • Inbox: A built-in messaging system where users can check and respond to messages or inquiries from potential buyers, customers, or other users on the platform.
    • CubeWP Wallet: A virtual wallet where users can view and manage their funds or balance, typically used for payments, purchasing plans, or boosting campaigns.
    • ClassifiAd – Sales: Displays details about the user’s sales activity within the ClassifiAd platform, helping users track the products or services they’ve sold.
    • ClassifiAd – Purchased History: A record of all the purchases the user has made, such as buying ads, boosting listings, or subscribing to services.
    • ClassifiAd – Profile: This section allows users to manage their ClassifiAd profile, updating their personal or business information, photos, contact details, and more.

You can add the tabs for required content type while creating dashboard:

User profile Form Builder

Access CubeWP Settings

  • Log in to your WordPress admin dashboard.
  • Navigate to CubeWP

Click on User Profile Form Builder

  • Within CubeWP , locate and click on “User Profile Form Builder.”

Set Form Settings

  • Set Form Container Class for styling the form container.
  • Set Form Class for styling the form.
  • Set Form ID for styling or scripting purposes.
  • Enter Submit Button Title for the button’s displayed text.
  • Set Submit Button Class for styling the submit button.

Select the desired user role

  • You can select your user role as an administrator, editor, author etc.

Customize WordPress Default Fields

  • Choose WordPress default fields based on your design requirements.

Utilize Custom Field Section

  • Explore and use the custom field section located on the right side of the window.

Save Changes

  • Click on “Save Changes” at the end of the window to apply the modifications.
Note:
  • User Profile Form Builder is for creating forms that allow existing users to edit their profiles.

User Registration Form Builder

Access CubeWP Settings:

  • Log in to your WordPress admin dashboard.
  • Click on CubeWP to access its settings.

Navigate to User Sign-up Form Builder:

  • Click on User Sign-up Form Builder to access the form-building features.

Open Form Settings:

  • Set Form Container Class: Input desired class for the form container styling.
  • Set Form Class: Specify the class for styling the form itself.
  • Set Form ID: Input a unique ID for styling or scripting purposes.
  • Set Submit Button Title: Enter the title or text for the submit button.
  • Set Submit Button Class: Specify the class for styling the submit button.

Select User Role:

  • Find an option to select the user role for those who sign up (e.g., administrator, editor, author). Choose the appropriate role from the available options.

Select WordPress Default Fields:

  • Look for options to select default fields for the WordPress user registration form. Choose the fields you want to include (e.g., username, email, password).

Save Changes:

  • After configuring all the settings according to your requirements, find and click on the Save Changes button to apply the changes to your CubeWP user sign-up form.

Note:

  • User Signup Form Builder is for creating registration forms for new users.

Single Post Layout Editor

Ad Single post Layout Editor: Customize Your Ad Detail Pages with Drag-and-Drop Flexibility

With the ClassifiAd theme, admins have full control over the layout of their ad detail pages thanks to the Single post Layout Editor. This tool allows you to design your ad pages using simple drag-and-drop functionality, ensuring that each page can be tailored to your specific requirements.

How It Works

Once you import the ClassifiAd demo, the theme provides you with custom cubes (pre-built elements) through the CubeWP Layout Editor. You can access this editor by navigating to CubeWP >> Single Post in the WordPress dashboard. Here, admins gain the flexibility to design the layout of the ad detail pages to fit their preferences.

Customization Options with Single post Layout Editor

1. Pre-Built Custom Cubes: With the demo import, you receive custom cubes that include various elements such as ad titles, descriptions, image galleries, contact forms, categories, and more. These cubes can be used to structure the ad detail page.

2. Inclusion and Exclusion of Elements: Admins can choose which elements to include or exclude from the post. If certain sections aren’t relevant to your listings, you can easily remove them from the layout.

3. Drag-and-Drop Arrangement: You can arrange these cubes however you like by simply dragging and dropping them into position. Whether you prefer the images on top, the contact form in the sidebar, or a map at the bottom of the page, the layout editor lets you structure the page to your liking.

4. Sidebar and Content Area Flexibility: The layout editor offers the flexibility to place elements in either the main content area or the sidebar. You can create a more organized, user-friendly layout by positioning key information where it makes the most sense.

Why This Feature is Essential

The Single post Layout Editor offers the following benefits:

Total Customization: You have full control over the appearance and structure of each ad detail page, ensuring it aligns with your branding and site design.

User-Friendly Experience: With drag-and-drop functionality, customizing your layout is quick and easy—no coding knowledge is required.

Flexibility: As your business grows or your site’s needs evolve, you can easily adjust the layout, add or remove elements, and reorganize sections.

Conclusion

The Single Post Layout Editor in ClassifiAd empowers you to create a custom ad detail page that fits your vision. Whether you’re launching a new classified site or fine-tuning an existing one, this tool provides you with the flexibility to design the perfect layout using drag-and-drop simplicity.

Start designing your unique ad detail pages by navigating to CubeWP >> Single Post and take full advantage of this powerful feature!

Post Card Customizer

Post Card Customizer: Tailor Your Listings Effortlessly with ClassifiAd

The ClassifiAd theme brings an innovative feature to the table: the Post Card Customizer. This powerful tool allows admins to personalize their post cards without requiring any programming knowledge, making it easy to create an attractive and functional layout that suits your site’s needs.

Seamless Customization for All

With the Post Card Customizer, admins can easily modify various aspects of post cards, including post types, loop styles, taxonomies, custom tags, and custom fields. These options empower you to shape the appearance and functionality of your listings according to your specific requirements.

You can access this editor by navigating to CubeWP >> Post Cards in the WordPress dashboard.

Key Features of the Post Card Customizer:

1. Importing with the Demo: When you import the demo content, you will automatically receive a variety of post types and taxonomies pre-configured. This gives you a solid foundation to start customizing your post cards right away.

2. Include or Exclude Elements: The customizer allows you to selectively include or exclude various elements from the post card. If certain information isn’t relevant for your listings, you can easily remove it. This flexibility helps you streamline your cards, making them more user-friendly and focused.

3. Real-Time Visualizer: One of the standout features of the Post Card Customizer is its **real-time visualizer**. As you make adjustments—whether adding new elements or excluding existing ones—the visualizer instantly displays how the post card will look. This immediate feedback enables you to make design decisions confidently, ensuring that your cards are visually appealing and functional.

4. Post Card Layout Editor: The layout editor provides an intuitive interface for arranging elements on the post card. You can drag and drop components short codes to find the perfect arrangement that enhances the user experience.

5. Layout CSS Editor: For those who wish to go a step further in customization, the Layout CSS Editor allows for advanced styling options. This feature enables you to fine-tune the appearance of your post cards, giving you full control over how each element looks without needing extensive coding skills.

Why the Post Card Customizer is a Game-Changer

The Post Card Customizer in ClassifiAd revolutionizes how you manage your listings. Here are some key benefits:

User-Friendly Experience: With no programming knowledge required, anyone can customize post cards easily. The intuitive interface makes it accessible for admins of all skill levels.

Enhanced User Engagement: By tailoring the post cards to better fit your audience’s needs, you can create a more engaging experience that keeps users coming back.

Flexibility and Control: The ability to include or exclude elements means you can adapt the cards to fit various types of listings, making your site more versatile.

Conclusion

The Post Card Customizer in the ClassifiAd theme is an essential tool for anyone looking to create a customized and visually appealing classifieds site. With its user-friendly features, including the real-time visualizer and layout editors, you can easily tailor your listings to better meet the needs of your users.

Ready to transform your post cards? Dive into the Post Card Customizer with ClassifiAd and start creating a unique and engaging experience for your audience today!

On-site ad campaigns

On-Site Ad Campaigns: Boost Your Listings with ClassifiAd’s Featured Ad Campaigns

Running successful ad campaigns is crucial for increasing the visibility and engagement of your listings, and the ClassifiAd theme makes this easier with its On-site Ad Campaigns feature. Through this system, users can promote their ads to Featured Listings, ensuring premium placement and maximum exposure on the platform.

Why Promote to a Featured Listing?

Promoting your ad to a Featured Listing offers several advantages that can significantly improve the visibility of your listing:

Premium Placement: Your listing is pushed to the top of the search results, making it one of the first ads users see.
Top of Listings/Results: Featured ads appear prominently in the most visible areas of the listing pages, improving the chances of user engagement.
Highlighted Styling: Featured ads are styled differently, drawing attention with unique visuals to make them stand out among regular listings.
Boosted Visibility: With these features combined, your listing gets more views and interactions, helping it gain priority over competing ads.

Step-by-Step Process: How to Run a Featured Ad Campaign

The ClassifiAd theme makes it simple for users to launch their own featured ad campaigns. Here’s a step-by-step guide:

1. Access the User Dashboard: Log into your account and navigate to your User Dashboard.

2. Boost Your Ad: In the dashboard, click on the Boost Your Ad section. This will take you to the boost campaign options for your existing posts.

3. Select the Boost Type: From the list of available post types, select the one for which you want to boost the ad. Then, click on New Boost to start the promotion process.

4. Choose Boost Option: Two types of boost options will appear:
Bump Up: This pushes your ad higher in the listing but does not provide the enhanced visibility of a featured ad.
Featured Ad: Select Featured Ad to ensure premium placement with all the advantages listed above.

5. Enter Ad Details:
– Enter the Title of your ad.
– Select the Post you want to run the ad for (from your available listings).
6. Select Boost Type:
– Choose between two payment models:
Pay Per Click: Pay based on the number of clicks the ad receives.
Pay Per Day: Pay a flat fee for the number of days you want your ad to remain featured.

7. Select Pay Per Day:
– If you choose Pay Per Day, select the number of days you want your ad to be featured.

8. Ad Summary: You will see an Ad Summary on the right-hand sidebar at the bottom. This summary displays the details of your promotion, including cost, duration, and ad type.

The price displays as Pay per click and Pay per day can be set from Cubewp >> Post type forms
Select post type as Booster and then press Form settings then at the bottom of the form you can see the amount set for Ads rates.


9. Payment and Checkout: Click on Pay to Boost to proceed to the checkout page. Enter your payment information, select your payment option, and press Place Order.


10. Order Completion: Once the payment is processed, the system will create the order. Now, the admin needs to confirm the order.

11. Admin Payment Processing: The admin will manually complete the payment process by marking the order as completed in the system.


How the Ad Displays

Once your ad promotion is complete and the payment is confirmed, your Featured Ad will display as:

Conclusion

ClassifiAd’s On-site Ad Campaigns allow users to maximize the visibility of their listings through Featured Ads. The easy-to-follow process ensures that you can boost your ads quickly and effectively, giving your posts the spotlight they deserve. By promoting your listings through Premium Placement, you can increase the chances of driving more traffic and engagement, ultimately leading to better conversions.

Take control of your ads and boost them today with ClassifiAd!

Bump-up ad campaigns

Bump Up Ad Campaign: Renew Your Listing’s Visibility

In the competitive world of classified listings, keeping your ad visible and relevant is essential to attracting potential buyers or clients. The Bump Up Ad Campaign feature in the ClassifiAd theme allows you to revitalize an older ad by renewing its visibility and moving it to the top of the listings. Here’s why and how you should take advantage of the Bump Up option.

Why Bump Up Your Listing?

As new listings continue to get posted, older ads can gradually move down the page, becoming less visible to users browsing the site. With the Bump Up feature, you can renew an existing listing’s visibility by pushing it back to the top of the search results. Here’s why this is beneficial:

Moves Ad to Top: The Bump Up option immediately moves your ad to the top of the listings, making it one of the first ads that users see when they search for relevant categories. This increased visibility can lead to more clicks and inquiries, reviving interest in your ad.

Resets Posting Date: When you Bump Up an ad, the posting date resets, making the listing appear as if it were freshly posted. This gives your ad the advantage of appearing more relevant and up-to-date, even if it was initially posted weeks or months ago.

Promotes Older Ads: Older ads often get overlooked as users gravitate toward newer posts. Bump Up helps you promote these older ads without having to create a new listing from scratch, allowing you to extend the life and visibility of your previous posts.

Step-by-Step Process: How to Run a Featured Ad Campaign

The ClassifiAd theme makes it simple for users to launch their own featured ad campaigns. Here’s a step-by-step guide:

1. Access the User Dashboard: Log into your account and navigate to your User Dashboard.

2. Boost Your Ad: In the dashboard, click on the Boost Your Ad section. This will take you to the boost campaign options for your existing posts.

3. Select the Boost Type: From the list of available post types, select the one for which you want to boost the ad. Then, click on New Boost to start the promotion process.

4. Choose Boost Option: Two types of boost options will appear:
Bump Up: This pushes your ad higher in the listing but does not provide the enhanced visibility of a featured ad.
Featured Ad: To ensure premium placement with all the advantages listed above.
Select Bump Up boost type

5. Enter Ad Details:
– Enter the Title of your ad.
– Select the Post you want to run the ad for (from your available listings).
6. Select Boost Type:
– Select bump up fee:

The price displays can be set from Cubewp >> Post type forms
Select post type as Booster and then press Form settings then at the bottom of the form you can see the amount set for Ads rates.

7. Payment and Checkout: Click on Pay to Boost to proceed to the checkout page. Enter your payment information, select your payment option, and press Place Order.


8. Order Completion: Once the payment is processed, the system will create the order. Now, the admin needs to confirm the order.

9. Admin Payment Processing: The admin will manually complete the payment process by marking the order as completed in the system.


How the Ad Displays

Once your ad promotion is complete and the payment is confirmed, your Featured Ad will display as:

Conclusion

The Bump Up Ad Campaign is a simple yet powerful tool in the ClassifiAd theme that helps you keep your ads visible and relevant. Whether you want to renew the visibility of an older ad or maintain the engagement level of a current post, Bump Up offers a quick and efficient solution to get your listing back at the top. By moving your ad to the top of the search results, resetting its posting date, and giving older listings a fresh boost, you can maximize the visibility of your content and attract more potential buyers or clients.

Use the Bump Up feature today and keep your listings at the forefront of the market!

Two-way review system

Two-Way Review System: Building Trust in ClassifiAd

The ClassifiAd theme introduces a powerful feature that fosters transparency and trust between users: the Two-Way Review System. This functionality allows both business owners and users to review each other, creating a balanced feedback loop that enhances credibility and improves user experiences.

How the Two-Way Review System Works

In the ClassifiAd theme, both the business owner (ad poster) and the users who interact with the ad can leave reviews for each other. This mutual review system ensures a fair and reliable platform, where both sides can share feedback about their experience. This way, users can make informed decisions when engaging with listings, and business owners can receive valuable input to improve their services.

Customizing the Review Form

One of the most flexible aspects of the review system in ClassifiAd is the ability to customize the review form. Admins can tailor the review form to include specific fields, ensuring the reviews gather relevant and actionable information. Here’s how you can create or modify the review form:

1. Access the Review Form Settings:
– Navigate to your WordPress dashboard and go to CubeWP.
– Select Post Type Forms from the menu.

2. Select Post Type = Reviews:
– Once you’re in the Post Type Forms section, choose **Reviews** as the post type you want to edit.

3. Select the User Role:
– Choose the relevant user role—such as Admin** or Subscriber. This allows you to tailor the form according to who is posting the review (business owner or user).

4. Edit the Review Form:
– A customizable form builder will open, where you can drag and drop elements to include the specific fields you want users to fill in. You can add text boxes, ratings, dropdowns, and other fields that are relevant to the type of review you want to gather.

5. Save Your Form:
– Once you’ve arranged the form fields to your liking, save the form. This customized form will now be used for reviews within the platform.

Viewing and Managing Reviews

All submitted reviews will be easily accessible in the Author’s Page. Both the business owner and user reviews are neatly organized under the All Reviews tab, where users can see feedback that has been given and received.

Why the Two-Way Review System is Important

Trust & Transparency: By enabling both parties to review each other, ClassifiAd promotes a culture of trust. Users can feel confident that the reviews they see are balanced, with both business owners and customers having a voice.

Feedback for Improvement: Reviews provide business owners with valuable insights about how they can enhance their listings and customer service, while users get a chance to reflect on their experiences with each business.

Balanced Ratings: Since both sides can provide feedback, the review system remains balanced, giving a more holistic view of interactions on the platform.

Conclusion

The Two-Way Review System in ClassifiAd is a critical feature for fostering trust, transparency, and accountability between users and business owners. With customizable review forms, easy access to all reviews, and the ability for both parties to share their feedback, this system ensures a fair and open marketplace. It helps build a community of trust, where honest reviews benefit both users and business owners alike.

Start using the Two-Way Review System in ClassifiAd today to enhance your platform’s credibility and user experience!

Boost Your Ad message

Boost Your Ad: Maximize Visibility and Get Noticed!

As an ad owner, you understand that visibility is the key to attracting the right audience. Whether you’re selling a product, offering a service, or promoting an event, the more people who see your ad, the better your chances of achieving success. That’s where the “Boost Your Ad” feature comes in—an easy and effective way to increase your ad’s exposure and make sure it stands out from the crowd!

What is “Boost Your Ad”?

When you post an ad on our platform, it gets listed among many other ads in the same category. While your ad is still accessible, it can quickly get buried under newer posts. To help you keep your ad visible and in front of potential buyers, we’ve introduced the “Boost Your Ad” option.

This feature displays a prominent message above your ad card:

Boost Your Ad to reach more potential customers!

Below this message, there will be a “Click here to Boost” button, conveniently placed to encourage users to enhance their ad’s visibility with a simple click.

What Happens When You Click “Boost”?

Clicking on the “Click here to Boost” button will open up a popup having Boost Now button which takes you to Booster form. This form allows you to choose from several boosting options, each designed to give your ad the prominence it deserves. Whether you’re looking for a short-term bump in visibility or a longer-lasting feature, our flexible options have you covered.

Why Boost Your Ad?

1. Increase Ad Visibility:A boosted ad gets featured at the top of the listing, ensuring it’s seen by more potential buyers.
2. Get Noticed Faster: Boosting can help your ad grab attention sooner, so you can make a sale or get inquiries in less time.
3. Stand Out from the Competition: By boosting your ad, you’ll gain an edge over other ads in the same category, making yours more likely to catch the eye.
4. Targeted Exposure: When you boost, your ad reaches a larger, more targeted audience—helping you connect with people who are genuinely interested in what you’re offering.

How Easy is it to Boost?

Boosting your ad is as simple as clicking the **”Click here to Boost”** button, choosing a boosting package, and completing the form. It only takes a few moments, and the benefits are immediate. Your ad will be bumped up and highlighted, increasing your chances of a successful sale or response.

Don’t let your ad get lost in the crowd—boost your ad today and ensure it gets the attention it deserves! Whether you’re looking for more views, quicker responses, or increased engagement, boosting is the perfect way to get your ad noticed. Click the button and start seeing the results for yourself!

chat system (Inbox)

Introducing the User-to-Ad Owner Chat System: Streamline Your Communication with Ease!

When it comes to buying, selling, or negotiating an item, clear and direct communication is key. Our User-to-Ad Owner chat system (Inbox) makes it easier than ever for users to get in touch with ad owners, ask questions, and even negotiate prices—all within the platform. This seamless communication channel ensures that both parties can interact directly, leading to faster responses and better outcomes.

How Does the User-to-Ad Owner Chat System Work?

The chat system allows users to send messages directly to the ad owner through the inbox feature, which is conveniently integrated into each ad’s detail page. Whether you have a question about the product or want to make an offer, the inbox allows you to contact the ad owner without leaving the platform.

Here’s how it works:

1. Message Form on the Ad Detail Page
Users can easily initiate a conversation with the ad owner by using the message form. This form is displayed on the ad detail page, allowing potential buyers to ask questions or negotiate with the seller in a direct, private chat.

2. Seamless Integration Using CubeWP
For website admins and developers using CubeWP, adding the message form to the ad detail page is incredibly simple:
– Navigate to CubeWP >> Single Post.
– Select the relevant post type (e.g., “General Ads”).
– Drag and drop the “message form” tab to the post card builder, positioning it where you’d like it to appear on the ad detail page.

Once this is set up, the message form will appear like this:

Users can fill out their inquiries or offers, and their message will be sent directly to the ad owner.

3. Messages Delivered to the Ad Owner’s Dashboard
After a message is sent from the form, it will appear in the Inbox tab of the ad owner’s dashboard. This means that the seller receives every inquiry in one central place, making it easy to manage multiple conversations and respond promptly.

4. Quick and Direct Responses
The ad owner can reply to the user directly through the Inbox in their dashboard. Users, in turn, will receive the seller’s response in their own inbox, ensuring that the conversation is ongoing and fluid. Both parties are notified of new messages, making it easy to stay updated on the latest interactions.

Benefits of the Chat System

1. Direct Communication: Buyers can instantly connect with sellers, clarifying product details, availability, or terms of negotiation. This reduces waiting time and speeds up the buying process.

2. Secure and Private: The conversation happens within the platform, protecting both parties’ privacy. There’s no need to exchange personal contact details like email addresses or phone numbers.

3. Organized Conversations: Both buyers and sellers have their conversations neatly organized under the **Inbox tab** in their respective dashboards, making it easy to track interactions, especially for frequent sellers or buyers.

4. Better Engagement: By offering a direct chat feature, sellers can engage potential buyers more effectively, answer queries in real-time, and potentially close sales faster.

Final Thoughts

The User-to-Ad Owner chat system (Inbox) is designed to foster better communication and streamline the buying process on your platform. By making it easy for users to reach out and receive responses directly from ad owners, you improve engagement, trust, and the likelihood of successful transactions. So, add the message form today and start experiencing more efficient interactions on your site!

Make An Offer

Introducing “Make an Offer” Feature: Make Your Best Offer to the Ad Owner!

When buying or negotiating for an item, flexibility is key. With our Make An Offer feature, users now have the ability to negotiate directly with the ad owner by sending offers based on the listed price of an ad. This feature simplifies the bargaining process by allowing users to submit offers quickly and directly from the ad detail page, making it easier than ever to get a deal that works for both parties.

How Does “Make An Offer” Work?

The Send Offers feature allows potential buyers to submit a bid to the ad owner for an item they’re interested in purchasing. Rather than just asking for more information or starting a chat, users can send a specific offer, giving them the power to negotiate directly and efficiently.

Here’s how it works:

1. Auto-Generated Offers Based on the Ad Price
When a user clicks on the “Make An Offer” button, the system will automatically generate offers based on the ad price. These offers are calculated within preset limits, ensuring that the offer is reasonable and falls within a certain range. The seller can then review and decide whether to accept, decline, or counter the offer.

2. Setting Offer Limits via CubeWP
For website admins, the offer system is fully customizable. You can control the range and flexibility of offers users can send by navigating to CubeWP >> Settings >> Buy and Offer. This allows you to set minimum and maximum limits for offers relative to the ad price, so both buyers and sellers benefit from fair and reasonable negotiations.


How to Add the “Offer Ad” Button to Your Ad Detail Page

Adding the “Offer ad” button to your ad detail page is simple and requires no coding experience:

1. Go to CubeWP >> Single Post in your WordPress admin dashboard.
2. Select the post type (such as General Ads) where you’d like to allow offers.
3. Drag and drop the “Offer Ad Button” tab into the single post builder, placing it in the spot where you’d like the button to appear on the ad detail page.

After following these steps, the “Send Offer” button will be displayed like this on the detail page:

Now, users can send their offers with just a click, right from the ad page.

What Happens After an Offer is Sent?

1. Offer Appears in the Ad Owner’s Inbox
Once a user sends an offer, the ad owner will receive a notification, and the offer will be displayed under the Inbox tab in the ad owner’s dashboard. This makes it easy for sellers to track all incoming offers, decide which ones to accept or decline, and even respond with a counteroffer if needed.

2. Easy Communication Through Inbox
The negotiation continues directly in the inbox, making communication streamlined and easy. Both the buyer and seller can keep track of the offers, responses, and agreements all within the platform—no need for external emails or messages.

Why Use the “Send Offers” Feature?

1. Convenient Negotiation: Instead of back-and-forth messages to agree on a price, users can send their best offer instantly, making the process faster and more efficient.

2. Fair and Transparent: With offer limits set by the admin, users and sellers both know that the offers are fair and within a reasonable range. This reduces the chances of lowball offers or unrealistic price expectations.

3.Encourages Buyer-Seller Interaction: The offer system encourages more users to engage with ads and start negotiations. Even if they can’t pay the full listed price, users feel empowered to make an offer and try to strike a deal.

4. Organized Offers and Responses: Sellers can easily manage all offers from their dashboard, making it simple to review, respond, and track conversations with potential buyers. The system keeps everything organized in one place.

Conclusion

The Make an offer feature is designed to enhance the buying and selling experience on your platform. It adds a level of flexibility and convenience that encourages users to engage with ads and make serious offers. Whether they’re looking to negotiate or simply want to make their best offer right away, this feature streamlines the process, making it a win-win for both buyers and sellers.

To take full advantage of the “Send Offers” feature, make sure to integrate the Offer Ad Button into your ad detail page today. It’s the perfect way to boost interaction, increase sales, and provide a seamless user experience on your platform!

Typography Settings

How to set Typography Settings?

STEP 1: Go to CubeWP Settings >> Typography


Now change the typography as per your need. You will have various options for Body Font and Heading Styles, such as Font Family, Weight, Style, Size, Height, Color, etc

Header Search on Home Page

How to turn on the header Search on Home Page?

You can enable Header search on pages in CubeWP Settings.


STEP 1: Go to CubeWP Settings Header


https://slite.com/api/files/Qa6UWZ2x68TySI/headersearch.png


If you want to enable the search in headers, then make sure to add a search shortcode.


STEP 2: Go to CubeWP > Search Forms

STEP 3: Select your desired Post Type

STEP 4: Save Changes

STEP 5: Click on the Shortcode


https://slite.com/api/files/HUl6VD3KNqESCc/selectpost.png


Loop Grid Settings

How To Control Loop Grid Settings?

You can control loop grid options from CubeWP Settings.

STEP 1: Go to Loop Layout

You can control General, Property, and Automotive Loop Grid options by enabling the Custom Fields Loops


STEP 2: Turn on your desired Custom Field loop

STEP 3: Select your Custom Field Name

STEP 4: Add your Font Awesome icon related to your Custom Field

https://slite.com/api/files/LzFe-h6TXu0g0M/loop1.png

STEP 5: Save Changes


Your Loop Grid will look like this

https://slite.com/api/files/ktQIpYL0Zin-vQ/loop2.png


Top Bar menu

How to enable the Top Bar menu?

You can enable the top bar menu in the CubeWP Settings.
STEP 1: Go to Appearance  > Menu
STEP 2:  Create the Top bar menu if it’s not created already


https://slite.com/api/files/N37v_JEkt59Se8/topbar.png


STEP 3: Add your menu to the Top Bar menu
STEP 4: Click on the Header Top Bar option


https://slite.com/api/files/vWvZ4wWctdlKVM/topbar1.png


STEP 5:  Save Changes
STEP 6: Now Go to CubeWP Settings > Header
STEP 7: Turn on the Header top bar
STEP 8:  Save Changes

Landing pages

How to set landing pages for General, Property, and Automotive Ads in the Top Menu?

You can set the landing pages of these post types.


https://slite.com/api/files/Tni5NxIdSQnKXz/landing.png


STEP 1: Go to CubeWP Settings > Header
STEP 2: Scroll Down
STEP 3: Make sure that the Post Type Landing Page Links Option is on.
STEP 4: Select your Pages for General, Property, and Automotive Post Type


https://slite.com/api/files/UKH3x1WovzG92Z/landing1.png

Google AdSense

How to add Google AdSense in ClassifiedPRO

STEP 1: Create your AdSense into your Google Account..
STEP 2: When you’re done, copy your AdSense Code
STEP 3: Go to CubeWP Settings > Header > Scroll down > Home Page Header Google
AdSense / Static Image > Select Google AdSense
STEP 4: Paste your AdSense Code here
STEP 5: Same Steps for showing Inner pages.


https://slite.com/api/files/I-Jh_hzW-bwRyG/adsense.png


Server requirements

Server requirements to run ClassifiedPRO perfectly

Application Minimum
Wordpress
6.0
PHP
7.4
max_execution_time
300
memory_limit
256 MB
post_max_size
256 MB
upload_max_filesize
30 MB
max_input_vars
3000
Application Recommended Application Recommended
Curl
Yes
Cron Job
Yes
SSL
Yes
Note:
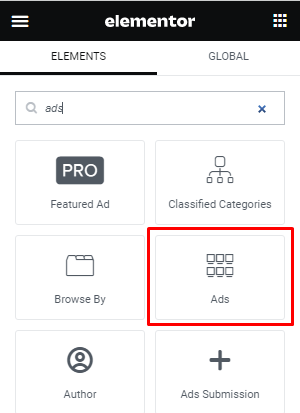
Many issues that you may run into such as; white screen, demo content fails when importing, empty page content and other similar issues are all related to low PHP configuration limits. The solution is to increase the PHP limits. You can do this on your own, or contact your web host and ask them to increase those limits to a minimum as shown above.

Security requirements

Is SSL required for ClassifiedPro?

Yes, SSL is required for Classified-Pro. Nowadays is highly recommended to include SSL in your domains. Some Cloud Servers and also Hosting Providers, also include SSL Certificates to enable your Websites. While using Classified-Pro some settings aren’t required the use of an SSL. Otherwise, some settings like Google MapsSocial LoginPayments, and others may require a Certificate that ensures the Website’s Security. If you don’t know what an SSL is and what it does on your Website, please Read this

Extra Paid Plugins

Do I need any Extra Paid Plugins for ClassifiedPro?

Classified Pro is an end-to-end directory solution. Whatever you see on the item page and demo is all included. Here’s the complete list of plugins that will come with Classified.

We do offer premium add-ons.

CORE PLUGINS (ALL INCLUDED, NO ADDITIONAL COST)

  • CubeWP Classified
  • CubeWP Framework
  • CubeWP Frontend Pro
  • CubeWP Payments
  • CubeWP Reviews
  • CubeWP Booster
  • CubeWP Forms
  • CubeWP Wallet
  • CubeWP Inbox

Third Party Plugins

Do I need any third party Plugins for ClassifiedPro?
THIRD-PARTY PLUGINS (INCLUDED)
  • Elementor
  • WooCommerce

Other than the above mentioned, we didn’t support any third-party plugins unless specified somewhere but you are most welcome to use any plugin as long as you don’t expect us to provide support.